To make this costume, you will require experience in chain stitch, bead work and embroidery. (Not a dress for the faint hearted)
Difficulty factor 10+++++!!!!
Difficulty factor 10+++++!!!!
Danielle De Barbarac's
Just Breathe Gown
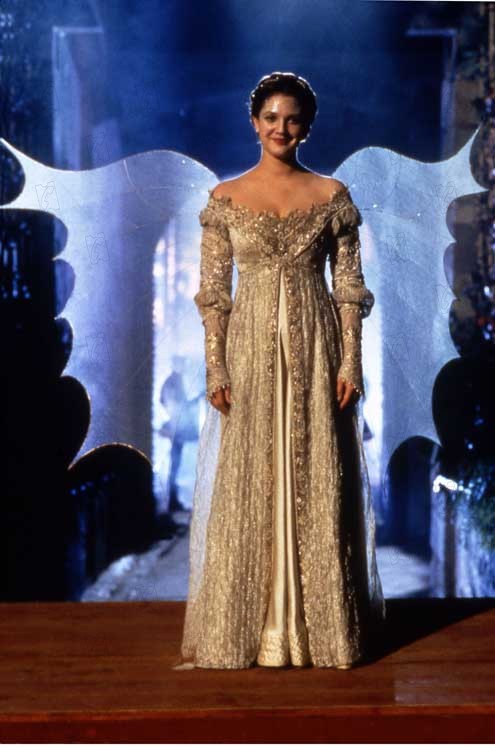
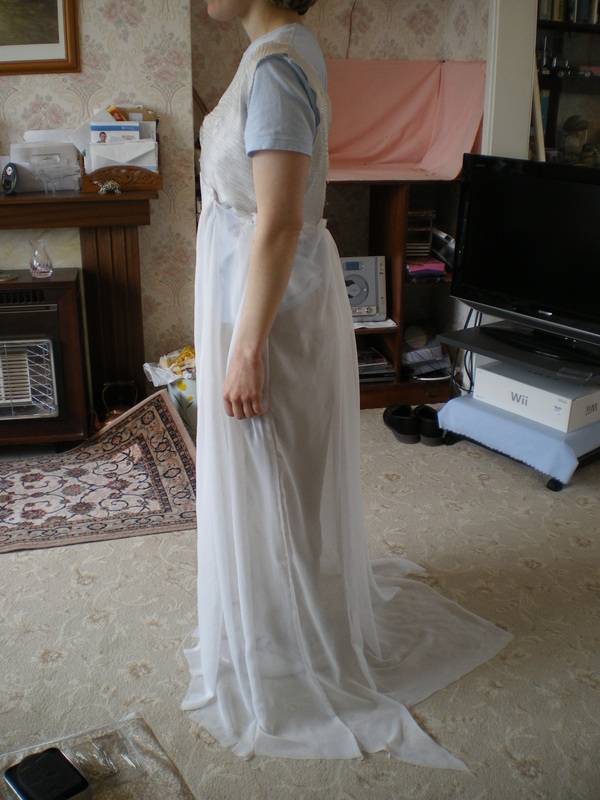
The original costume worn by Drew Barrymore as the character Danielle De Barbarac from the film Ever After (A Cinderella Story).
This has been the most difficult gown to make, to date. Virtually all of the gown has been hand made in some way involving many weeks of hand sewing. The research into the various trims and detail and the actual making of the gown, took 9 months to make.
Materials:
McCalls pattern P241
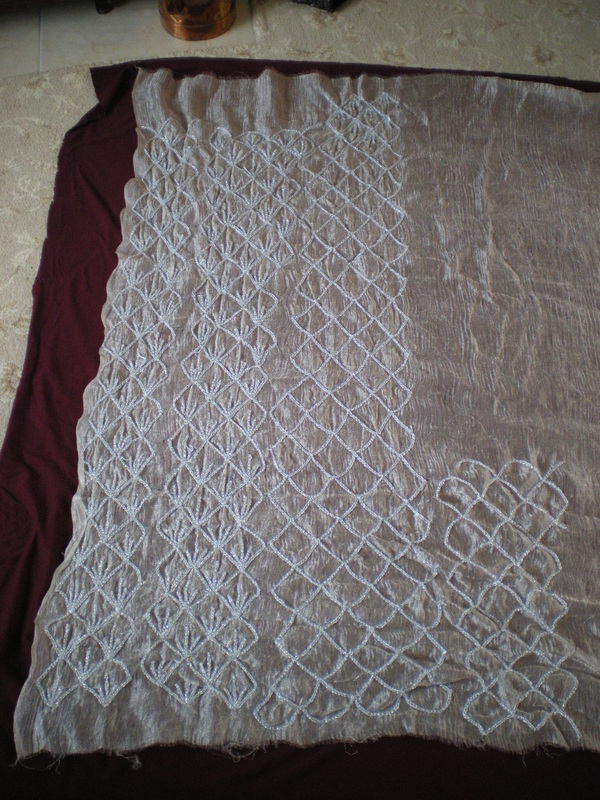
9 metres Sheer Rich Silver White Crinkled Tissue Silk
1/2 metre Silver Grey Taffeta
2 metres Ivory Draping Satin
Central Bullion Motif
Several lengths of trimming to suit
4 metres Ivory Upholstery Cord
1,134 x 4mm Ivory Pearl Beads
100 x 5mm Ivory Pearl Beads
60 x 6mm Ivory Pearl Beads
Packet of Ivory Seed Beads
20 Silver Faceted Flattened Beads
16" Invisible zip
1/2 metre wadding
Pack of 9mm and 6mm Ivory Bugle Beads
2 metres Silver Grey Cord
1 Metre Gold Tiinsel effect trimming
1/4 metre Ivory Lace
1/4 metre antiqued gold lace
40 x 5mm Swarovski flat back crystals
6-7 balls of silver Gold Fingering thread
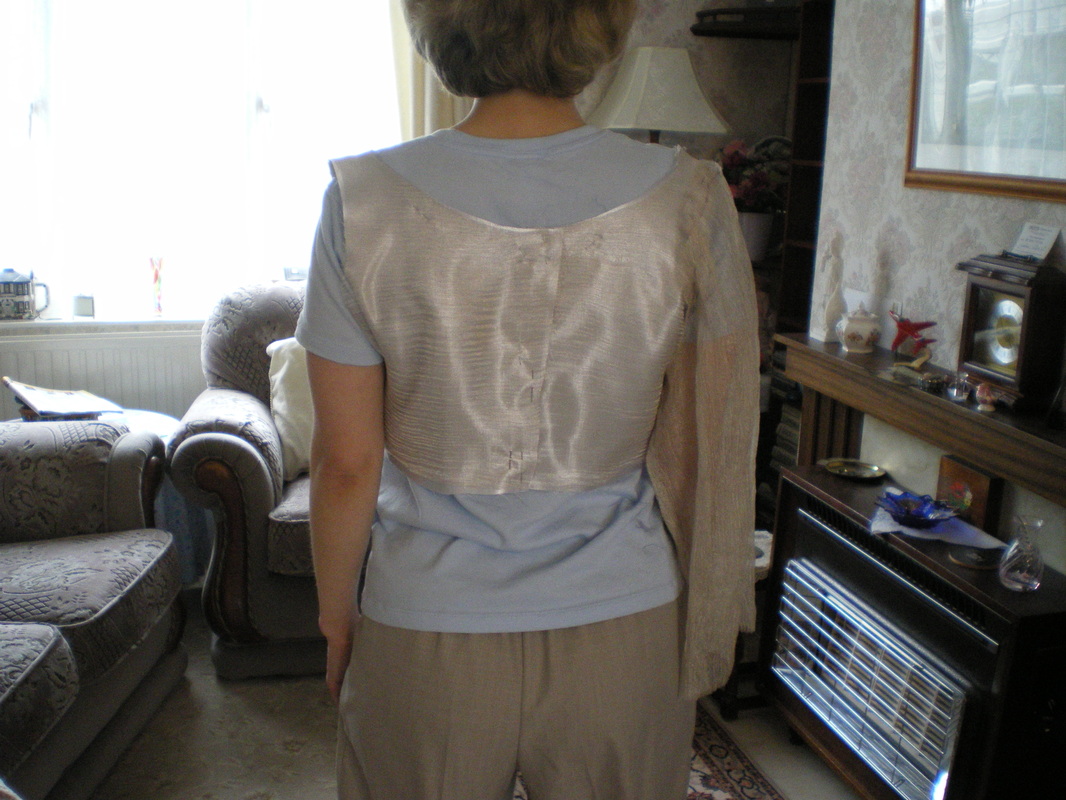
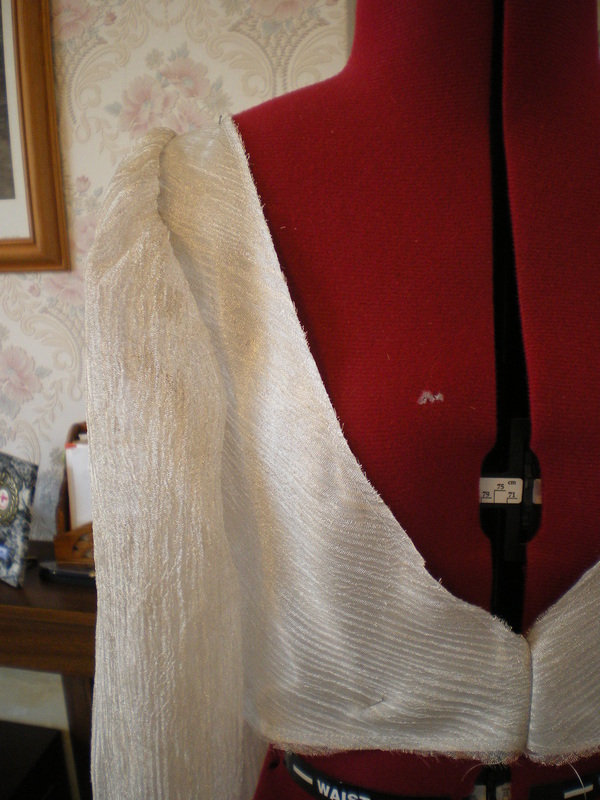
Making up the Bodice:
Using the Silver Grey Taffeta for the lining and the crinkle silk for the top layer, iron the crinkle silk flat before using.
Materials:
McCalls pattern P241
9 metres Sheer Rich Silver White Crinkled Tissue Silk
1/2 metre Silver Grey Taffeta
2 metres Ivory Draping Satin
Central Bullion Motif
Several lengths of trimming to suit
4 metres Ivory Upholstery Cord
1,134 x 4mm Ivory Pearl Beads
100 x 5mm Ivory Pearl Beads
60 x 6mm Ivory Pearl Beads
Packet of Ivory Seed Beads
20 Silver Faceted Flattened Beads
16" Invisible zip
1/2 metre wadding
Pack of 9mm and 6mm Ivory Bugle Beads
2 metres Silver Grey Cord
1 Metre Gold Tiinsel effect trimming
1/4 metre Ivory Lace
1/4 metre antiqued gold lace
40 x 5mm Swarovski flat back crystals
6-7 balls of silver Gold Fingering thread
Making up the Bodice:
Using the Silver Grey Taffeta for the lining and the crinkle silk for the top layer, iron the crinkle silk flat before using.
|
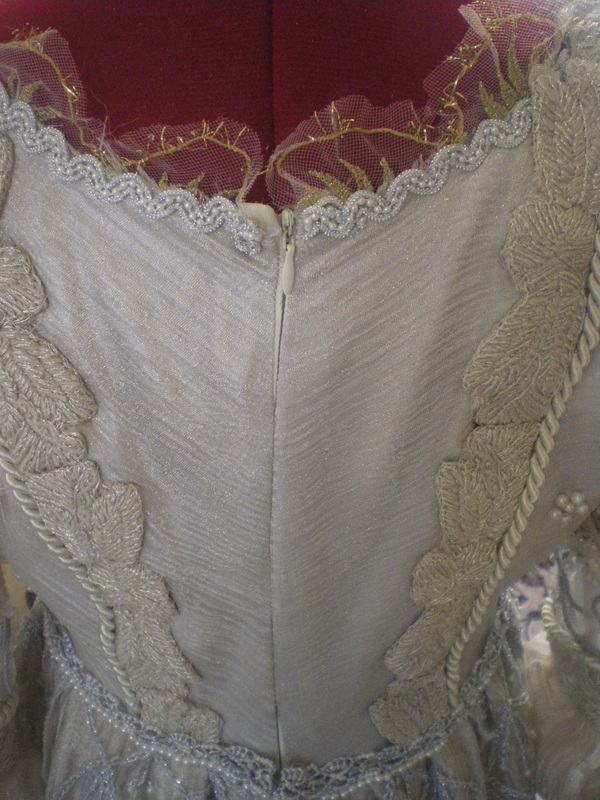
The alteration I made, was to close up the front and use a back seam for the zip. The zip will extend down through the skirt, so this will not be put in until later.
|
|
Make the sleeves as the pattern, but don't make the frilly cuffs. When making the bodice, you don't need to make the lining separate, you can leave the edges raw as there will be an edging to put on.
|
|
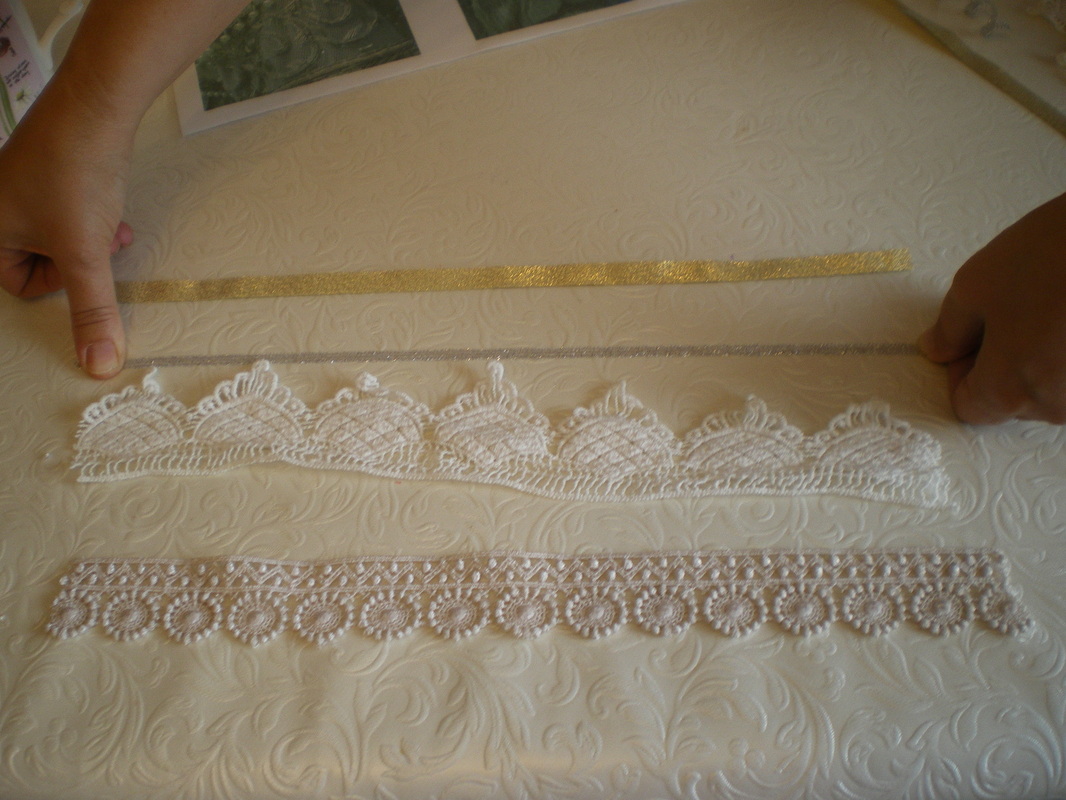
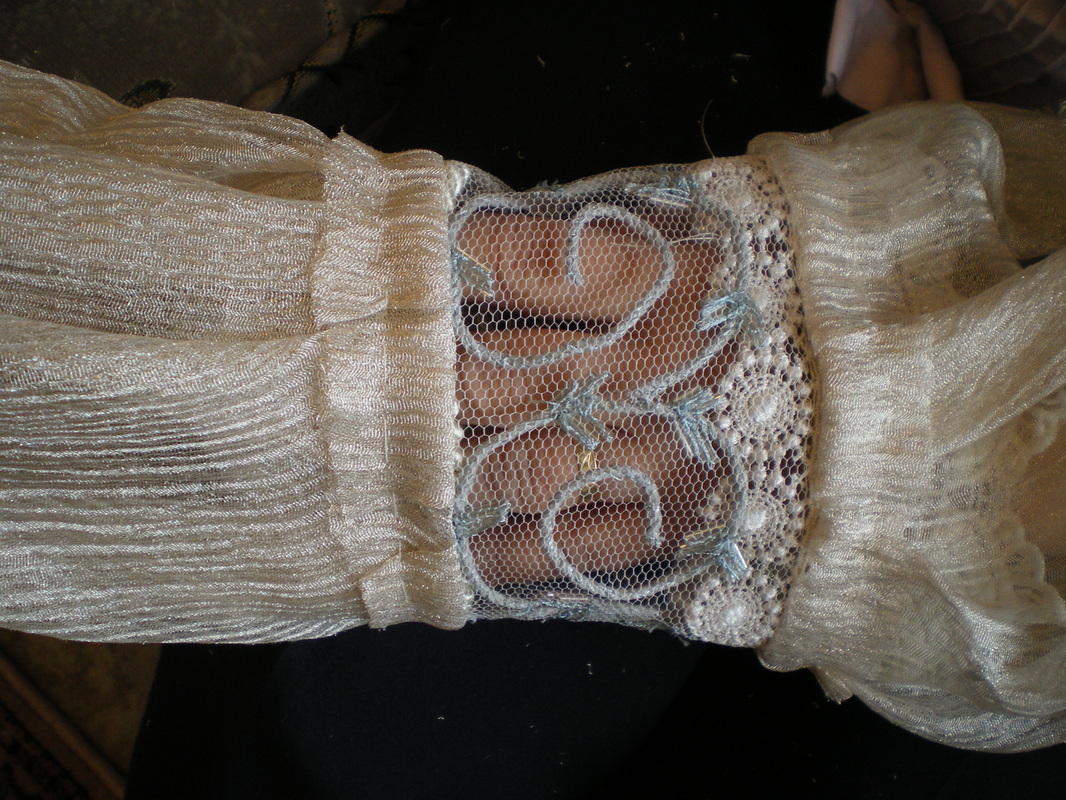
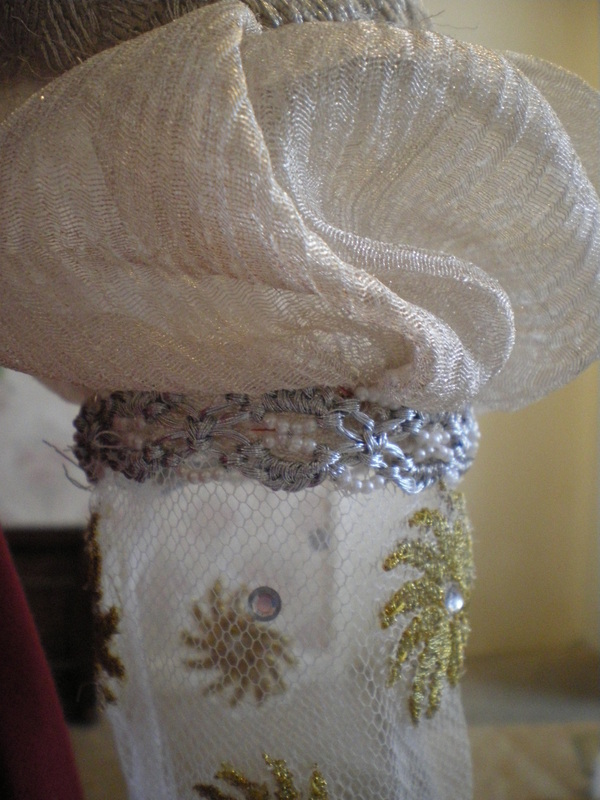
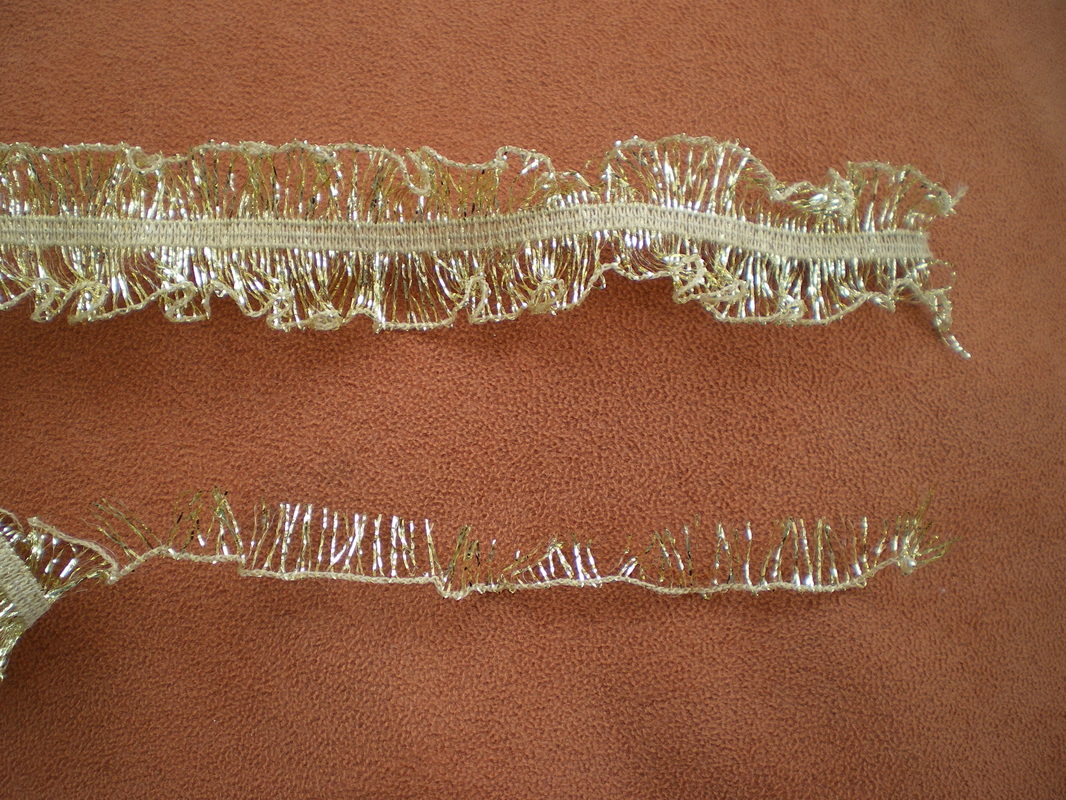
There are four elements for the upper arm band. 1cm gold trim, .5cm silver trim, lace with peaks, I chose this because I can take out some of the detail to create holes, then a bottom trim with circles.
|
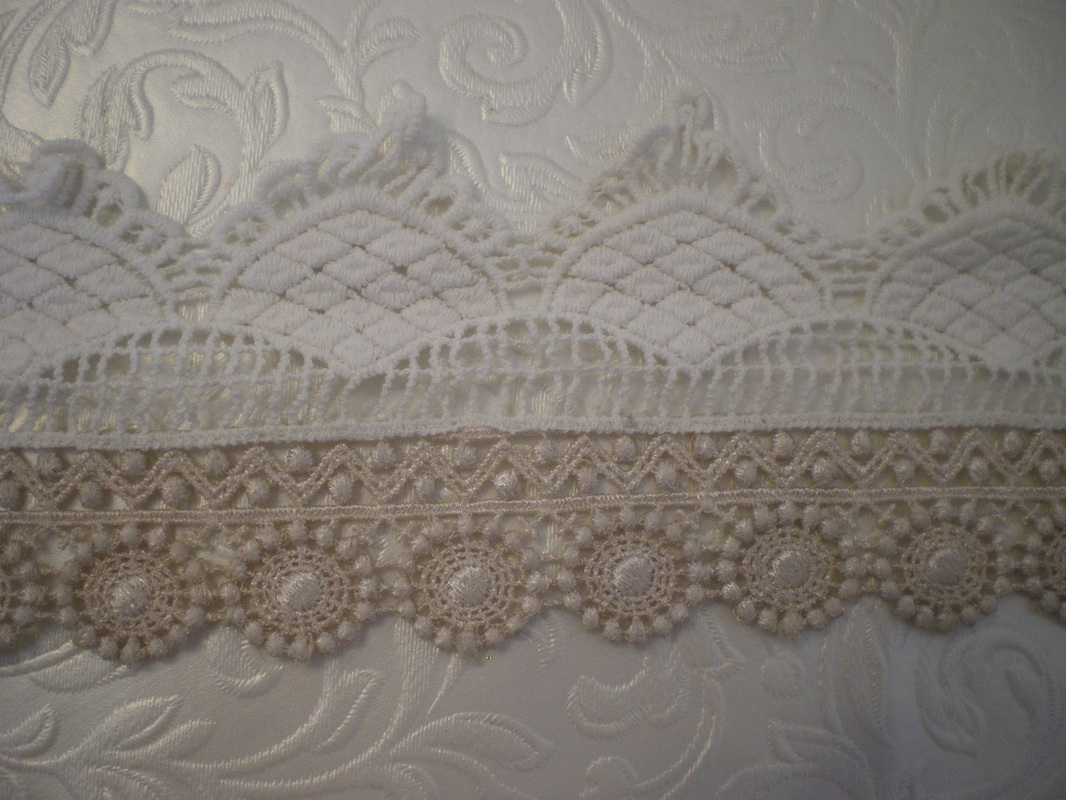
Connect the lace pieces
|
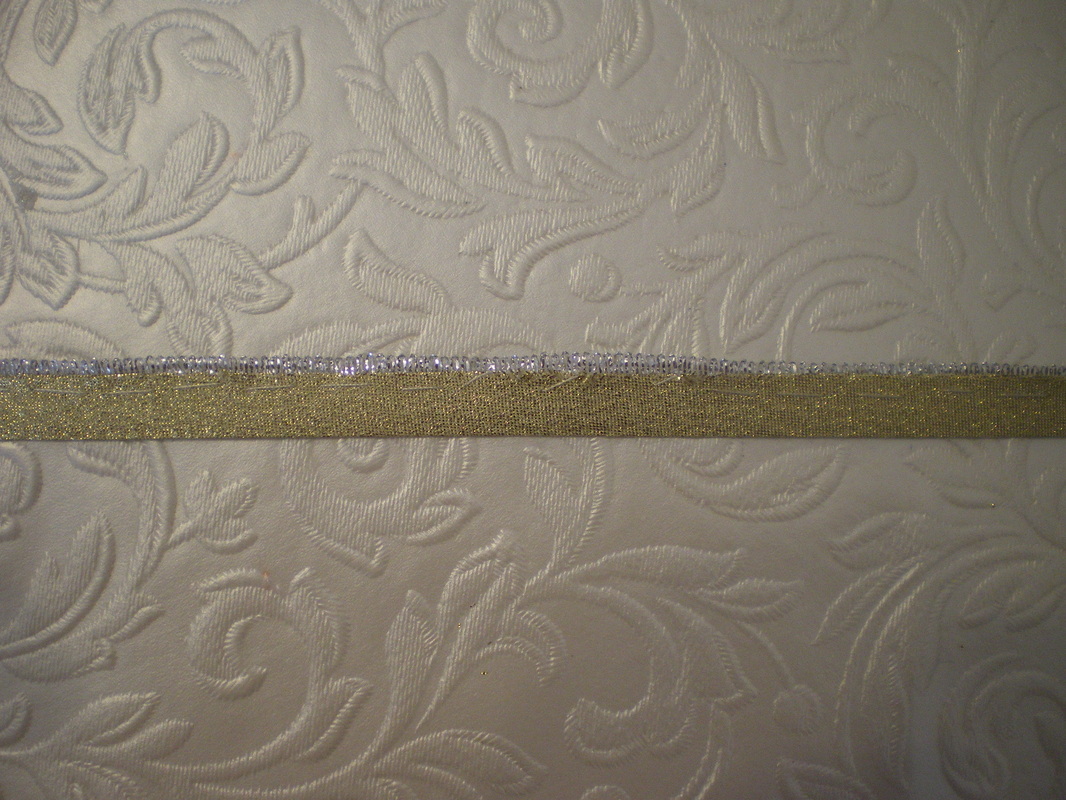
Connect the gold and silver with the silver just showing over the top, use a small catch stitch to hold them together.
|
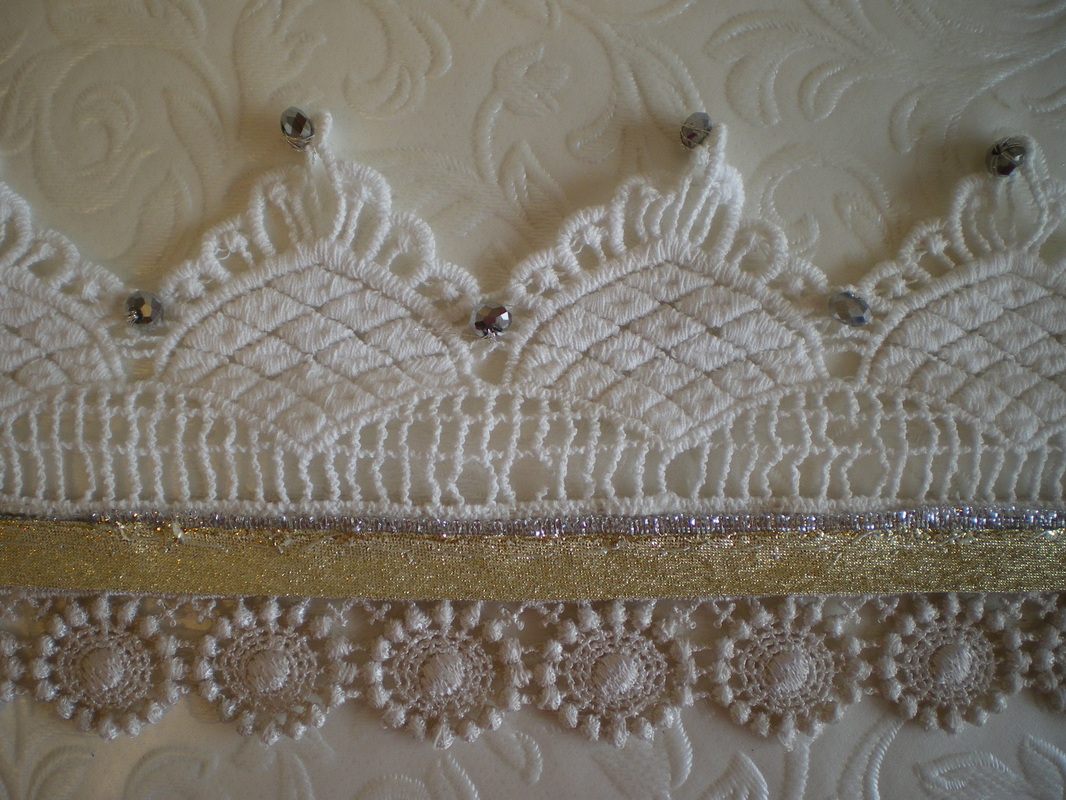
Connect both sets of trims with a very small catch stitch. Sew on the faceted beads.
|
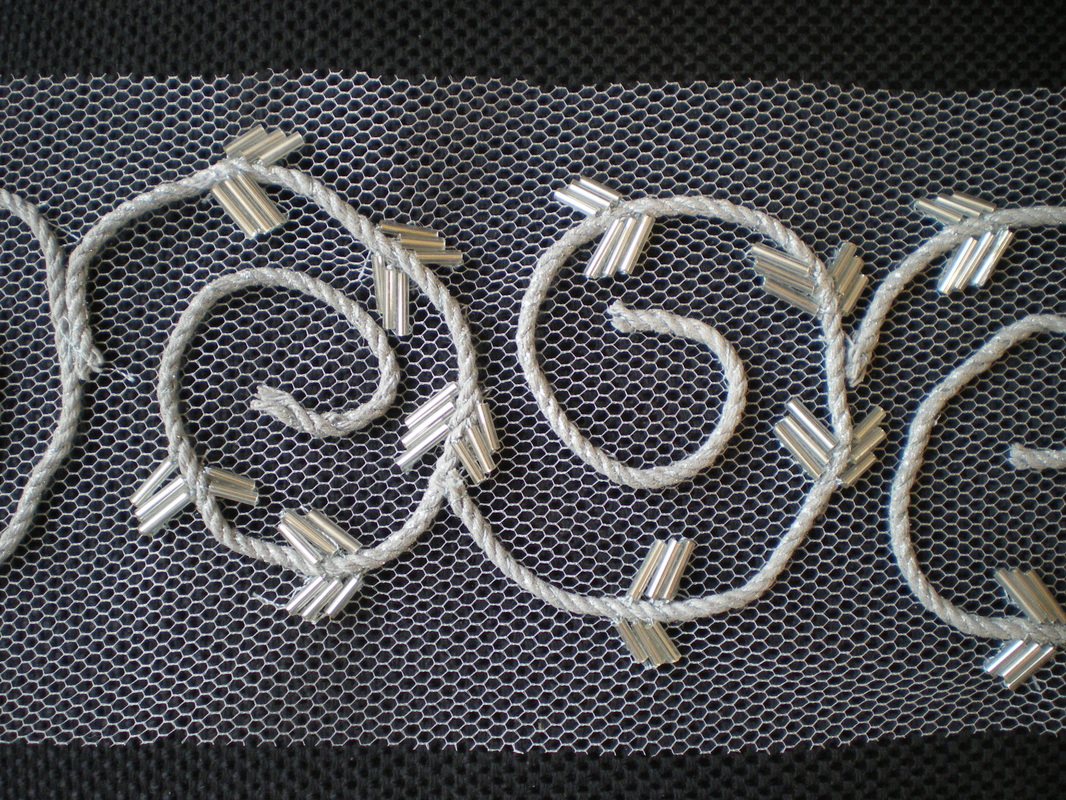
Cut a section of net. Colour some white cord with silver glitter paint. Sew on the bugle beads using both sizes, to resemble leaves
|
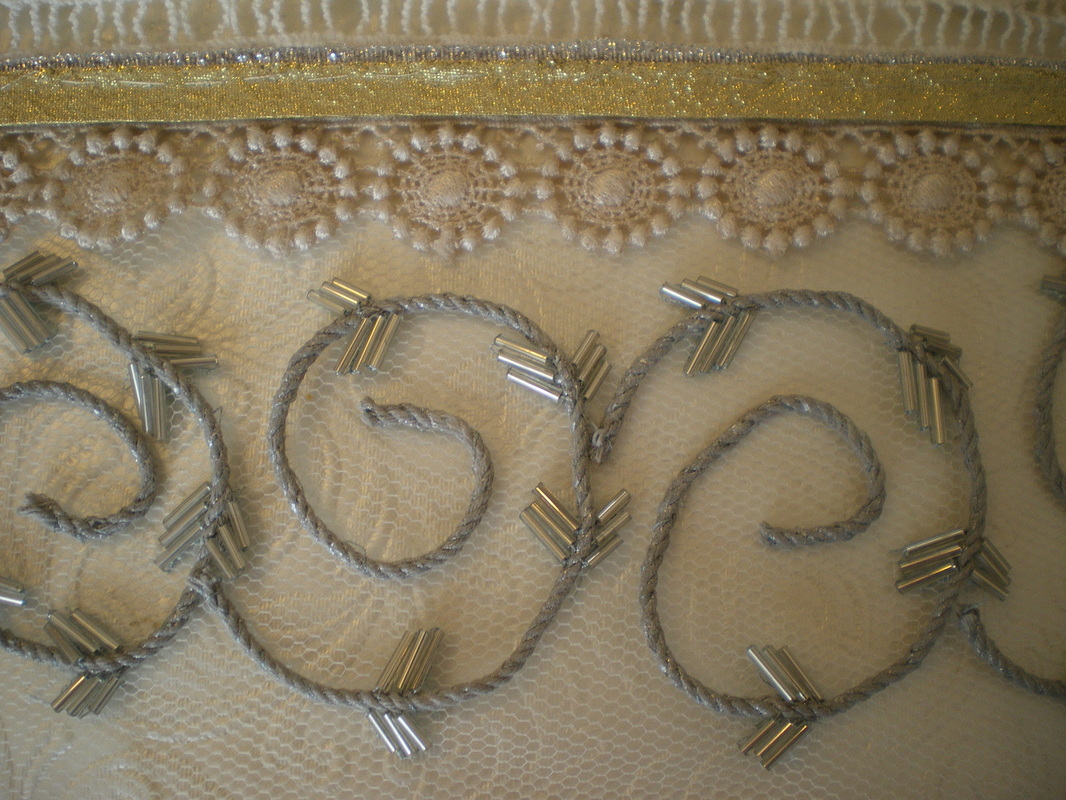
Attach the net to the trim
|
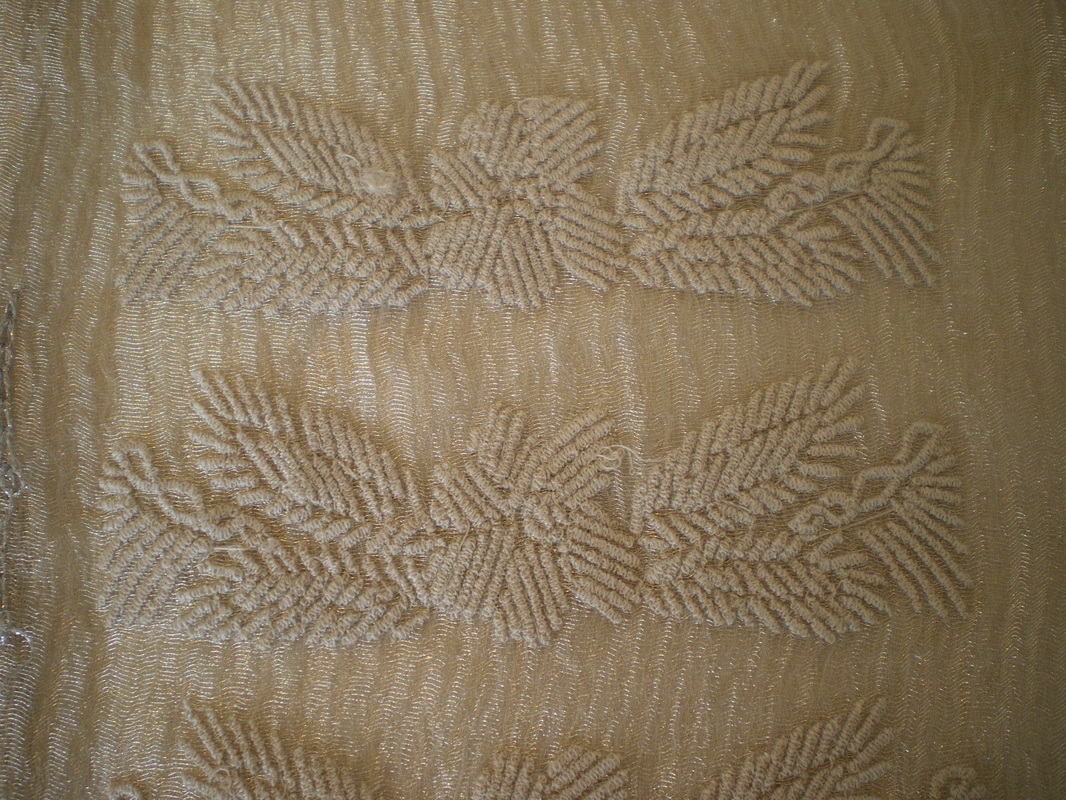
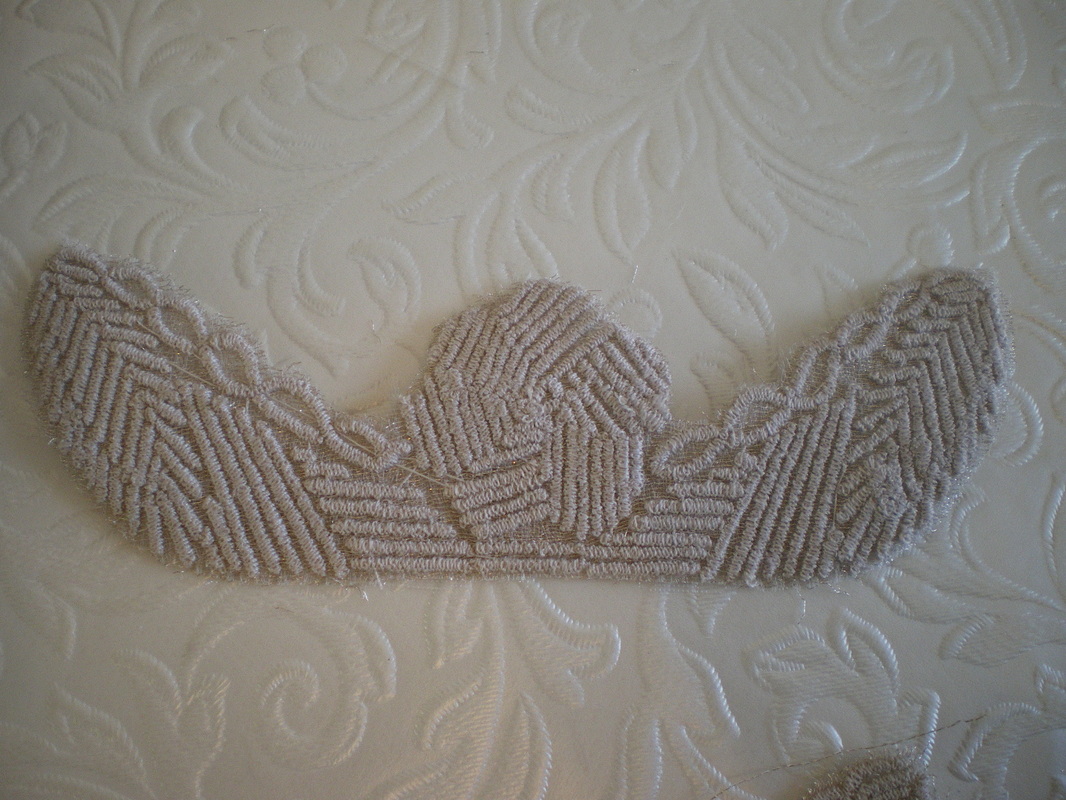
I managed to get a good photo of this trim, put it into my embroidery program and embroidered 17 of them. Each one, was then hand stitched between the lines with silver thread to make them stand out.
|
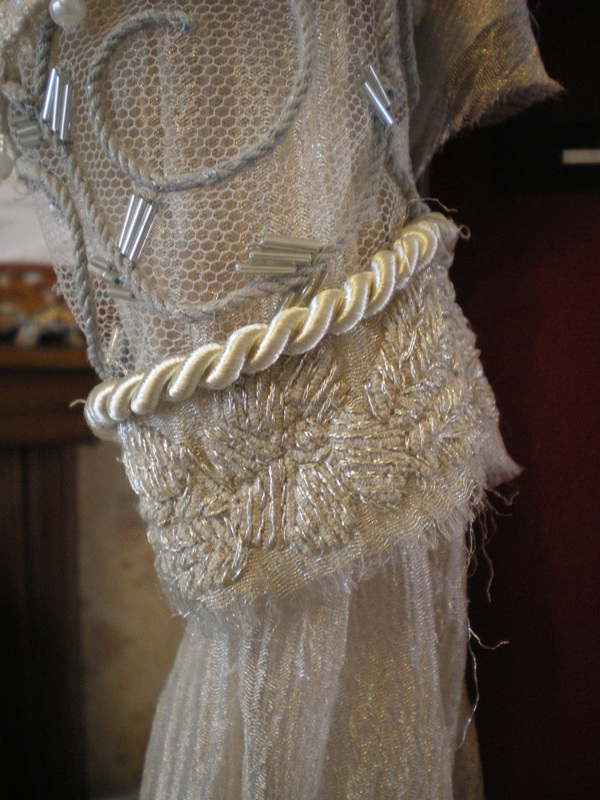
Attach the upholstery cord after you have closed the back opening. Turn under the bottom trim to neaten
|
Attach the band to the sleeve top just above and just below the net only. The finished band must finish at least 1" above the bent elbow.
|

Turn the sleeve inside out and very carefully, cut around the sleeve to reveal the armband.
|
Fold the sleeve back and secure.
|
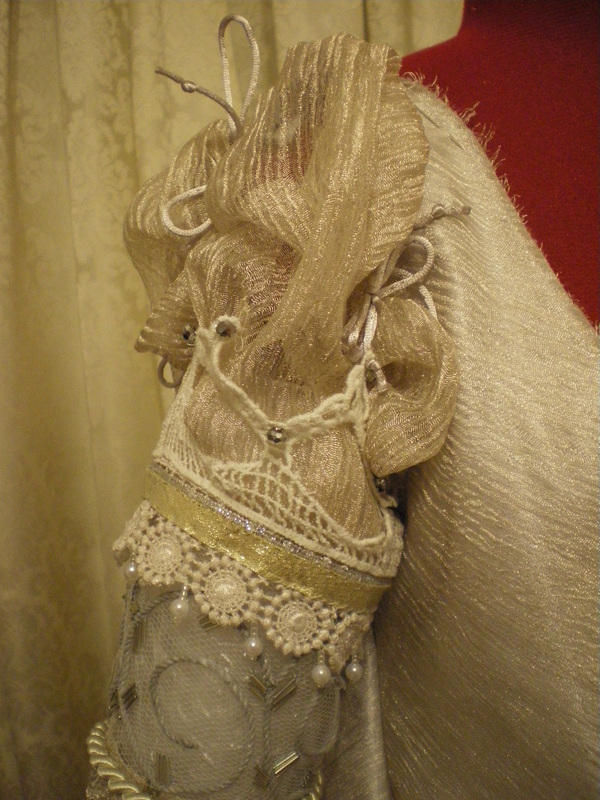
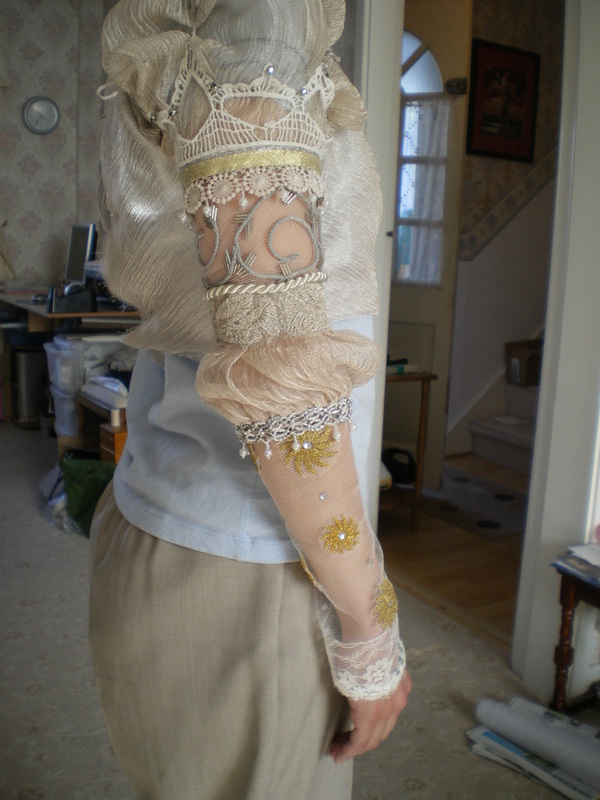
Attach lengths of silver grey cord to the front, shoulder and back of the sleeve and tie in a bow. These are for show only and not functional.
|
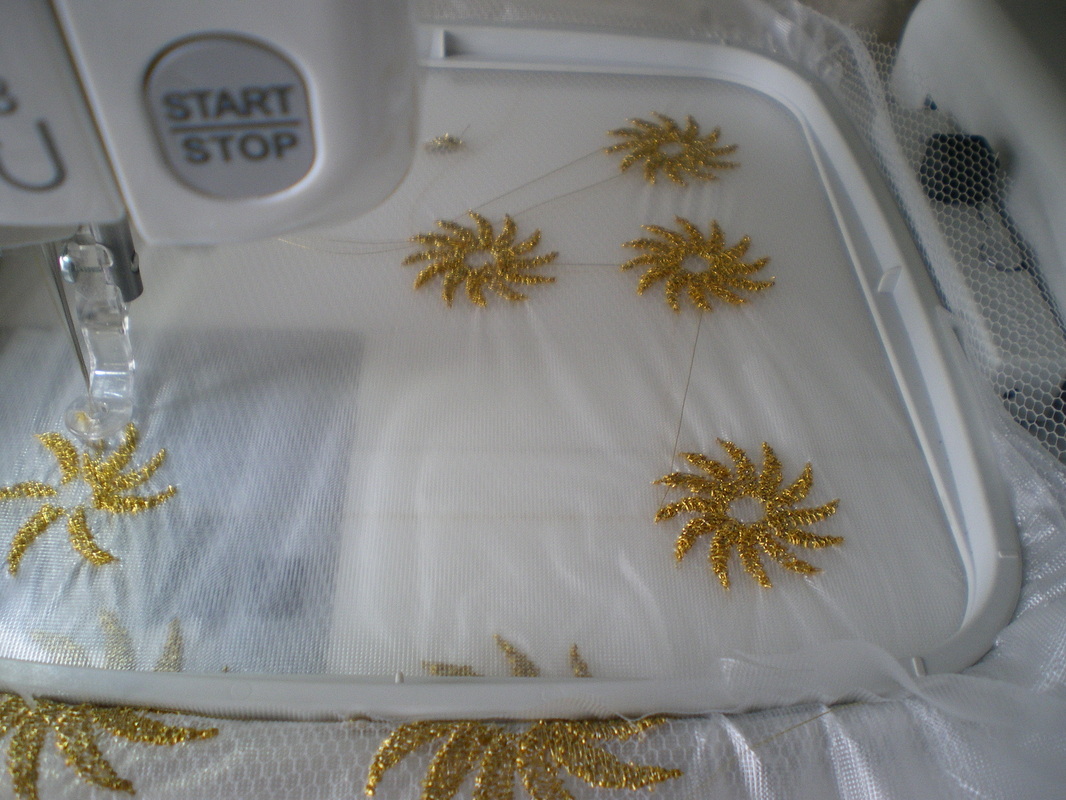
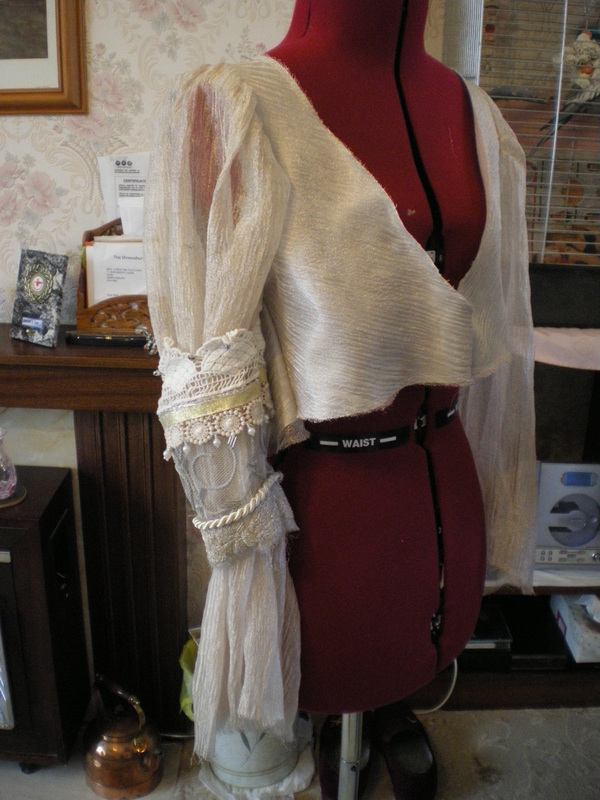
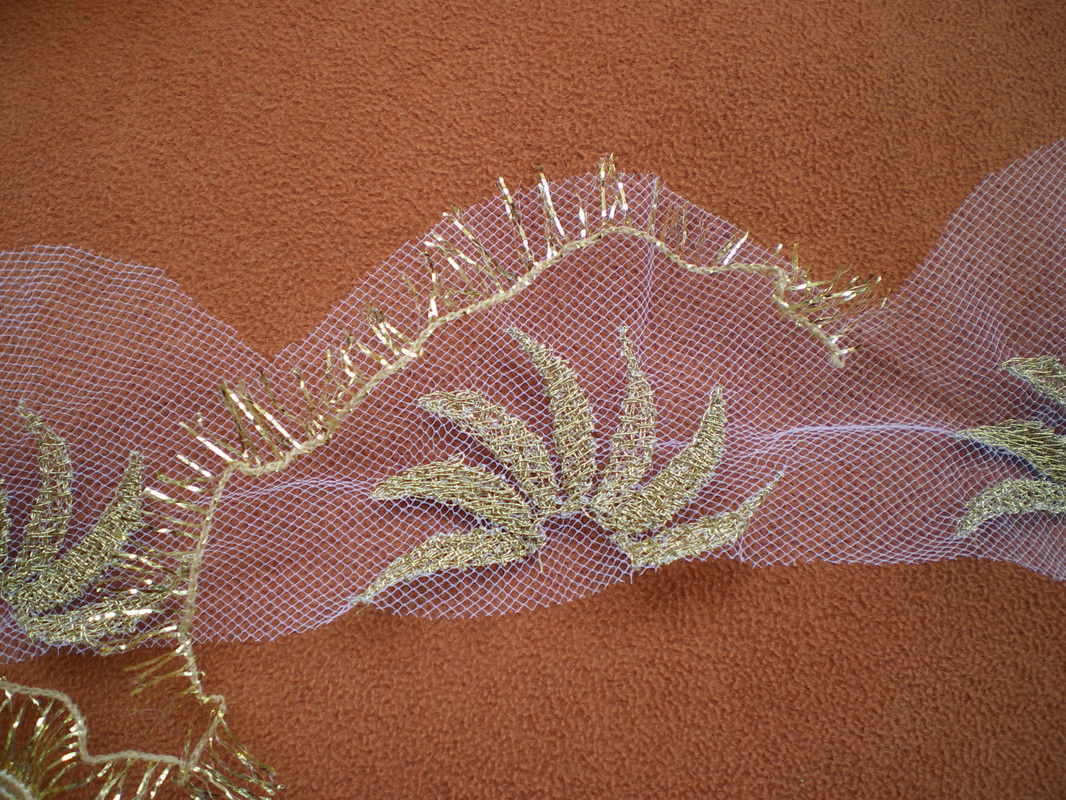
To make the lower sleeve, I obtained a close photo of the "sun" design and programmed it into my embroidery machine. I made 2 different sizes and embroidered them onto net.
|
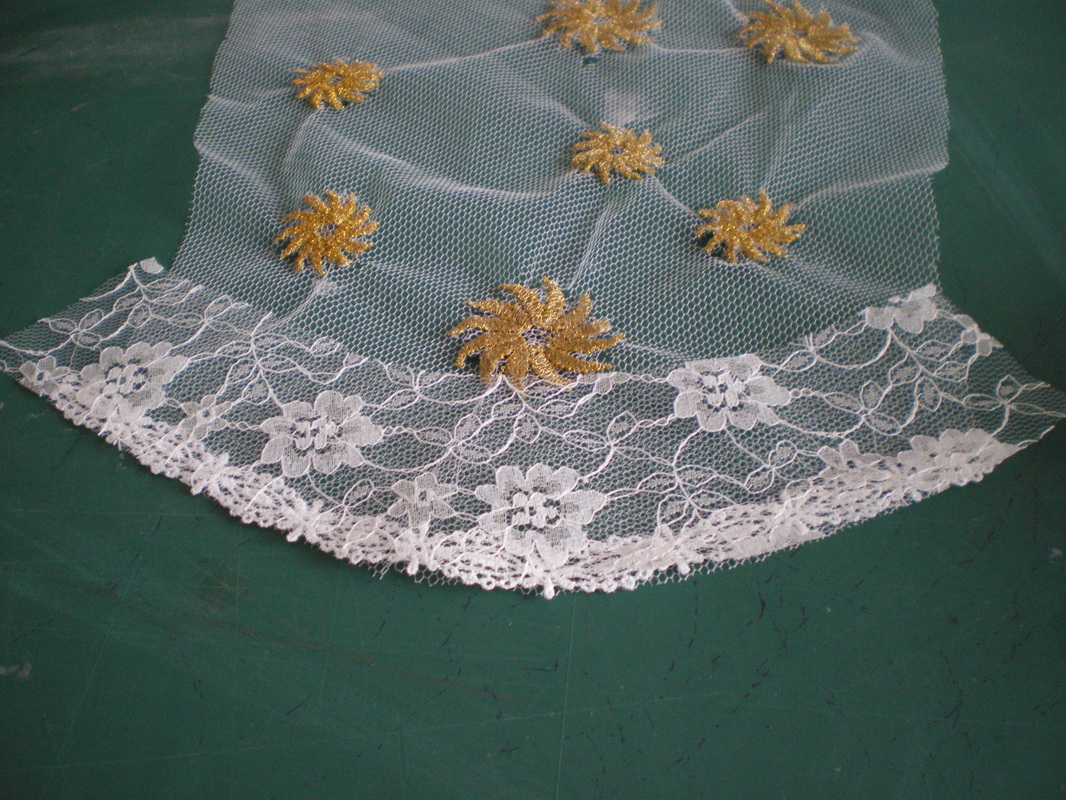
Cut out the suns and sew them onto another piece of net, which should just fit around the lower arm. Sew on a curved piece of lace, then add another trim on the edge
|
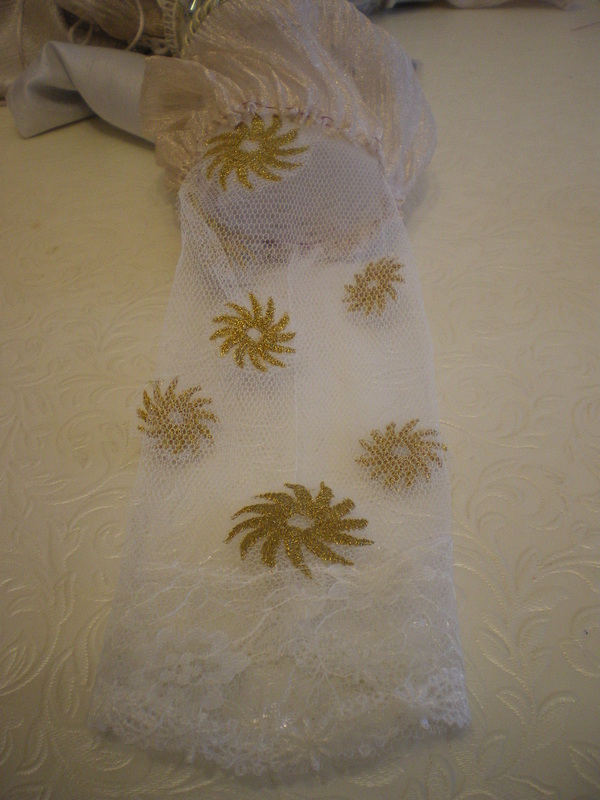
Cut the crinkle material straight at approximately 8" below the top armband. fold the sleeve under and secure on the inside at the top arm band. Between the finger and thumb, force the inner sleeve to become shorter on the inside than the outside, creating more material on the outside than the inside, attach the net to the edge of this. To allow for movement inside the sleeve, it will be necessary to create cuts on the inner sleeve so the elbow can bend.
|
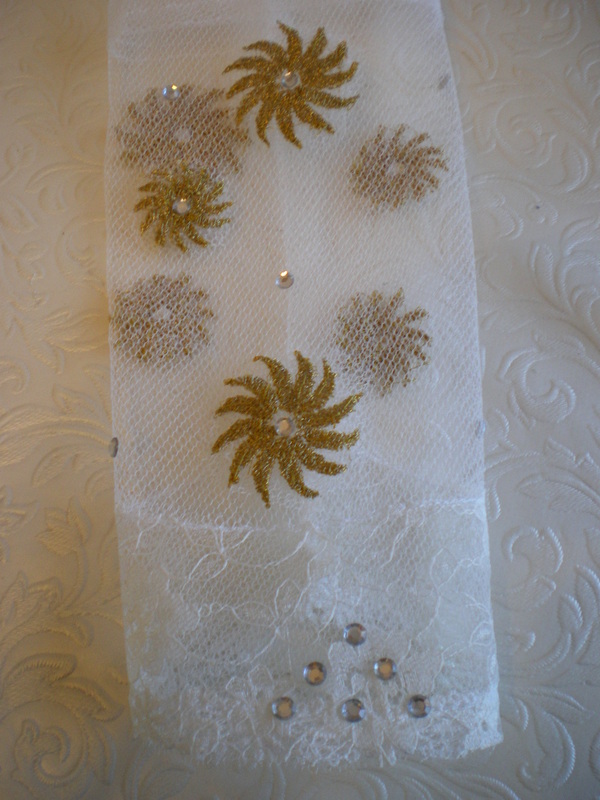
Glue 6 crystals on the edge, this should be just at the back of the hand when the sleeve is on you. Glue a few more crystals on the net.
|
Glue a crystal into the centre of each sun and attach a silver beaded trim to the top edge.
|
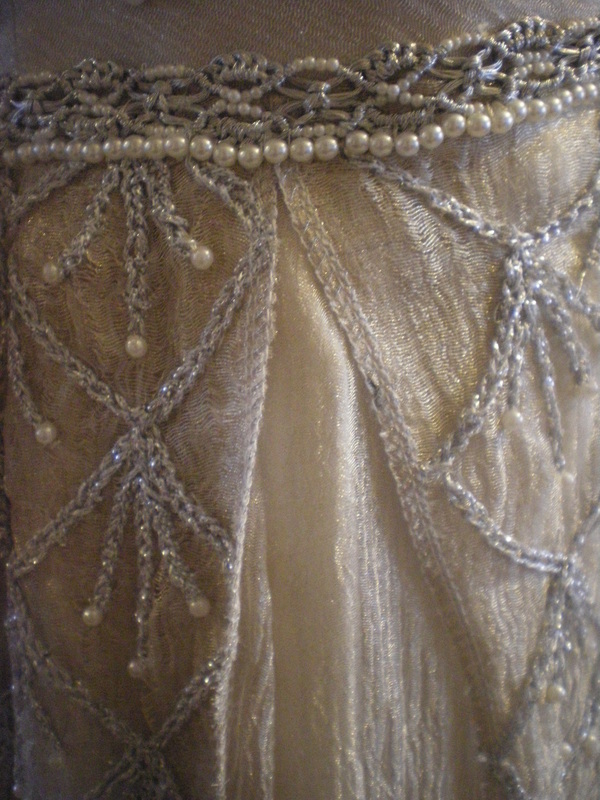
Put together pearl dangles, comprising of a 6mm pearl and 2 seed beads. Attach these to the top trim and elbow trim. Make dangles using the 4mm pearls and 2 seed beads to attach to the bottom of the sleeve.
This completes the sleeve. (now do it again for the other arm!!!)
This completes the sleeve. (now do it again for the other arm!!!)

|
|
|
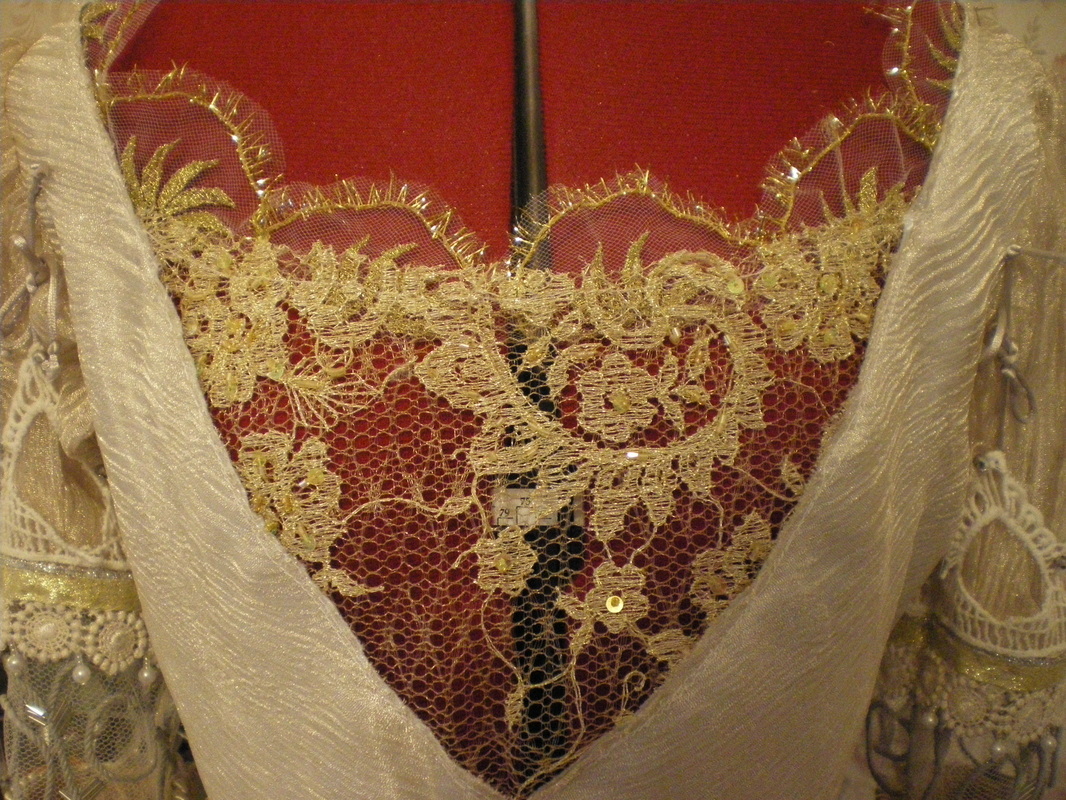
I sewed half suns onto a strip of net that was long enough to go around the top of the bodice and then scalloped the edges.
|
I found some elasticated gift wrap and cut off one section.
|
|
|
|
Attach the tinsel to the net.
|
Attach a section of gold antique lace to the inside of the bodice and then sew the net to the inside of the lace, continuing up over the shoulders to the zip opening. The sun motif just needs to be peeking out.
|
|
Attach the motifs around the neck of the bodice leaving a small gap at the front.
|
Making the underskirt. Follow the instructions for the pattern, but do not attach to the bodice just yet.

|
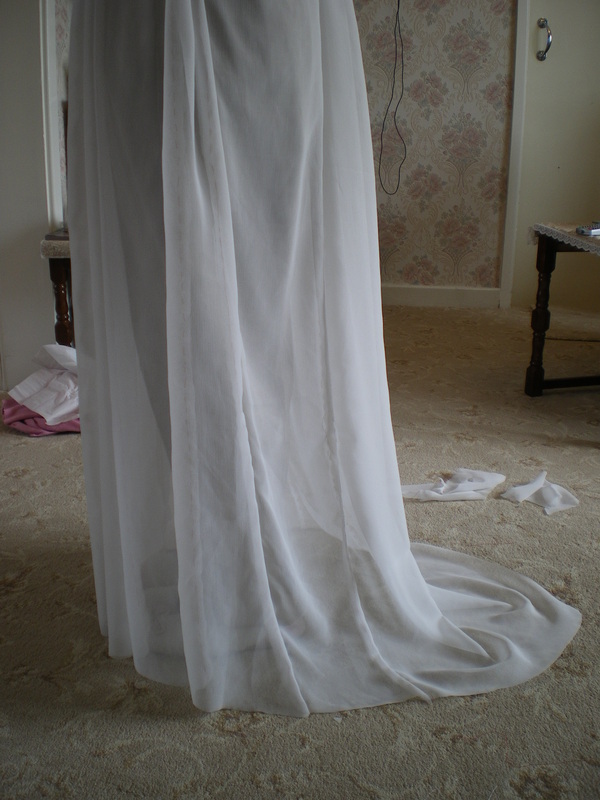
Using the Draping Satin, make the length 6" longer than necessary. Cut a piece of wadding 5" deep, turn the hem up sandwiching the wadding. Put in 5 rows of evenly spaced french knots, starting from an inch from the hem. Leave the skirt for now.
|
|
To make the overskirt:
First I needed a template, so I used some scrap chiffon. These pictures show before and after in the process. I now have a guide for all the panels I have to make.
|
|
|
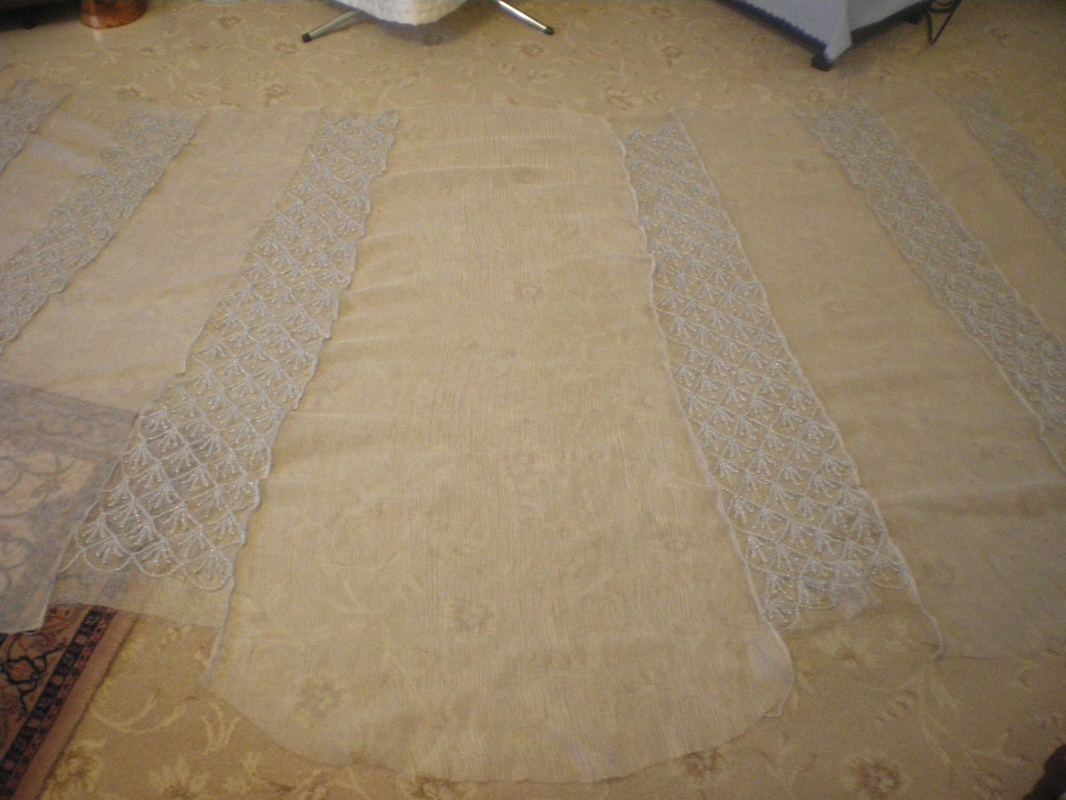
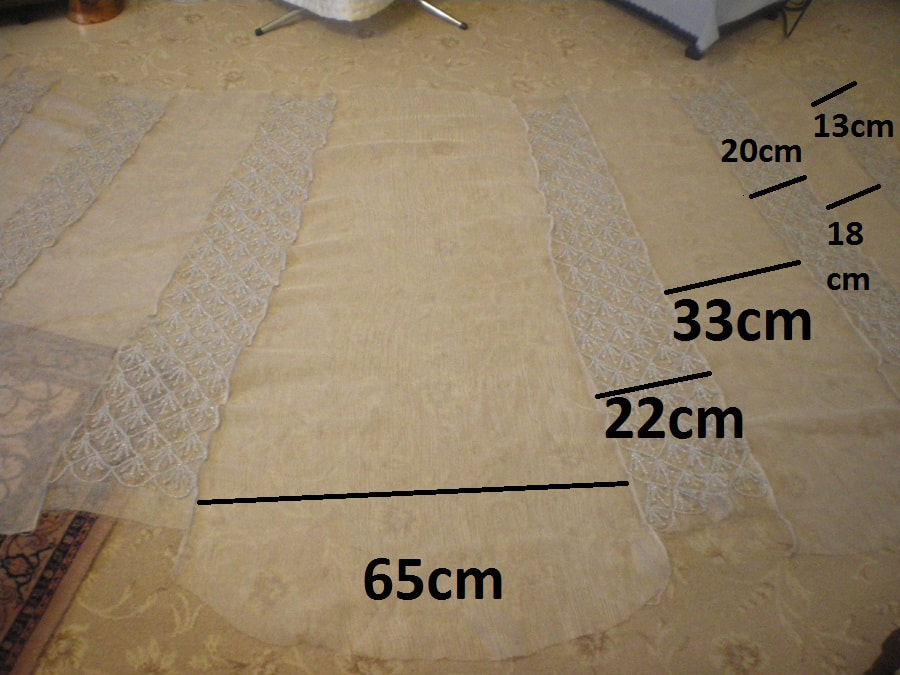
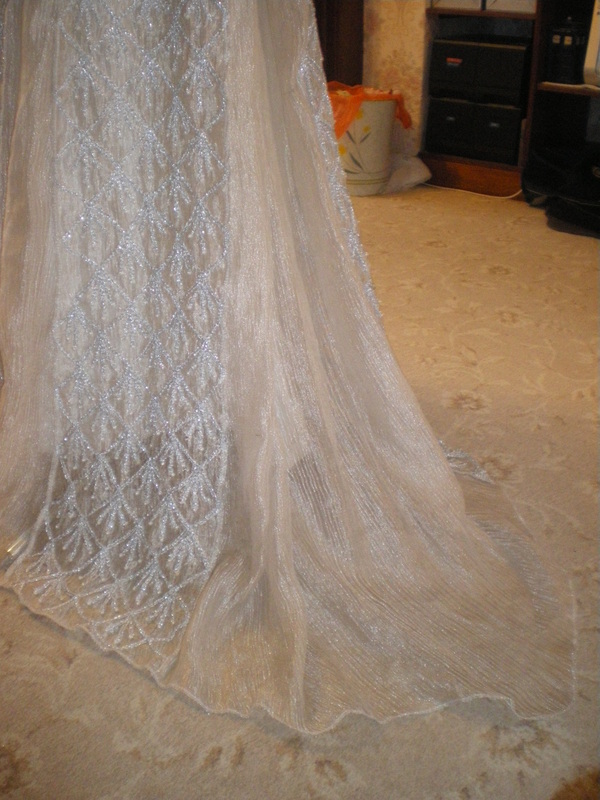
Iron the Crinkle Silk and mark off 6 panels to be filled with chain stitch, each panel getting gradually wider and allowing an excess at the bottom of each for trimming.
|
|
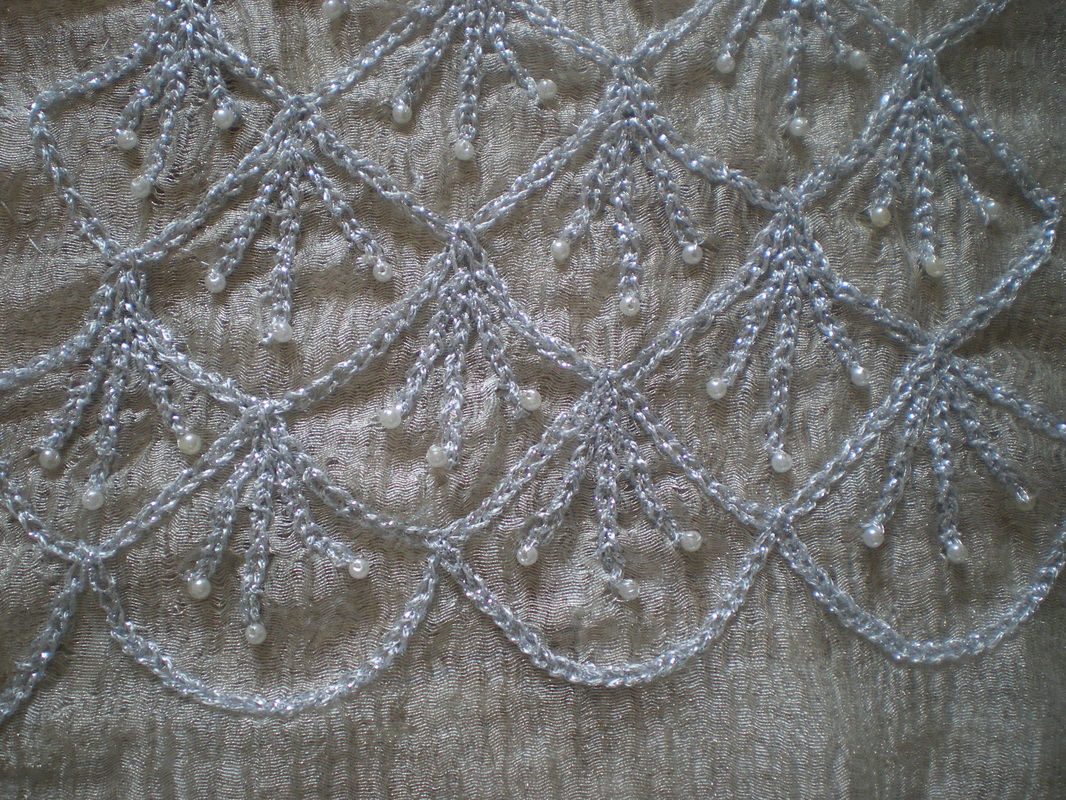
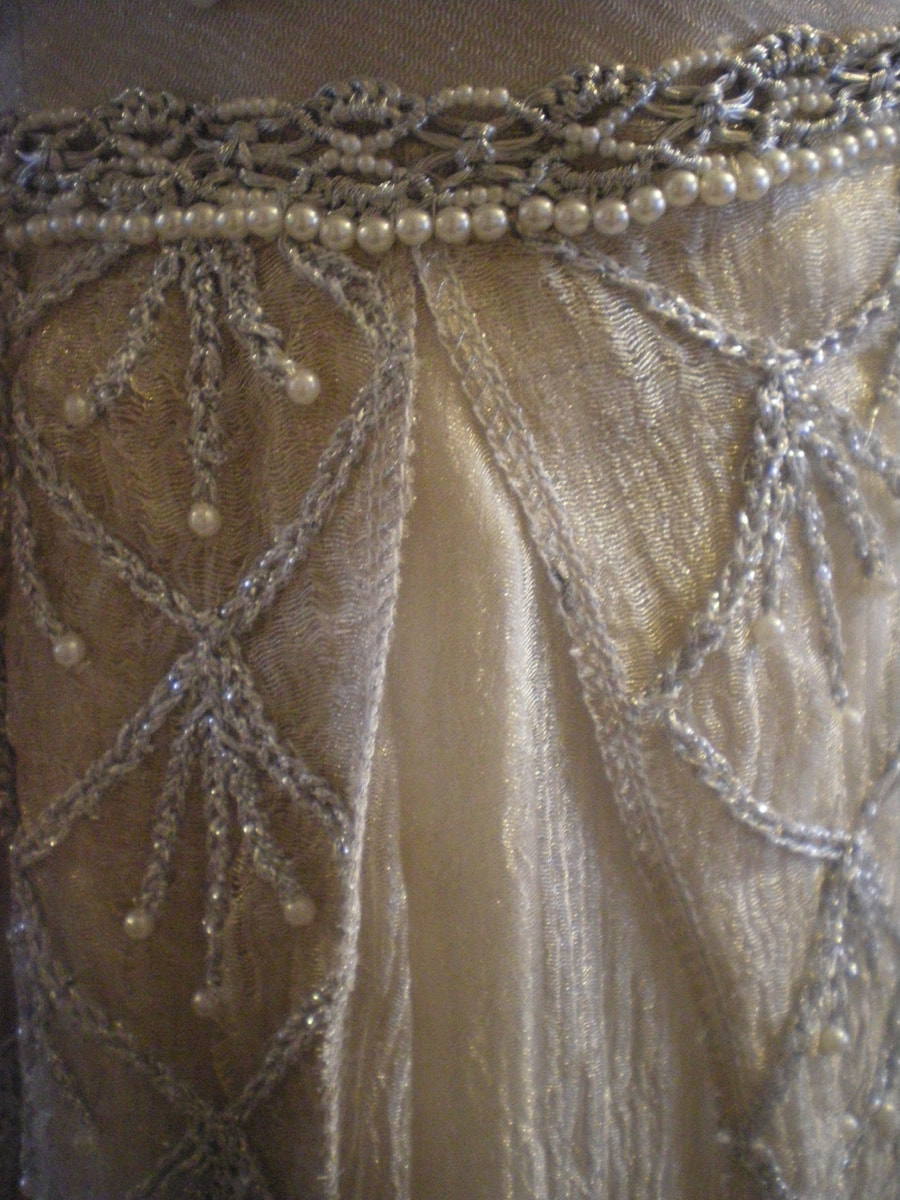
Each scalloped section had three lines of chains and at the end of each was a 4mm pearl bead. Over 1,000 were used just on the panels.
|
|
Having cut out all the panels, cut a piece of NON-ironed Crinkle Silk between each panel. Following the template of the chiffon skirt, cut a back piece that is quite wide and allow excess on all the panels for trimming later. I used silver thread on the overlocker and connected all the strips, the overlocking is done on the outside as part of the decoration.
|

|
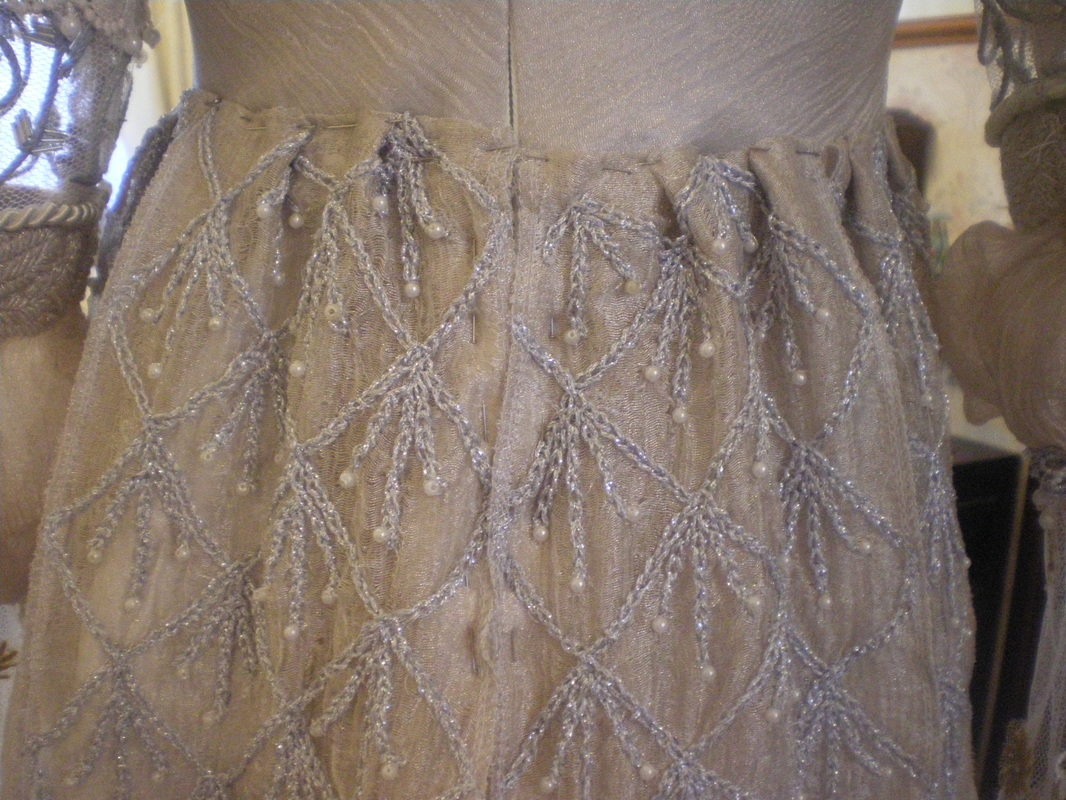
Put both skirts together and pleat onto the bodice. You will notice that there is an un-embroidered section at the waist, this has to be filled in with further chain stitch to complete the over skirt.
|
The plain crinkle material is box pleated so that the decorative panels meet at the top.
|
The decorative panels can be pleated to fit the waist.
Put a slit in the overskirt to match the underskirt and attach the zip. The 2 decorated panels need to meet at the zip. |
|
Overlock the hem using silver thread.
|
|
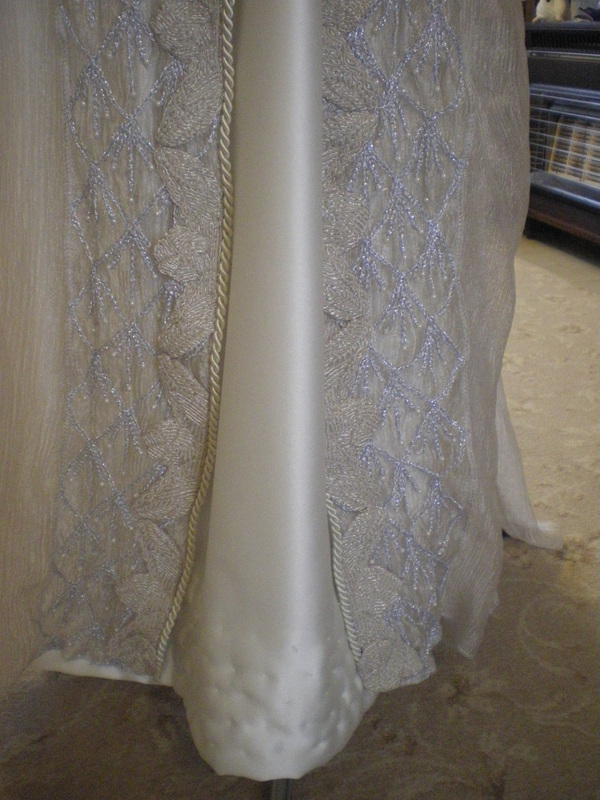
I needed to make a second design as a motif that goes down the front of the skirt. I made 17 of these, each worked with silver thread in the channels.
|
|
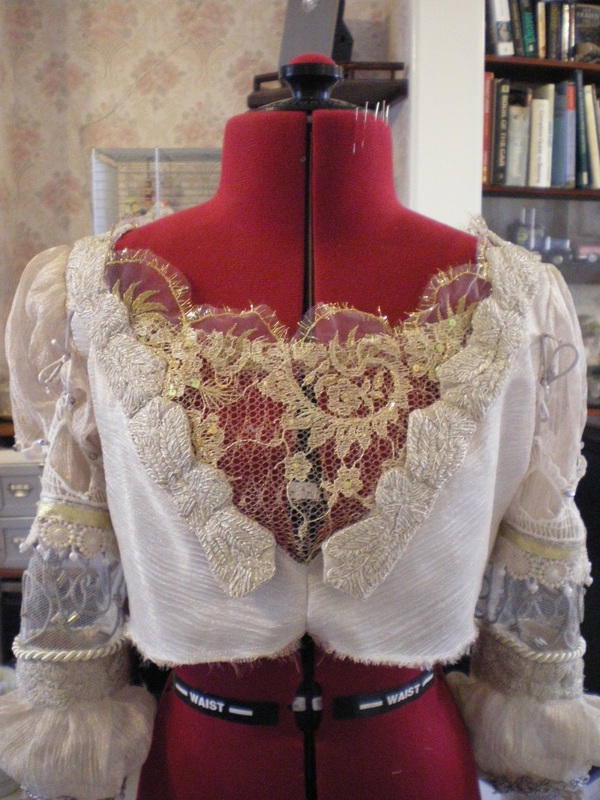
Sew on the silver beaded trim to the bodice and sew 4mm pearls just below it.l
|
|
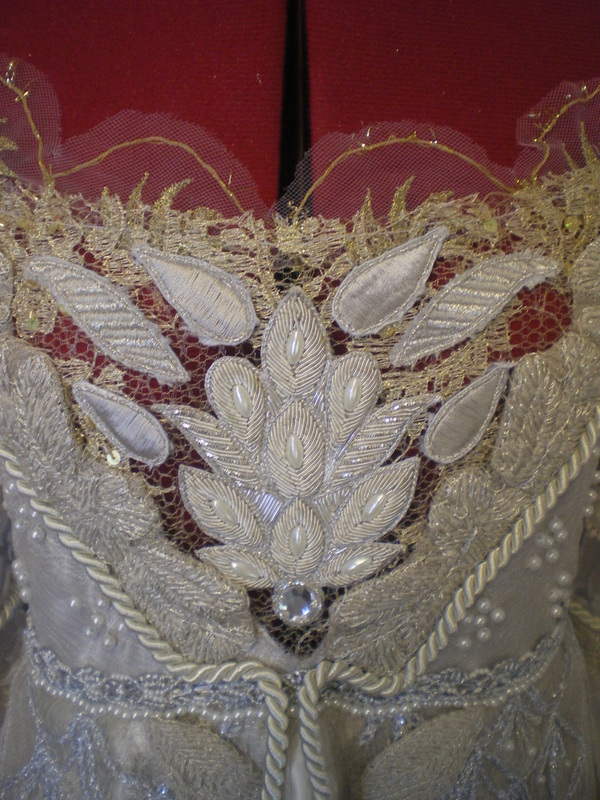
I embroidered additional leaves to go with the central motif I bought from the Internet. Using the upholstery cord, sew it on from the zip opening then down the front edge. Sew on all the motifs down the front of the dress and sew on clusters of 6 pearls onto the bodice. Sew on a motif right underneath the central motif. The motif was bought from Ebay, member ID heritagetrading and cost £7.49
Using another type of silver trim, sew this onto the bodice top going all the way around to the zip. |
|
|

|

|
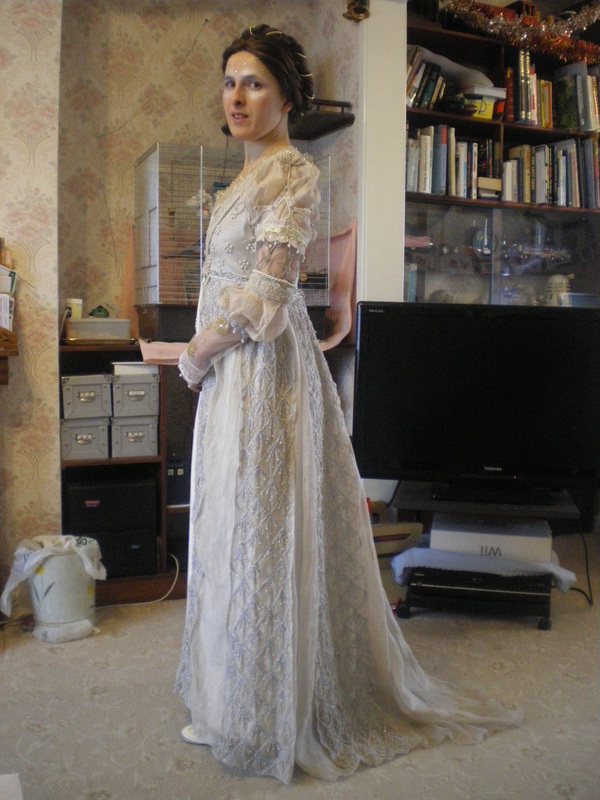
This completes the gown.
