This costume will require dying experience, you will find it helpful to practice on natural fabrics like cotton or silk to get your colours right. Please note, that if you are using polyester or man made fabrics, they will not dye to the same extent and will eventually fade in colour.
Difficulty factor for this dress 10 - 10
Please be aware that
we do not make
costumes to sell or hire
Difficulty factor for this dress 10 - 10
Please be aware that
we do not make
costumes to sell or hire
PLEASE NOTE:
SINCE MAKING THIS DRESS THE DYES THAT WE USED ARE NO LONGER AVAILABLE TO BUY, BUT YOU CAN FIND THE DYLON DYES AT THIS WEBSITE:
https://www.dharmatrading.com/dyes/dharma-acid-dyes.html
THE NAMES OF THE COLOURS HAVE CHANGED OVER TIME, SO BEAR IN MIND THAT THE ORIGINAL COLOURS USED WERE PASTEL SHADES. WE CAN ONLY SUGGEST THAT YOU TRY SOMETHING CLOSE TO THE COLOURS THAT YOU NEED BUT USE SPARINGLY UNTIL YOU HAVE ACHIEVED THE COLOUR THAT YOU NEED.
IT IS IMPORTANT THAT YOU EXPERIMENT WITH VARIOUS FABRICS AND ALSO BEAR IN MIND THAT MANMADE FABRICS WILL NOT HOLD THE DYE AND WILL FADE OVER TIME OR NOT TAKE AT ALL.
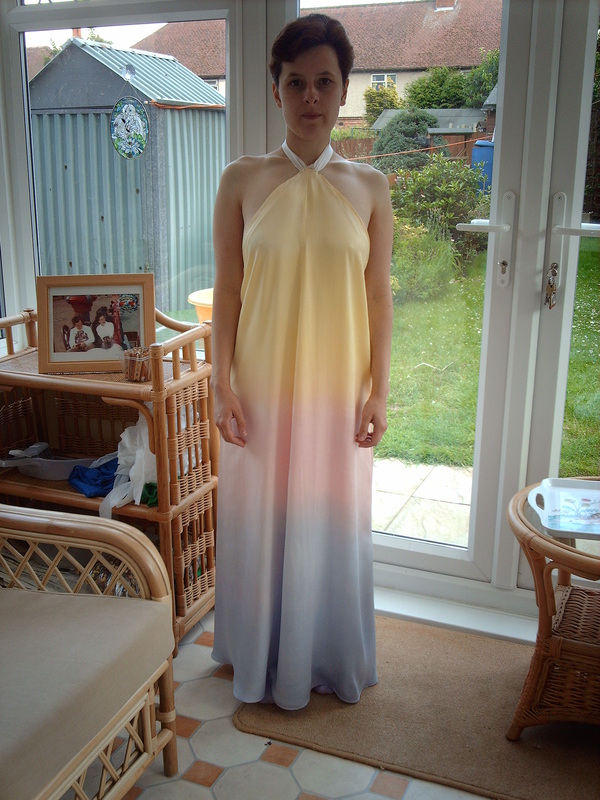
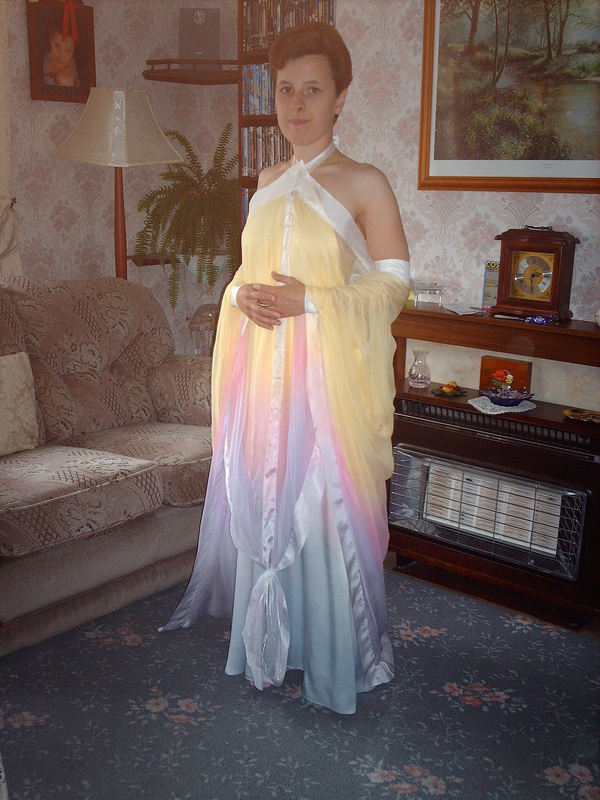
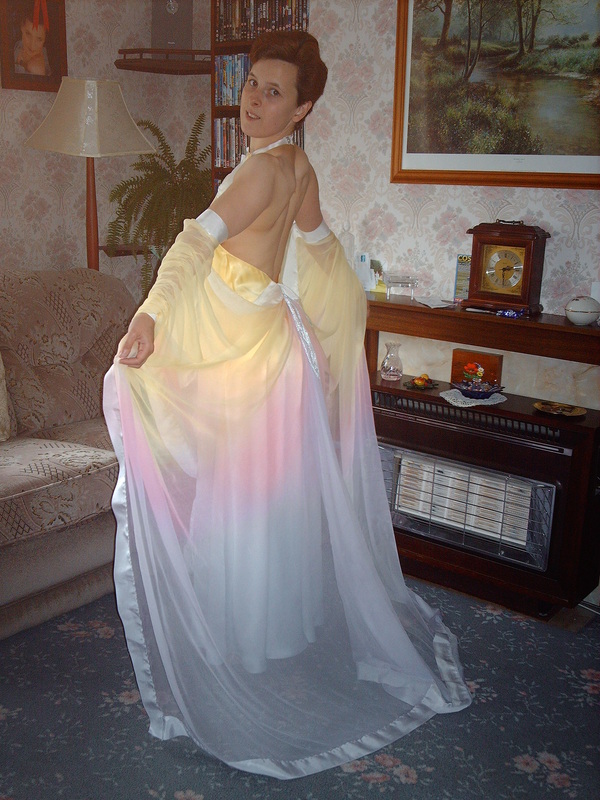
Construction of Padme Amidala's Rainbow Dress (Lake Dress)
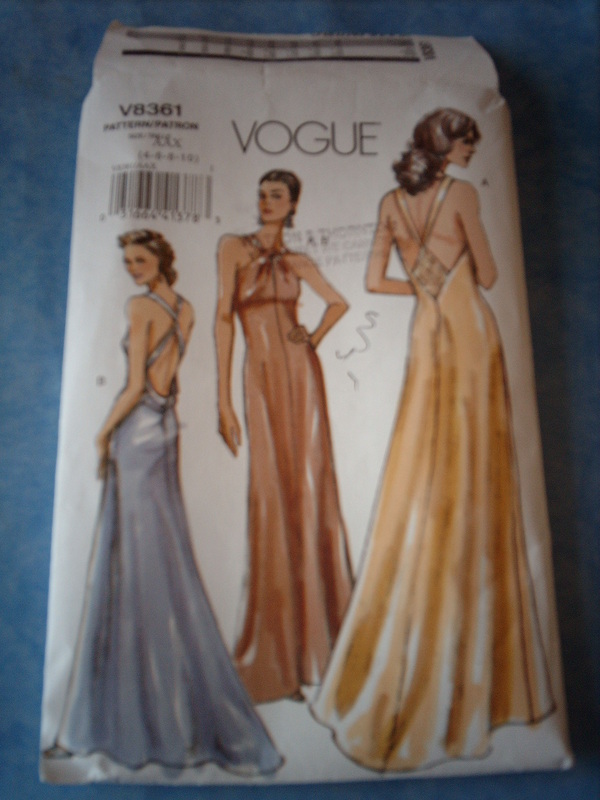
Using Vogue Pattern V8361 View A. (or you could use Simplicity 7072 or similar shift dress and alter it)
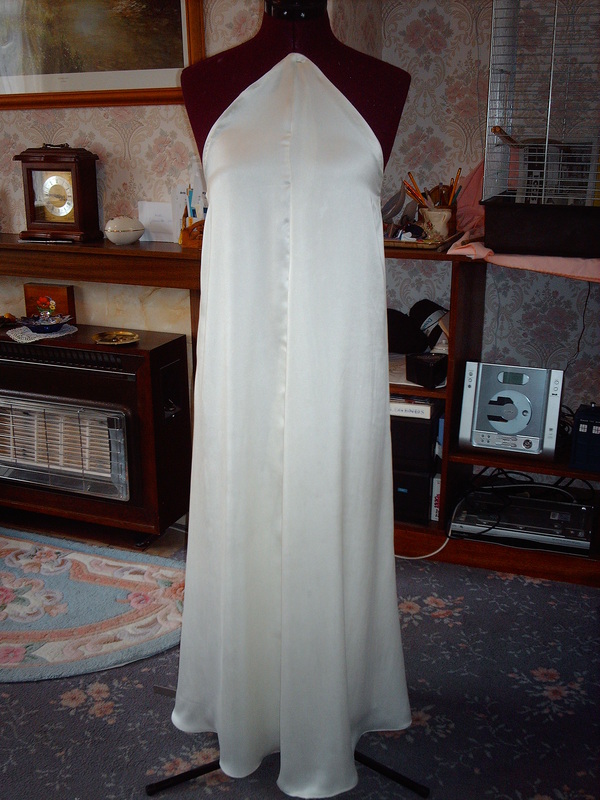
The length had to be reduced dramatically, as I needed a straight hem and I substituted all the straps for a "choker" attached to the front of the dress [see later illustration]. This dress pattern had the right amount of extra material to make the dress hang properly. The material was white Sand Washed Satin Silk bought from Whaleys (Bradford) Ltd, email: www.whaleys-bradford.ltd.uk, who will send you a free copy of their price list. All material will need to be pre-washed to eliminate shrinkage, this will cause the fabric to lose its sheen, but you can get this back by using a steam iron on the fabric. But be careful, start at a low heat setting and gradually increase the heat.
Using Vogue Pattern V8361 View A. (or you could use Simplicity 7072 or similar shift dress and alter it)
The length had to be reduced dramatically, as I needed a straight hem and I substituted all the straps for a "choker" attached to the front of the dress [see later illustration]. This dress pattern had the right amount of extra material to make the dress hang properly. The material was white Sand Washed Satin Silk bought from Whaleys (Bradford) Ltd, email: www.whaleys-bradford.ltd.uk, who will send you a free copy of their price list. All material will need to be pre-washed to eliminate shrinkage, this will cause the fabric to lose its sheen, but you can get this back by using a steam iron on the fabric. But be careful, start at a low heat setting and gradually increase the heat.
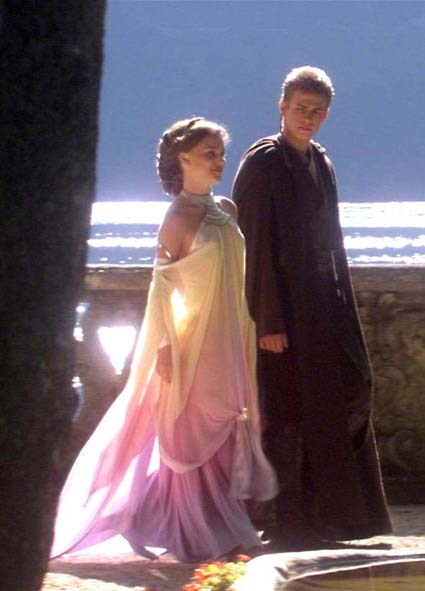
The original dress worn by Natalie Portman as the character Padme Amidala from Star Wars 2
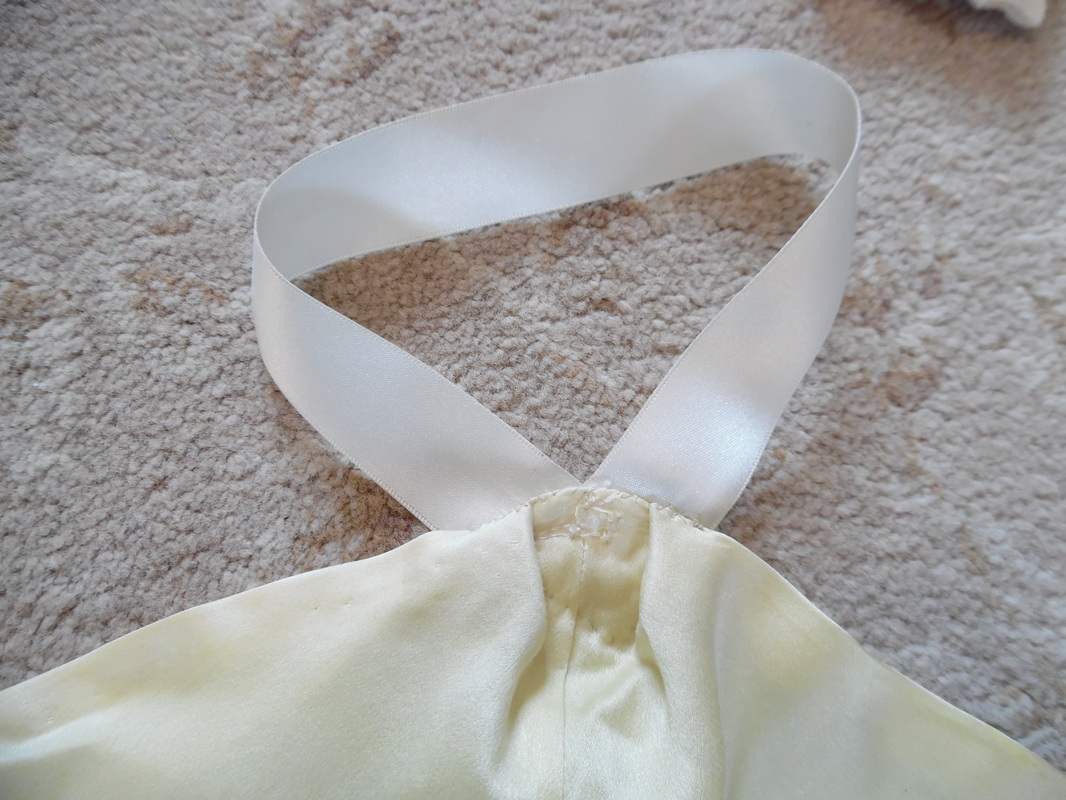
The hem of the dress was cut straight and the halter shape had to be reshaped so it came up to the neck line, to attach the "choker".
|

|
It is at this stage, the dress can be dyed. I chose to dye the dress AFTER it was assembled, with hindsight though, I think it should be dyed BEFORE the dress is attached to the lining and leave the lining white. From the top of the halter neck to the base of the zip, I used Dylon Cold A22 Sahara Sun, about 10cms was then dyed orange (as this helped to blend the yellow with the pink), from 10cms below the zip to approximately knee level, I used Dylon Hand Dye Baby Pink, then the remainder was dyed with Dylon Cold A3 Lilac. PLEASE SEE INFORMATION OF DYES ABOVE.

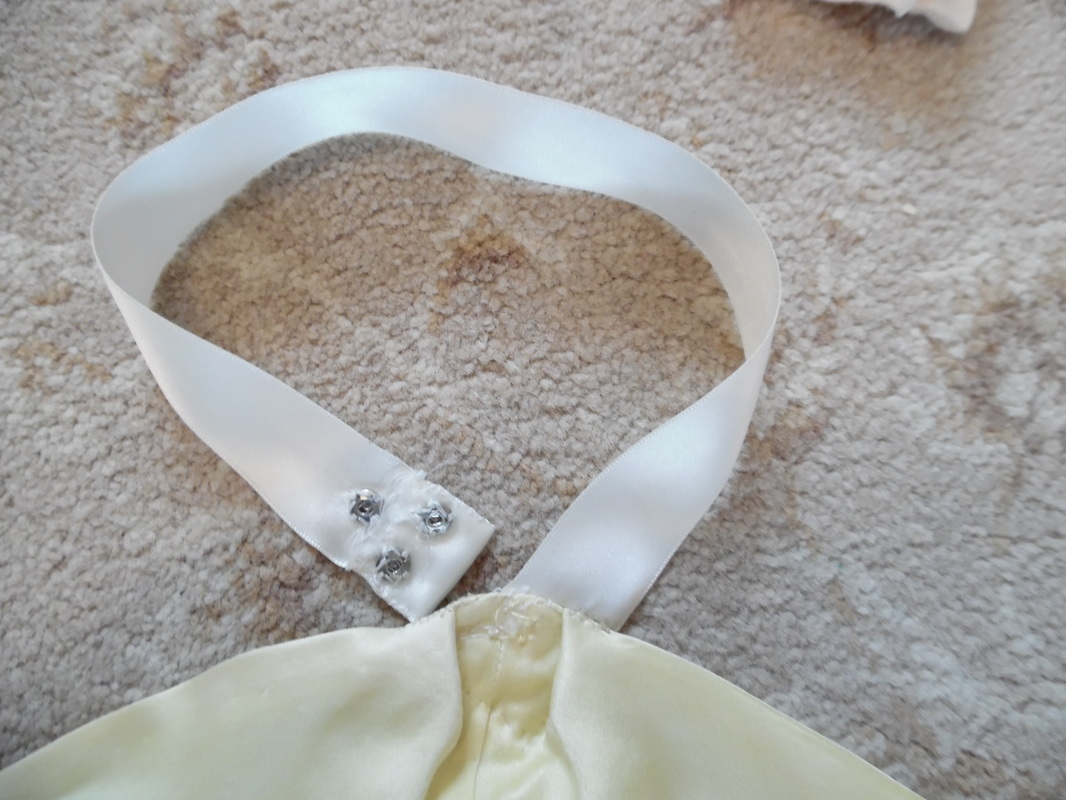
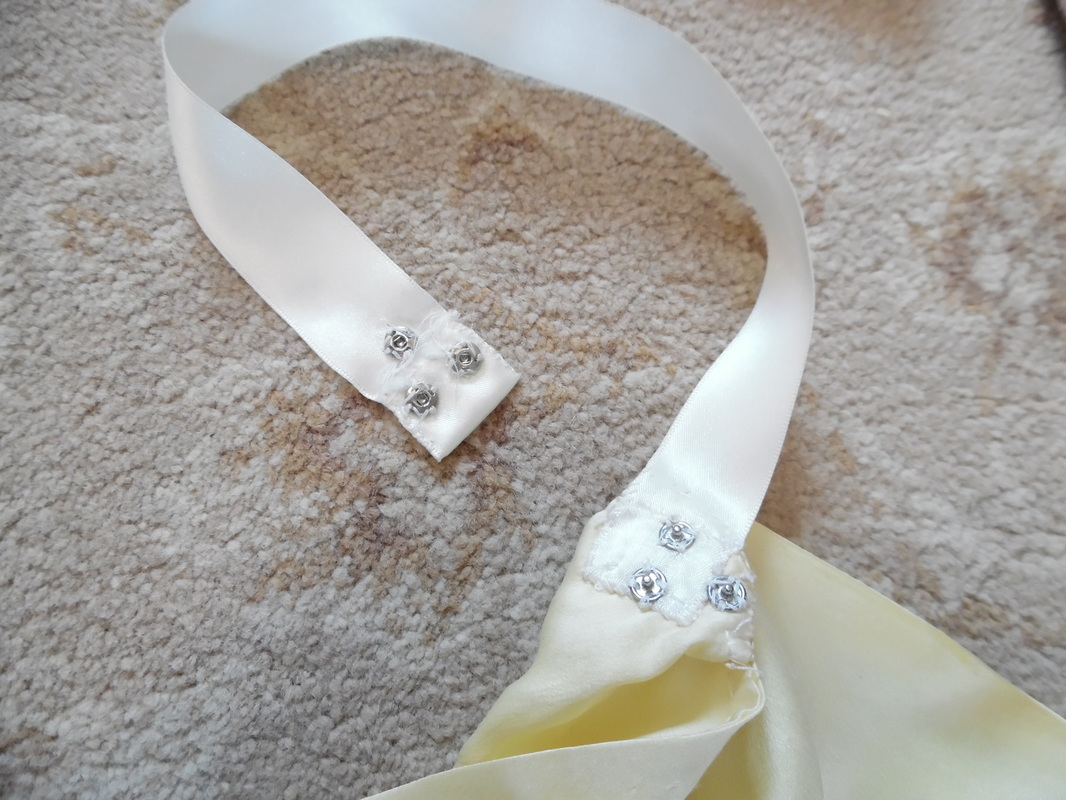
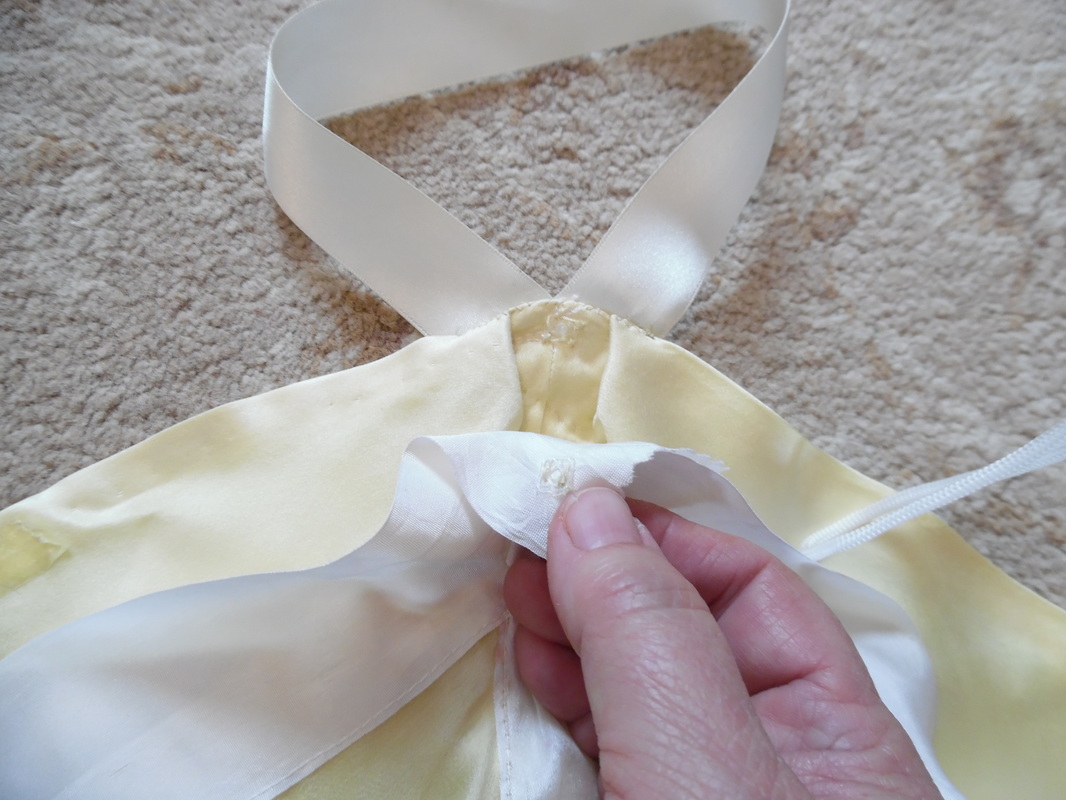
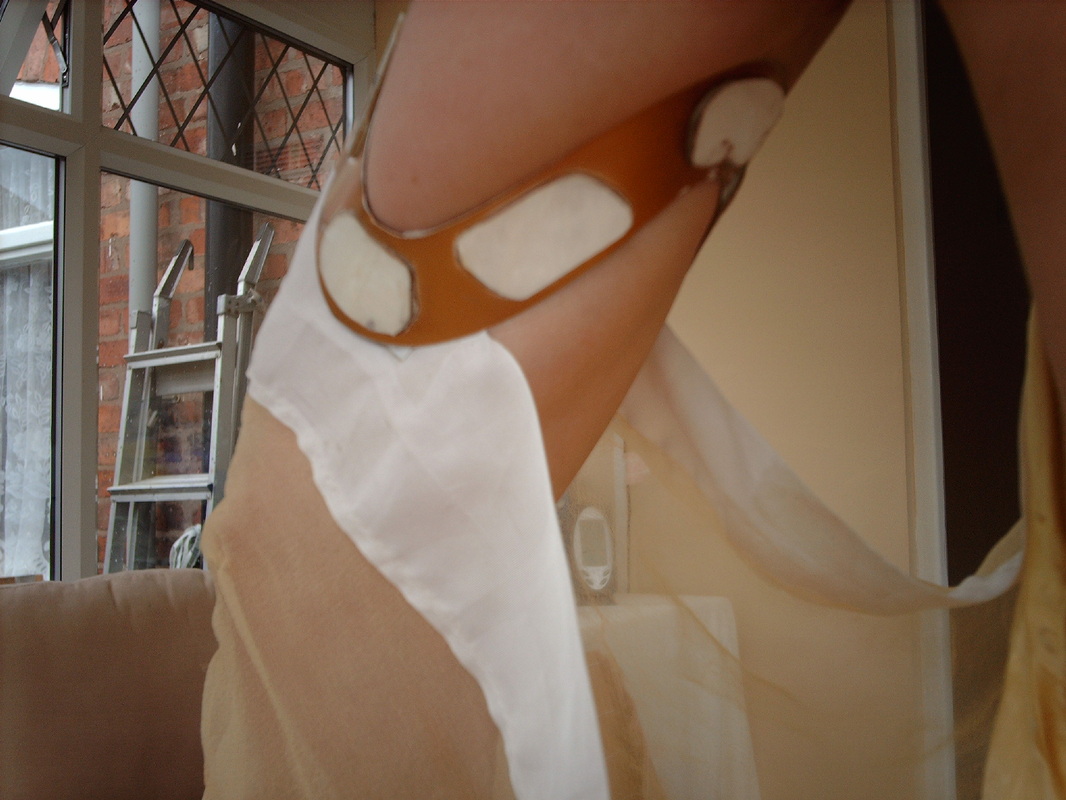
The halter neck choker was made from 1" white satin ribbon and was not dyed, it is fastened securely at the front, taken around the back of the neck and then attached at the front using snap fasteners
|
|
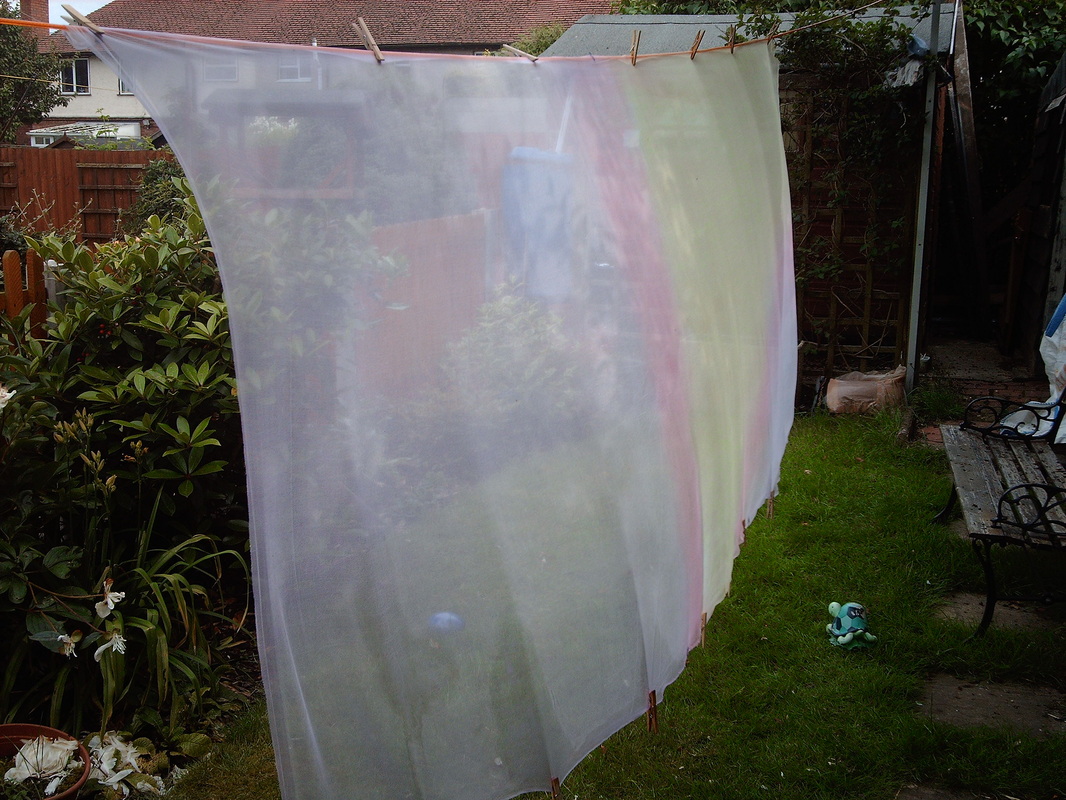
The following pictures shows the process used to dye the dress. I had four shallow trays set out on the lawn, with dye in each one. I then dipped each section VERY CAREFULLY into each dye, being careful NOT to drop the dress!! As the dress dried, the colours became less vibrant.

|

|
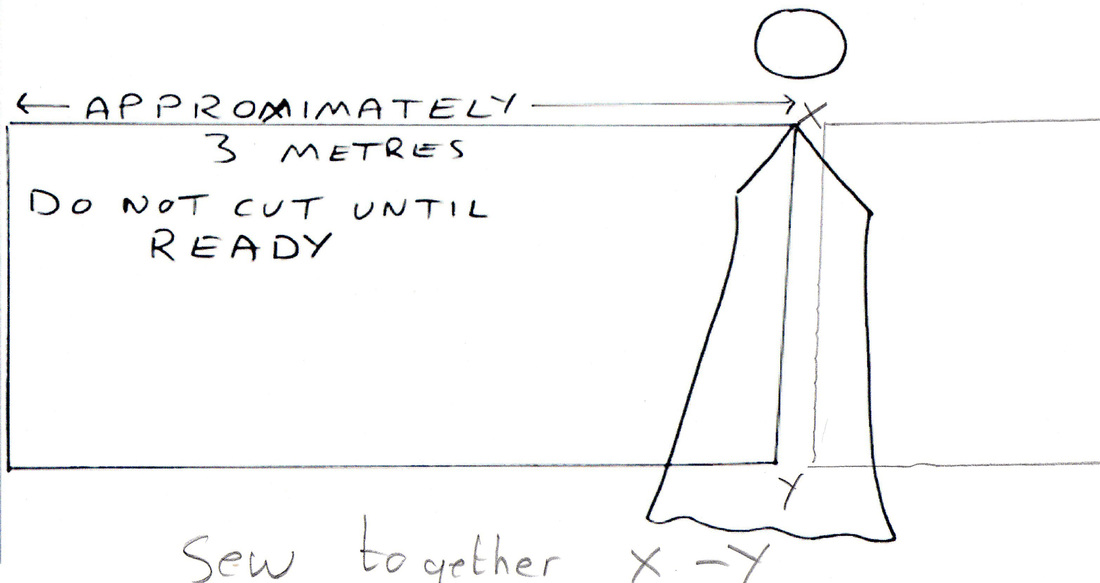
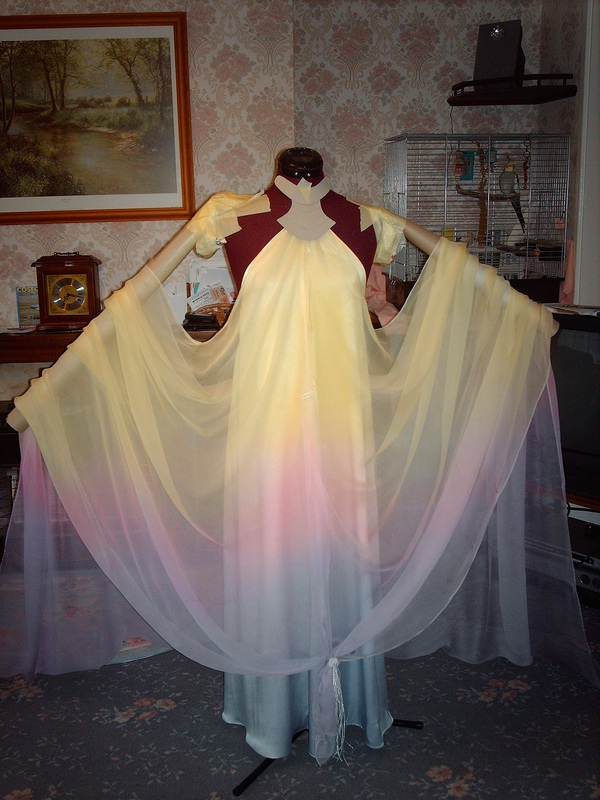
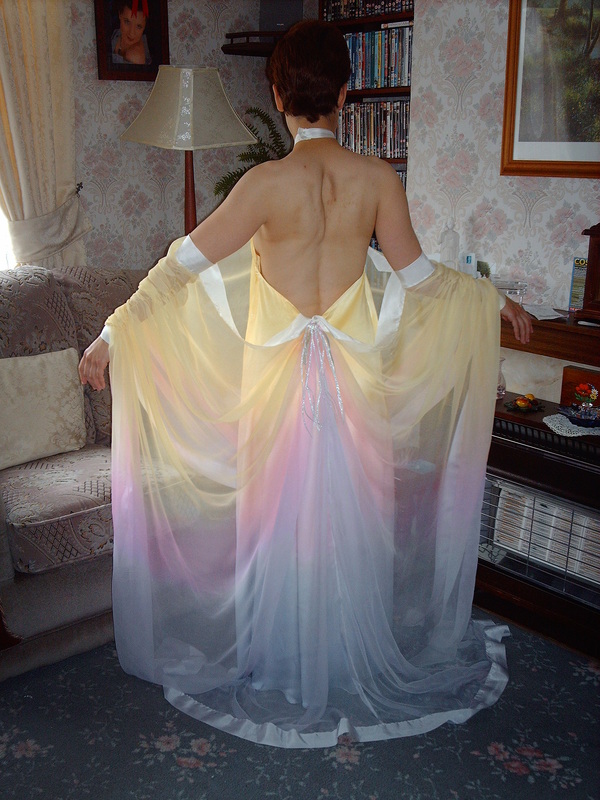
Next were the outer "wings". The chiffon was cut in two lengths and to measure this, raise the arm to 90 degrees out straight, place the tape measure at the bottom front, continue to the wrist, go over the arm and then to the lower back, continue down to the floor and add approximately 30cm to allow for a small train.
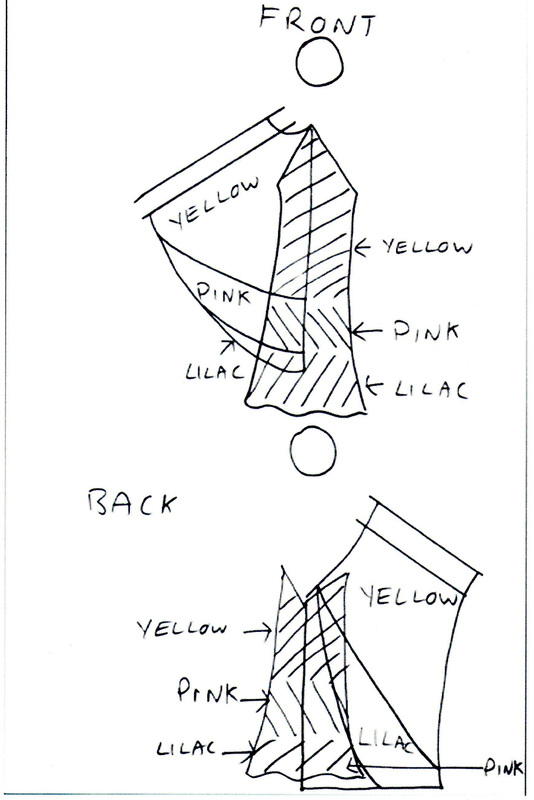
The following pictures show a very helpful tailors dummy, showing where the colours need to be added to the chiffon. I marked where the colours should be, then laid the chiffon on the lawn and using spray bottles, dyed each segment the correct colour.
The following pictures show a very helpful tailors dummy, showing where the colours need to be added to the chiffon. I marked where the colours should be, then laid the chiffon on the lawn and using spray bottles, dyed each segment the correct colour.
|
|
|
|

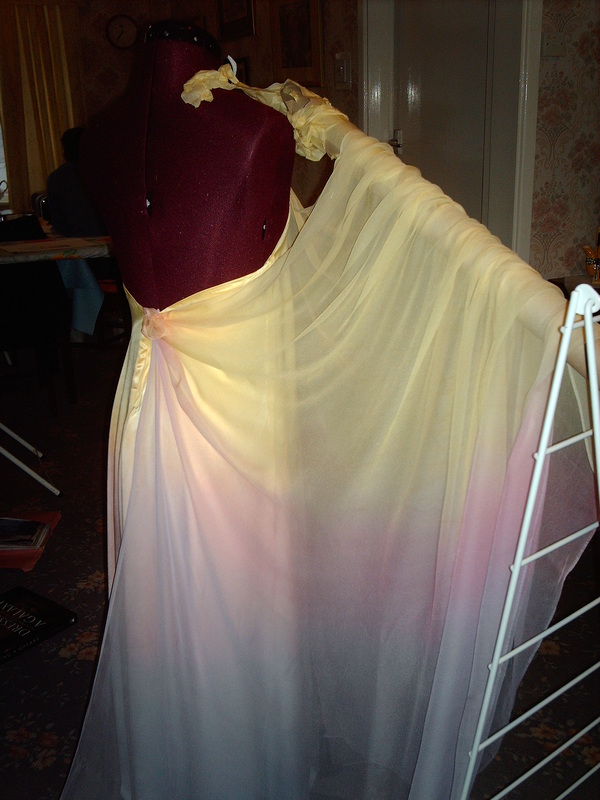
The wings are then joined at the front seam and at the back seam from the zip top of the dress to the floor. It was at this stage that I shortened the length, because when the tassle at the front was made, it touched the floor, so I reduced it all the way around by at least 20cms.
|

|
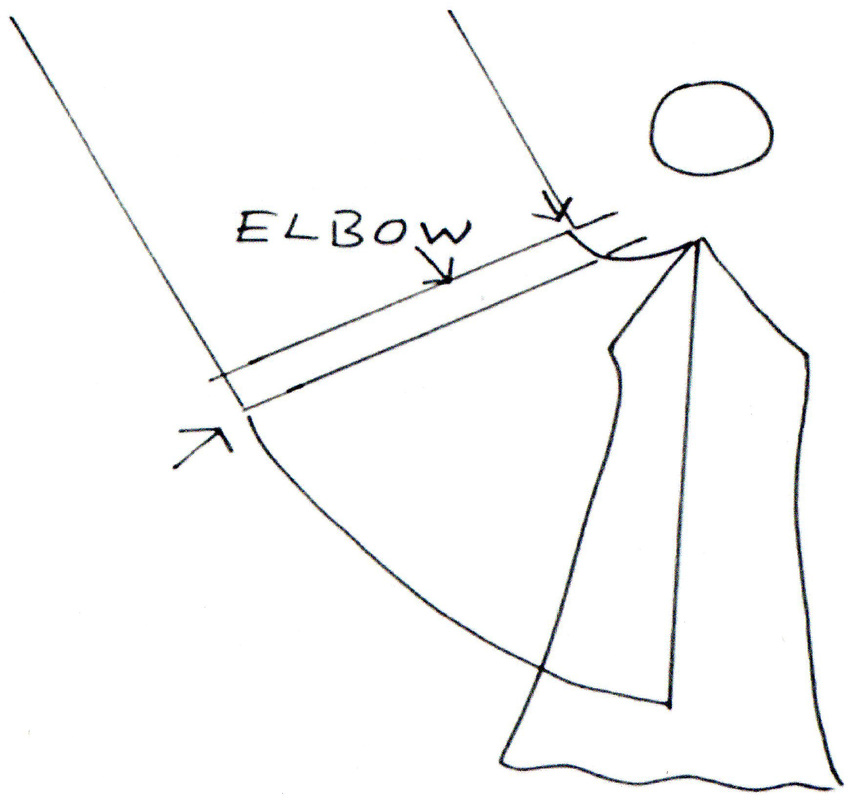
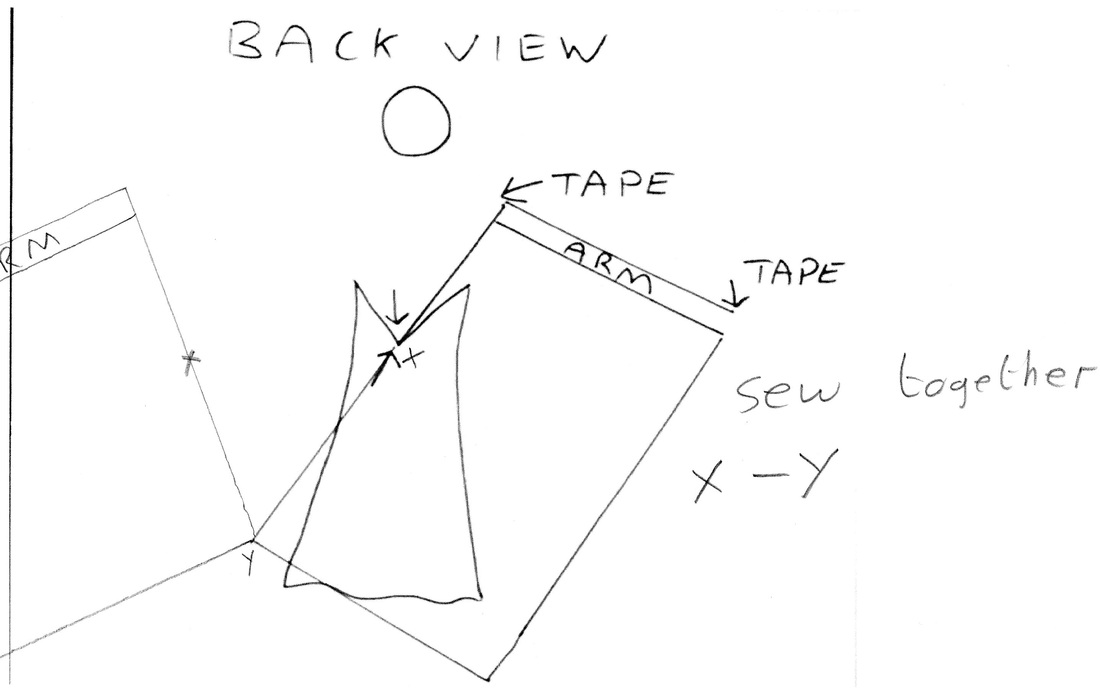
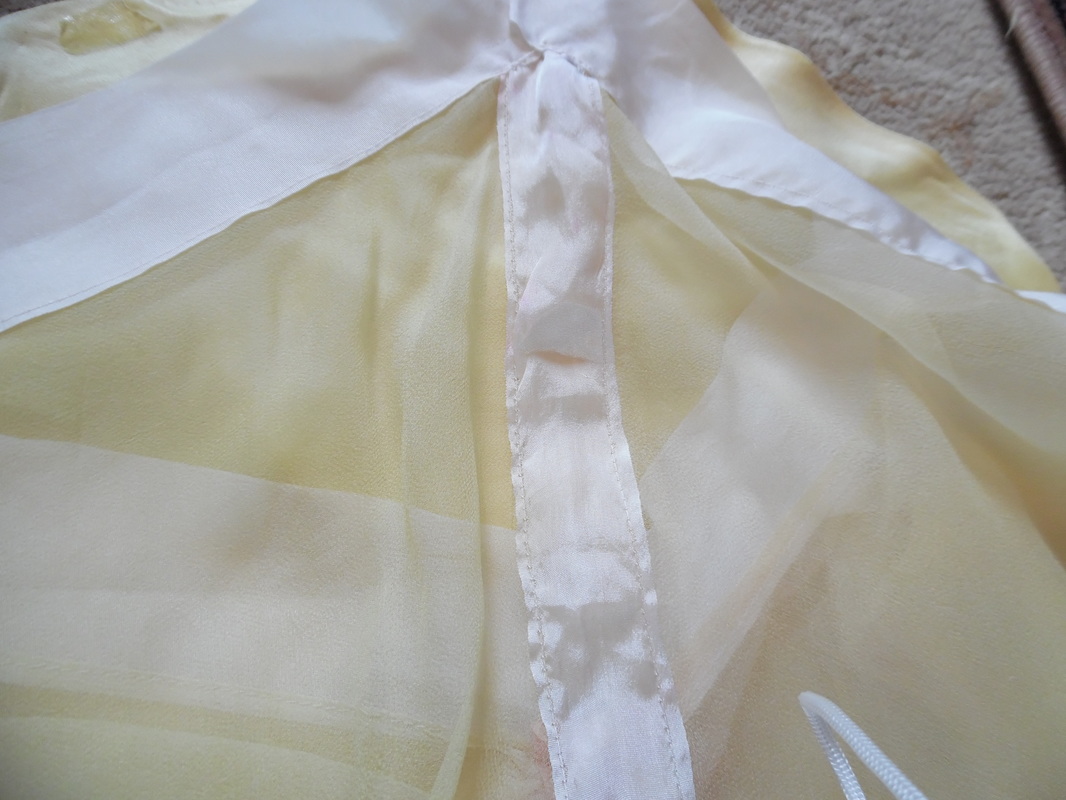
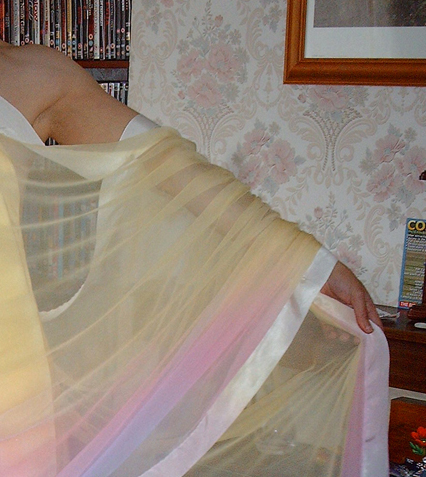
Next I put the edging strips on. We used 2" wide satin ribbon on the wings, this had to be dyed to correspond with the changing colours of the wings. Again I used 2" ribbon to go from the halter front, over the arms and to the back. The centre back wings are NOT stitched to the dress, it is left to hang loose, as a brooch will be used to attach it to the back. Please note: at this stage I am just demonstrating how the wings hang, the upper arm ribbons are NOT fastened around the arms, they hang loose and are attached to bands (shown later). The ribbon at the wrists is fastened tight using a small piece of velcro. A snap fastener is used at the top of the "V" front to the halter ribbon. A 1.1/2" wide ribbon is attached down the front and again dyed to correspond with the colours of the wings.
|

|
After sewing up the front seam, sew on the narrow ribbon. At the back of the "wings", sew up the back seam then sew on the wider tape, going all the way across the seam at the top.

|
|
A running stitch, (small tacking stitch) using strong thread or thread that is doubled, is sewn from the outer wrist to the top arm band and gathered up to fit.
|
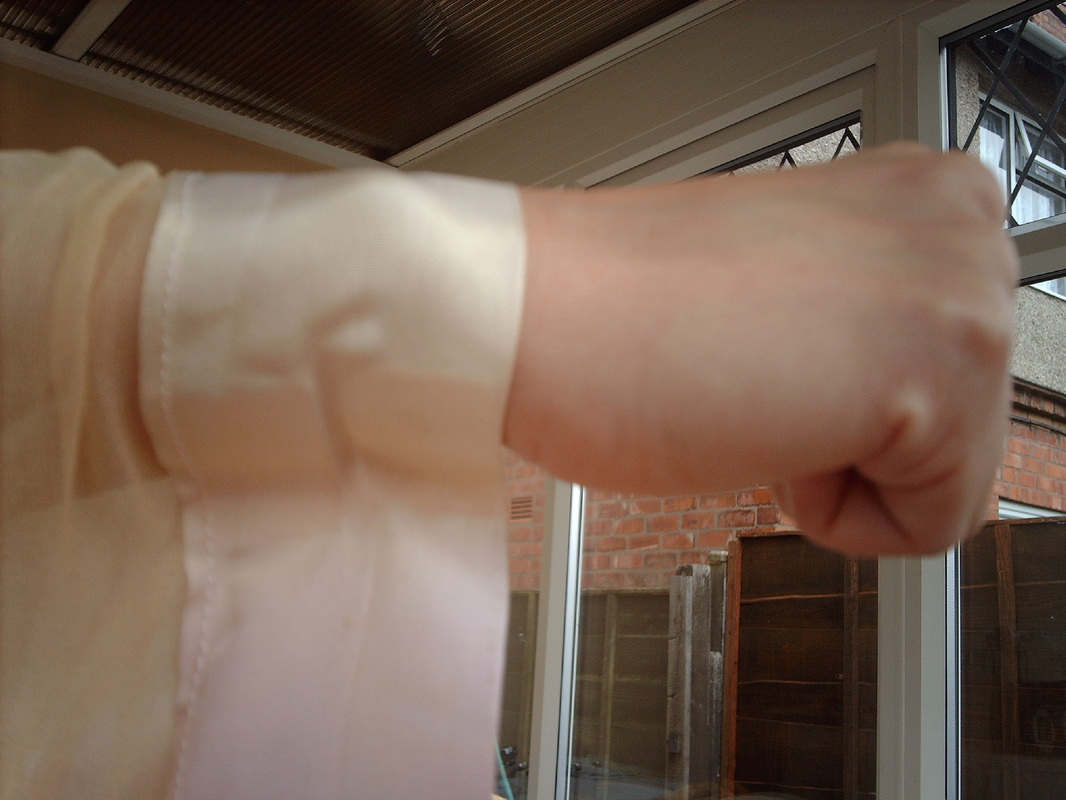
I used velcro to close the cuffs around the wrist.
|
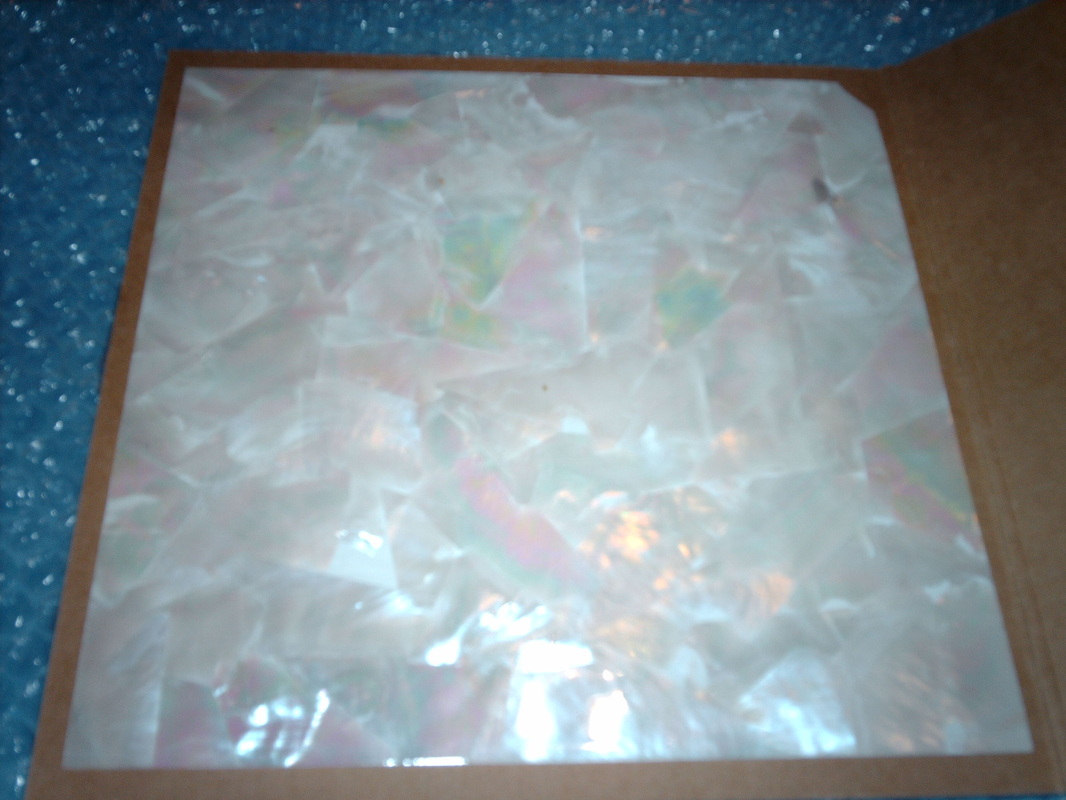
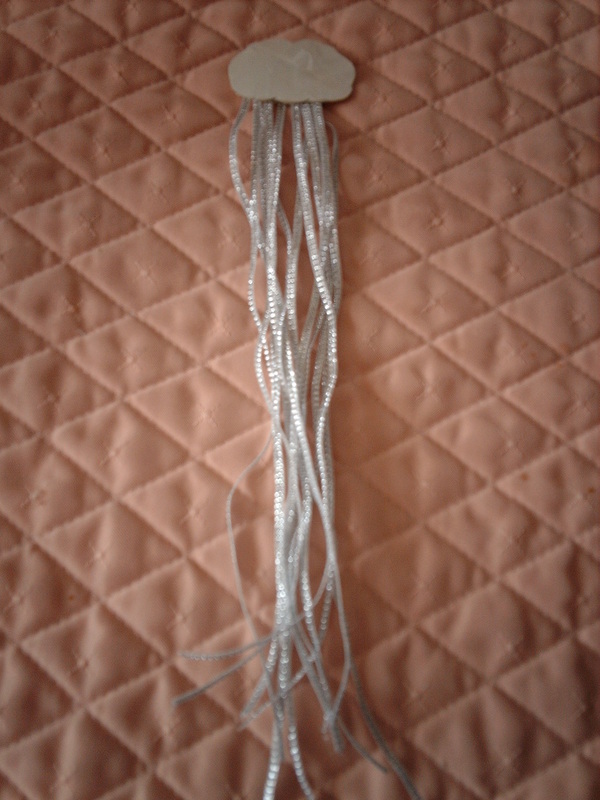
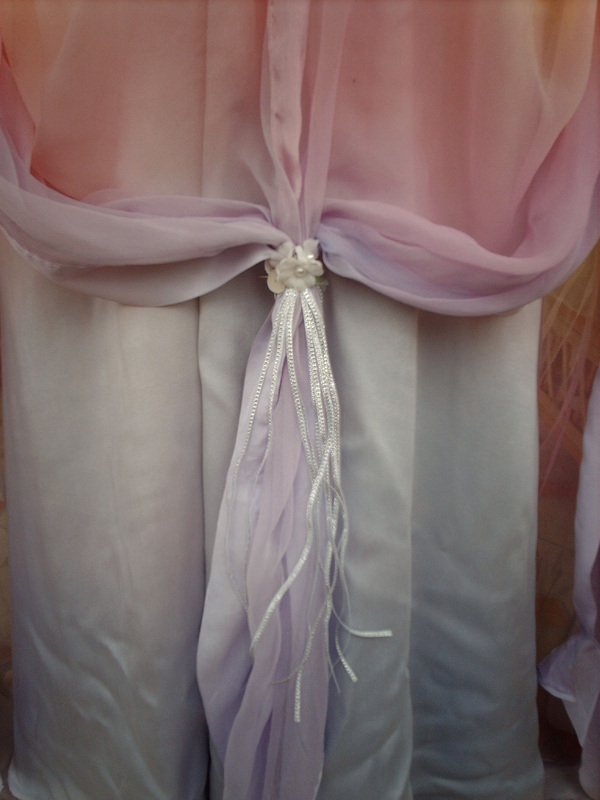
Making the centre back brooch. I bought a square of Mother of Pearl (8" x 8") which was purchased from Inbeads on Ebay from Australia. A "cloud" shape was cut and stuck onto a piece of card in the same shape. I then taped a safety pin to the back, and attached a selection of thin glittery ribbons approximately 20cms long.
|
|
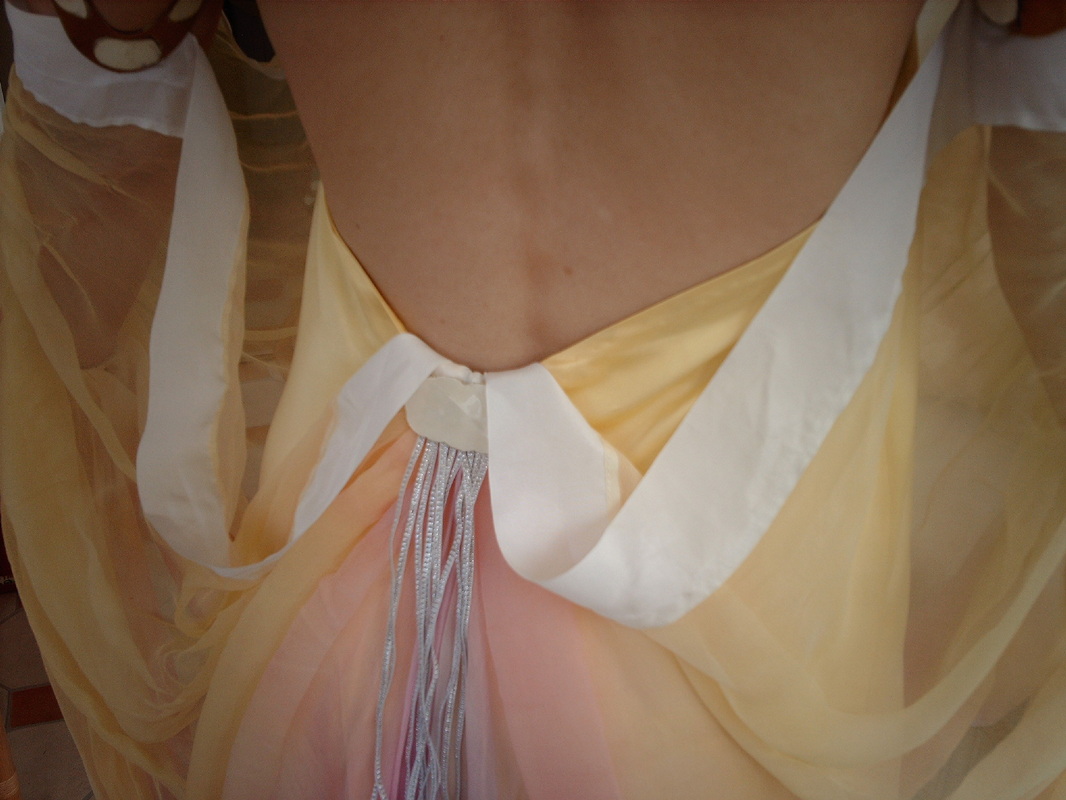
The ribbon is folded over the zip to the inside of the dress and the brooch pinned in place to cover the zip.
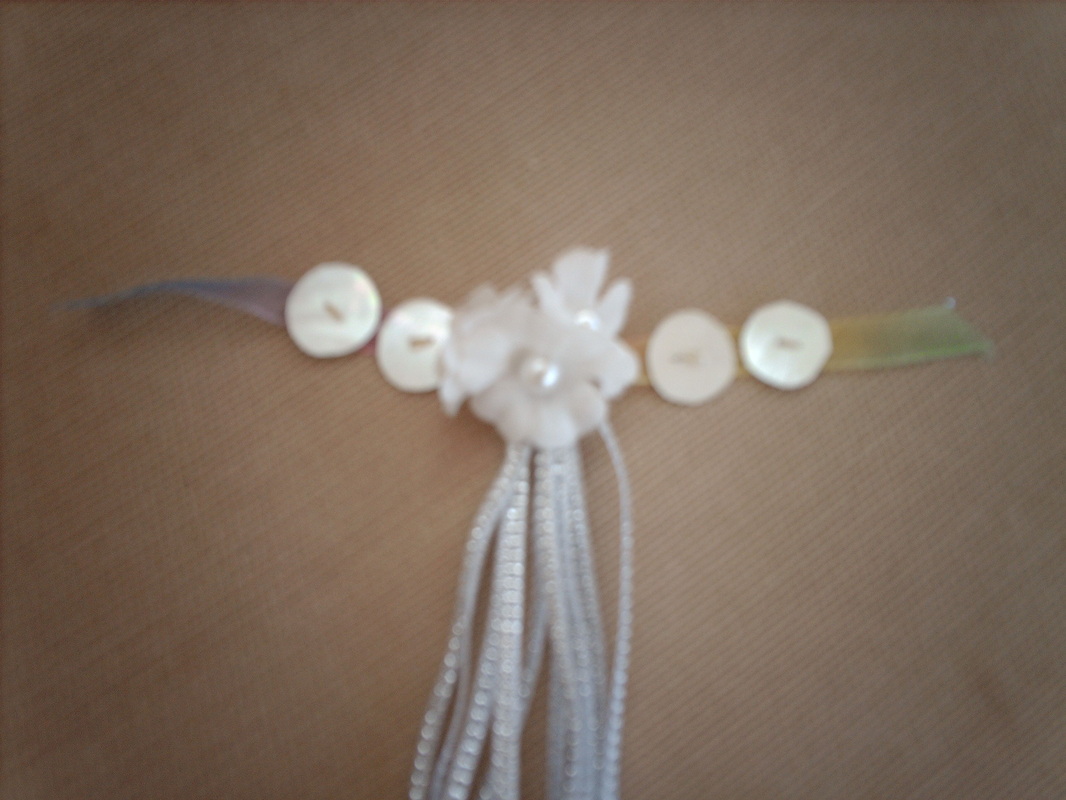
The front tassle is made from lengths of the same shiny ribbon, attached to a 1cm wide ribbon. A small white flower is placed at the centre with a pearl bead in the middle and four small discs of mother of pearl sewn on either side, this will be permanently attached to the front of the wings.
|
|
|
|
This concludes the making of the dress and wings, I will now make the armbands.
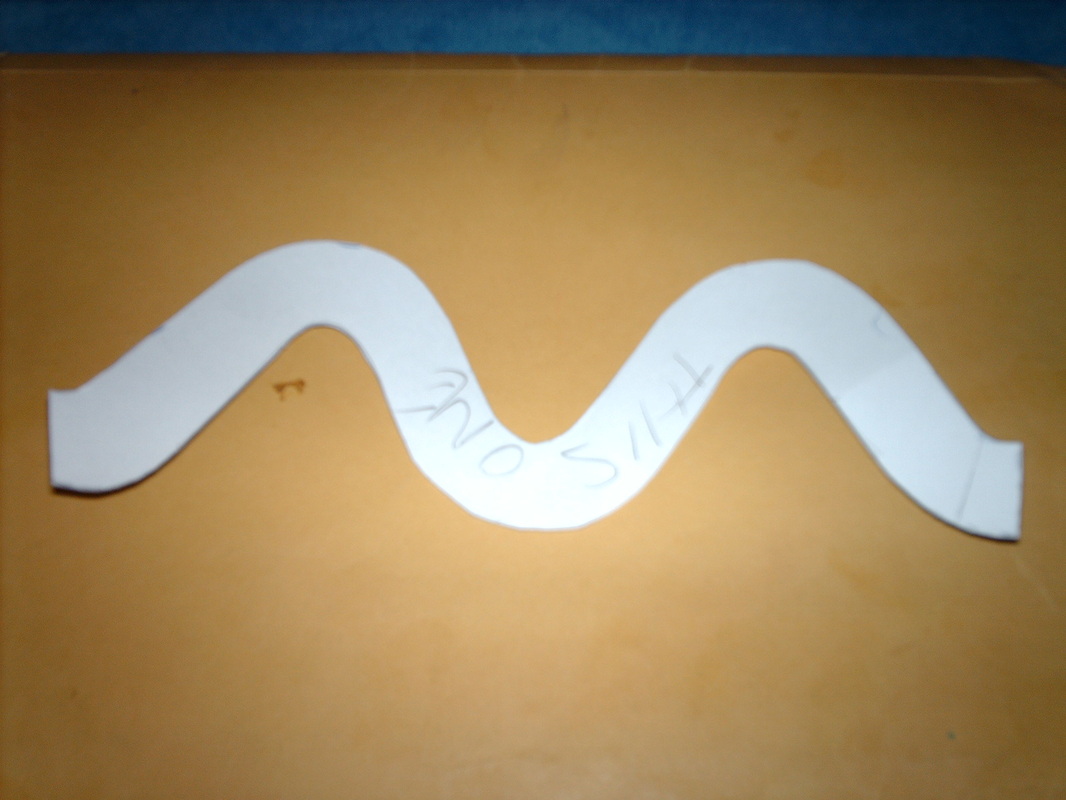
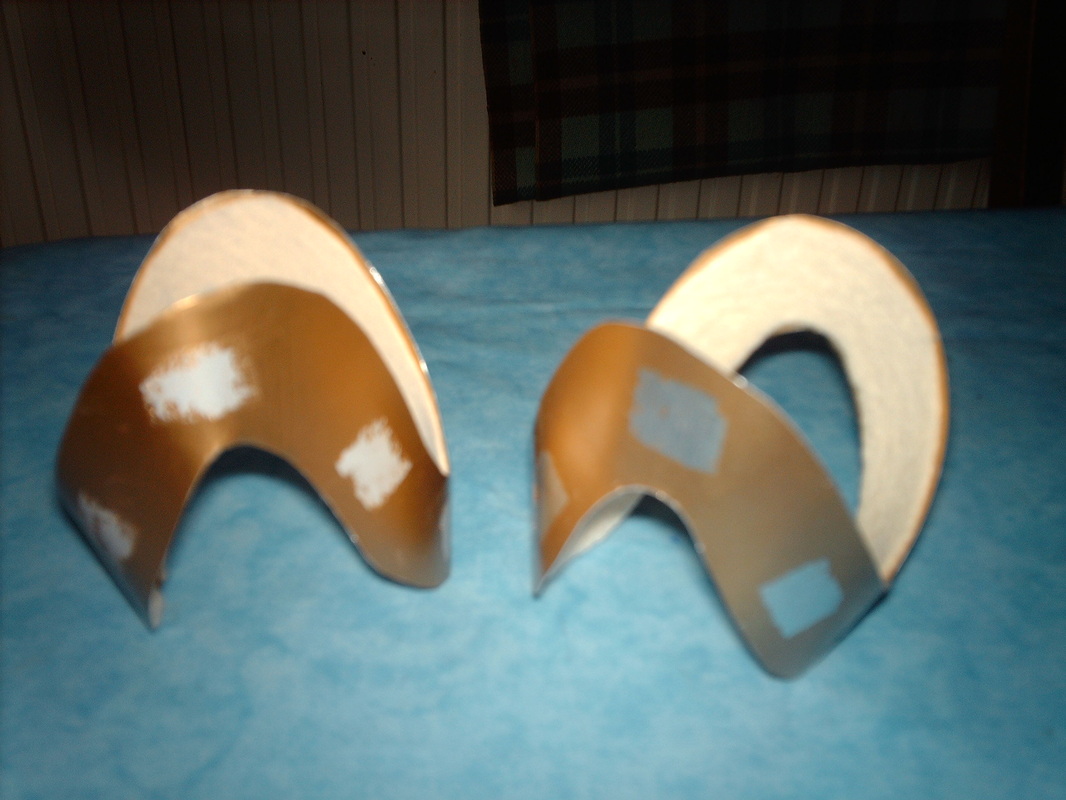
These are constructed using a wavy template and cut out of aluminium craft metal. Practice with a few designs first before cutting out properly, the bands are then sandpapered and sprayed gold and fastened together using Araldite or a glue used for metalwork. Mask off where the mother of pearl will be placed, before spraying, as they will not stick to the surface, the inside of the bands are lined with felt for comfort. Then a tab of velcro is glued to the lower parts of the band, this will be where the bands attach to the ribbon on the wings. The bands will be bent to grip the upper arms. Small shaped pieces of mother of pearl are glued onto the bands and a piece of velcro sewn onto the ribbon at the top to attach the wings to the bands. This is all that attaches the bands to the ribbon, the ribbon is not sewn at the back but hangs free.
These are constructed using a wavy template and cut out of aluminium craft metal. Practice with a few designs first before cutting out properly, the bands are then sandpapered and sprayed gold and fastened together using Araldite or a glue used for metalwork. Mask off where the mother of pearl will be placed, before spraying, as they will not stick to the surface, the inside of the bands are lined with felt for comfort. Then a tab of velcro is glued to the lower parts of the band, this will be where the bands attach to the ribbon on the wings. The bands will be bent to grip the upper arms. Small shaped pieces of mother of pearl are glued onto the bands and a piece of velcro sewn onto the ribbon at the top to attach the wings to the bands. This is all that attaches the bands to the ribbon, the ribbon is not sewn at the back but hangs free.
|

|
|
|
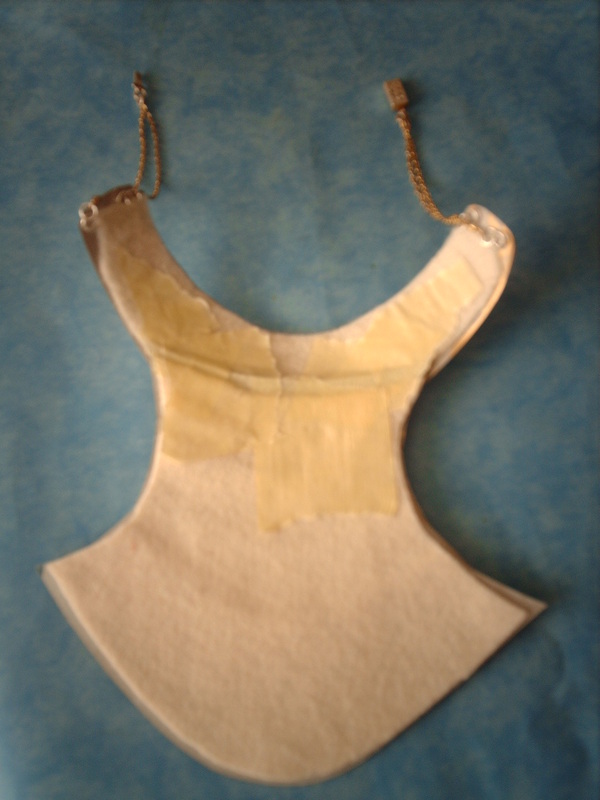
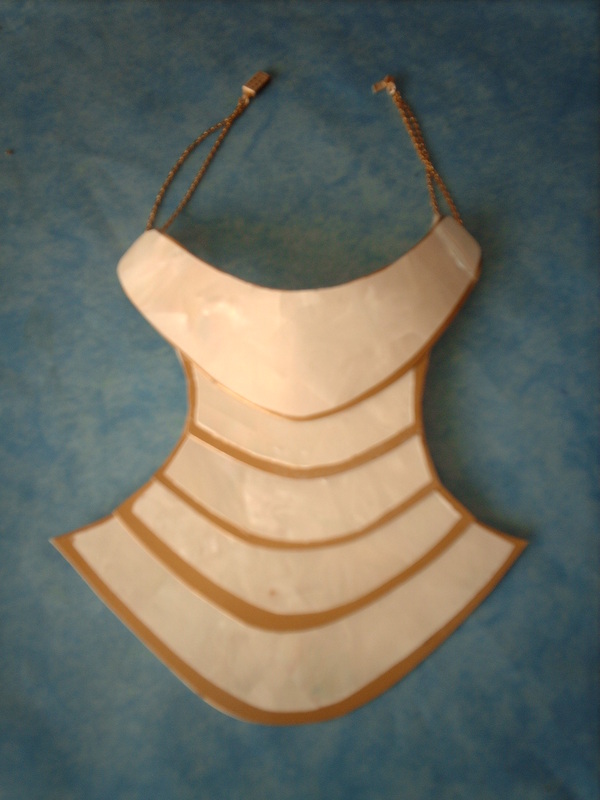
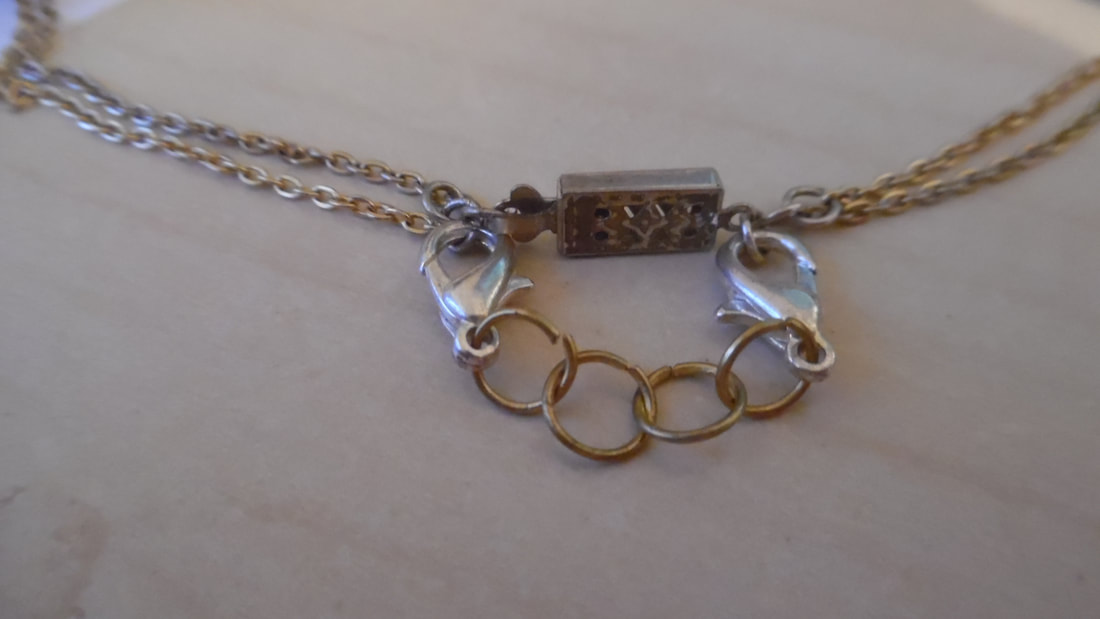
The Necklace:
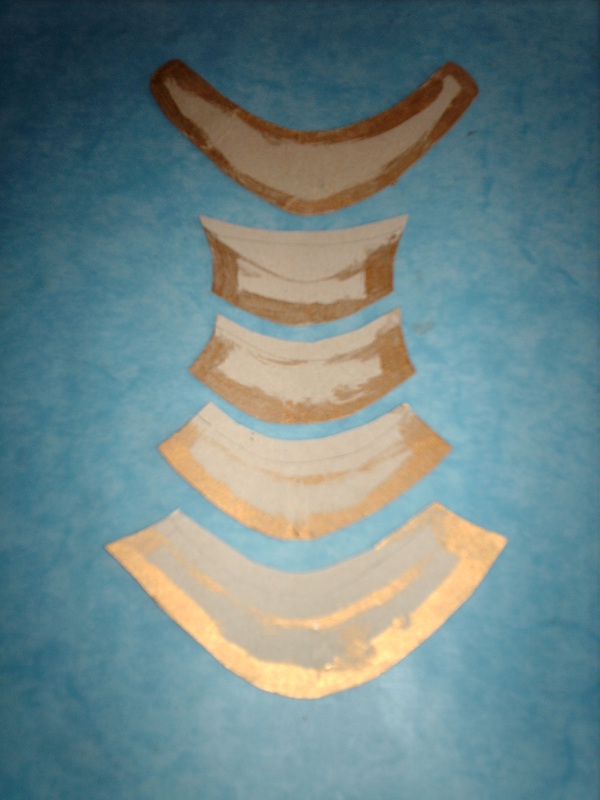
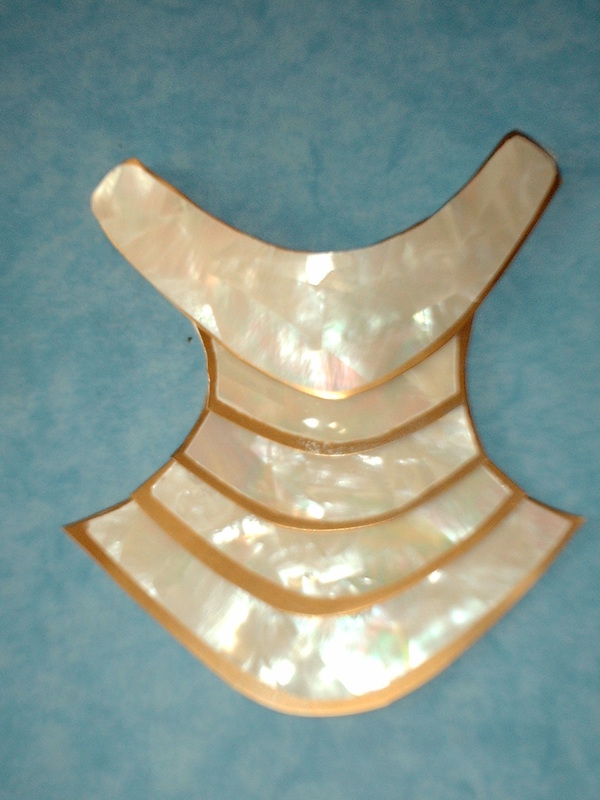
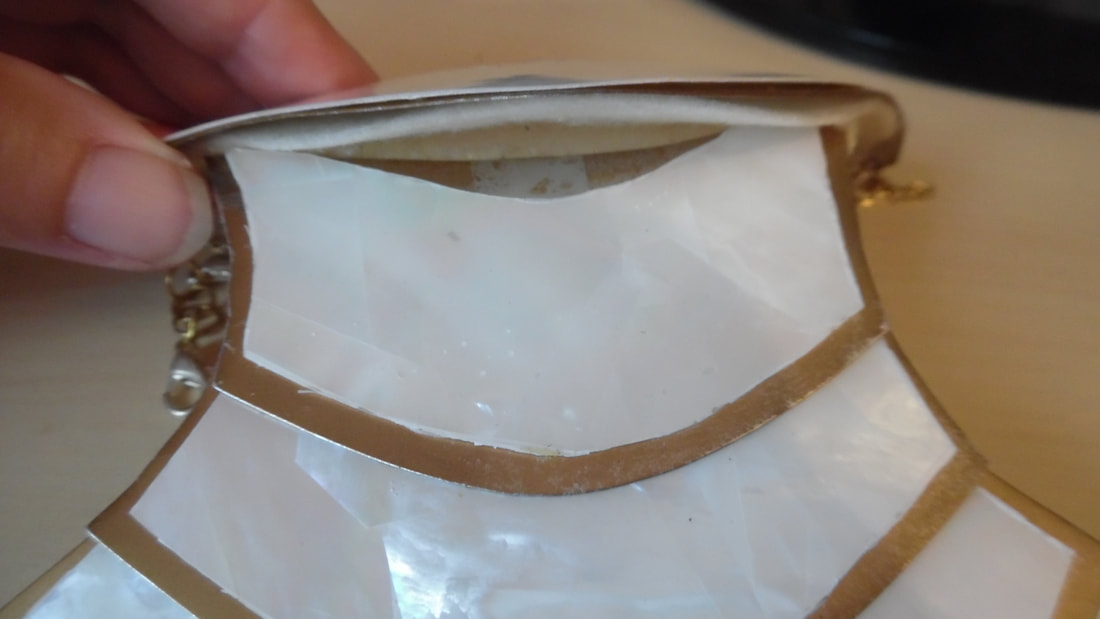
The necklace is deceptively small. The bottom edges must not extend past the halter dress at the bottom. It is constructed in 5 pieces, the top section will be bent slightly to go around the neck, we practiced with a few shapes before making it up. The pieces are made from thin cardboard and sprayed gold, but masked off where the mother of pearl will be glued on. The top section gives the illusion of being separate from the rest, as it is curved, it was difficult to attach, so we just used copious amounts of masking tape as a "hinge" on the back.
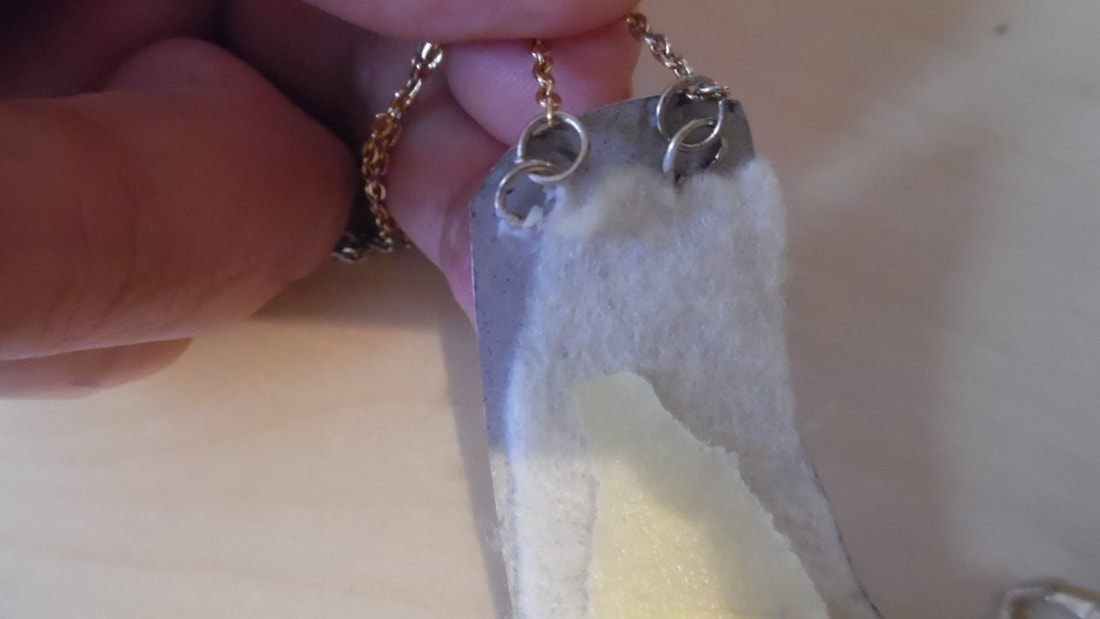
The whole necklace is covered with beige felt on the back. The chains are 4 sections of gold chain cut to length to just fit around the neck with a clasp on the end, the chains are attached to the piece by 4 small gold jump rings and hidden underneath the felt.
The necklace is deceptively small. The bottom edges must not extend past the halter dress at the bottom. It is constructed in 5 pieces, the top section will be bent slightly to go around the neck, we practiced with a few shapes before making it up. The pieces are made from thin cardboard and sprayed gold, but masked off where the mother of pearl will be glued on. The top section gives the illusion of being separate from the rest, as it is curved, it was difficult to attach, so we just used copious amounts of masking tape as a "hinge" on the back.
The whole necklace is covered with beige felt on the back. The chains are 4 sections of gold chain cut to length to just fit around the neck with a clasp on the end, the chains are attached to the piece by 4 small gold jump rings and hidden underneath the felt.
|
|
|
|
|
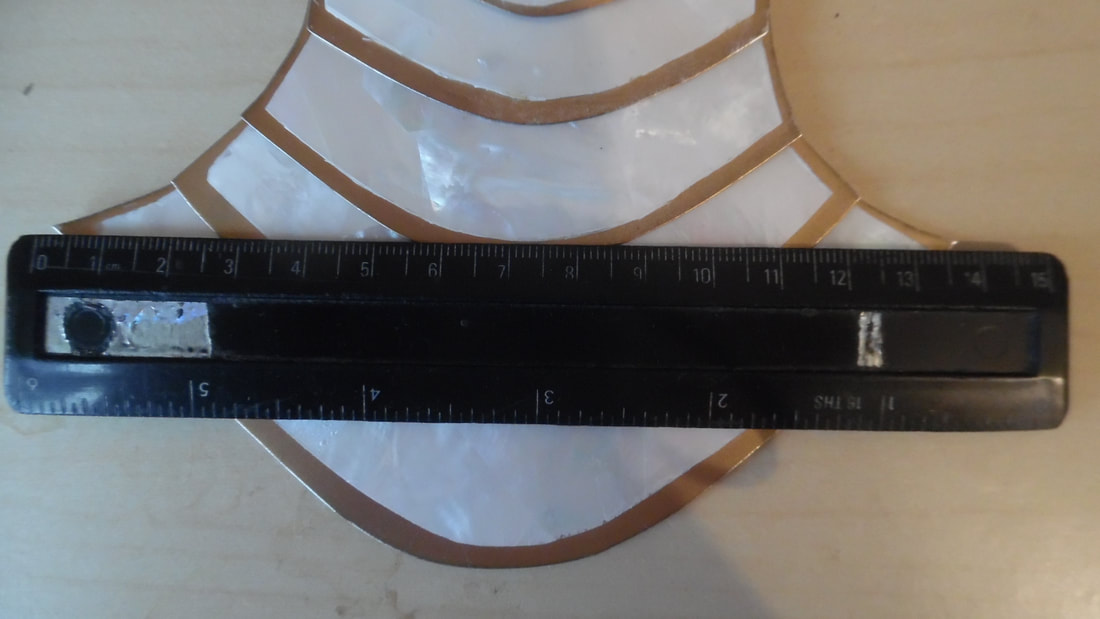
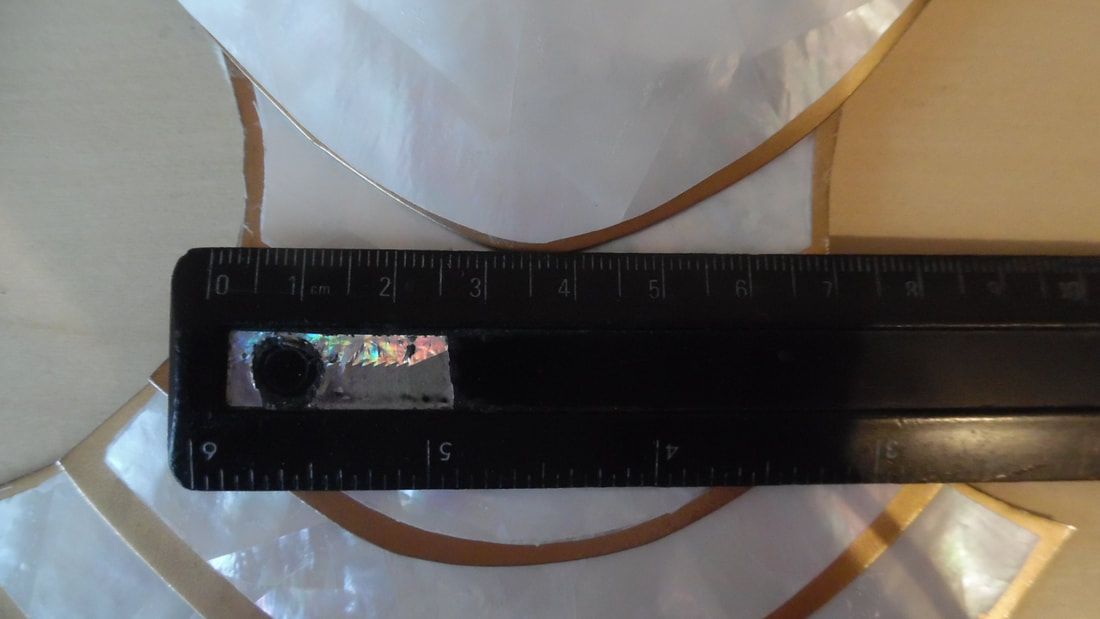
14cm at the widest point. A general rule of thumb, is to make up the costume and see how much room you have to play with. The width of the necklace, must not extend further than the dress.
|
|
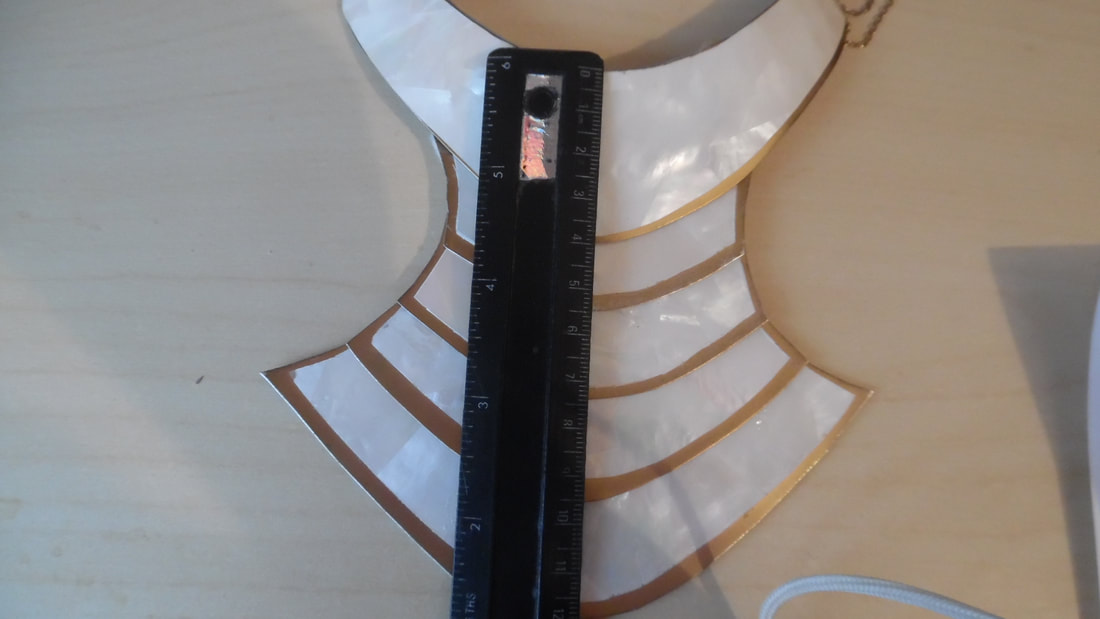
The height is 12cms. The four bottom pieces overlap each other and are all taped together at the back.
|
|
The narrowest part is 7cm.
|
|
The top piece is slightly curved to go around the neck and copiously taped on the back to create a hinge so that it moves and appears to be separate.
|
|
Before putting the top curved piece together, I sewed the jump rings through the cardboard first, then added the chains.
|
|
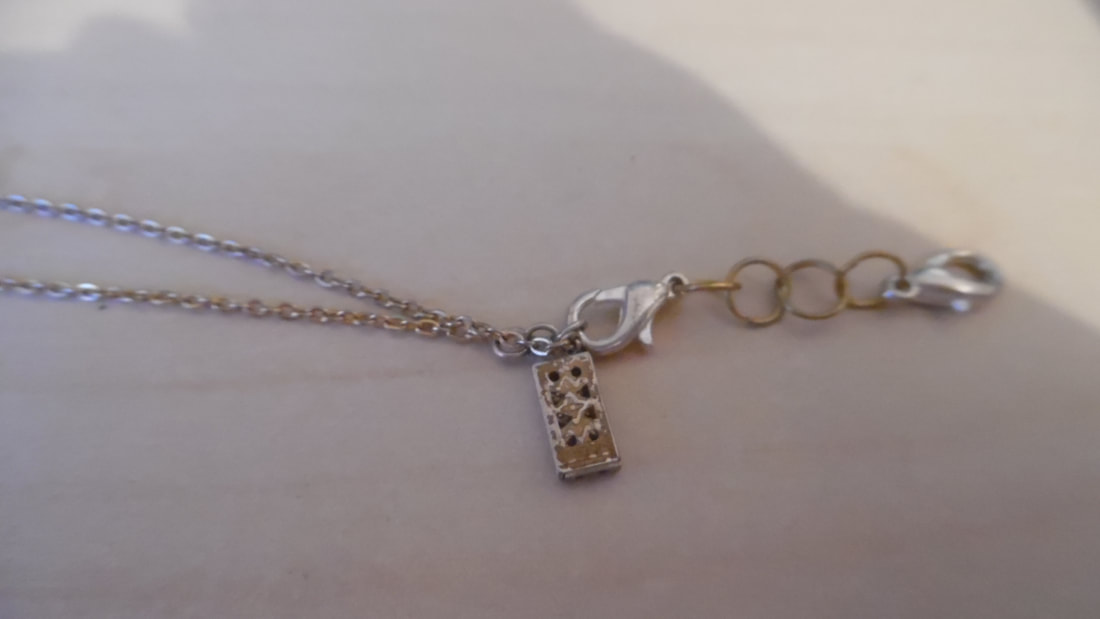
After putting the chains and clasp on, I wanted to make sure that if the clasp failed, I would have a fail safe. So I added a hand made extension piece as a precaution.
|

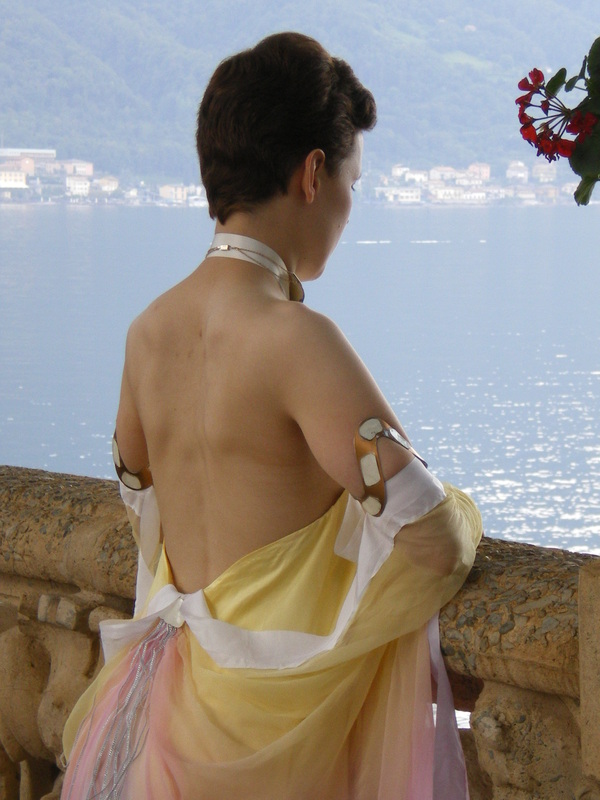
And this is me at the Villa Balbianello on Lake Garda, waiting for my Anakin.