Tracy's Costuming World
  • Home
  • Photos
    • 17th Century Costume
    • Snow White Disney
    • Georgian Sacque Back Gown
    • Moana
    • Claudia, Interview With The Vampire
    • Aurora
    • Elsa from Frozen
    • Anna From Frozen
    • Padme >
      • Padme Lake Dress
      • Padme Picnic Dress
      • Padme Packing Gown
      • Padme Parade Gown
    • Dorothy Gale
    • Danielle De Barbarac
    • Disney Giselle
    • Rapunzel
    • Ariel "Kiss The Girl"
    • Belle
    • Merida Blue Dress
    • Merida Teal Dress
    • Cinderella
    • Scarlett O'Hara BBQ Dress
    • Scarlett O'Hara Prayer Gown
    • Christine Daae
    • Snow White
    • Glinda
    • Anna Coronation Dress
    • Live Action Cinderella
  • Video Tutorials
    • Cosplaying
    • 17th Century Costume
    • Disney Snow White
    • Georgian Sacque Back Gown
    • Scarlett O'hara Ruffles
    • Moanna
    • Live Action Cinderella
    • Anna Coronation Dress
    • Aurora, Sleeping Beauty
    • Elsa from Frozen
    • Padme Packing Gown Bands
    • Padme Parade Gown Wig
    • Padme Picnic Dress
    • Giselle's Ruffled Petticoat
    • Rapunzel
    • Christine Daae Tutorial >
      • Christine Daae Wig
    • Scarlett O'Hara White Prayer Gown
    • Ariel Blue Kiss The Girl Costume
    • Belle's Gold Ball Gown >
      • Belle's Ball Gown Wig
    • Merida Blue Formal Dress and Wig
    • Merida Teal Dress
    • Cinderella
    • Snow White
    • Anna From Frozen
    • Claudia Interview With The Vampire >
      • Claudia Wig
  • Costume Tutorials
    • 17th Century Costume
    • Snow White
    • Georgian Sacque Back Gown. How to measure >
      • Georgian Shift >
        • Georgian Stays
        • Georgian Pocket Hoops
        • Georgian Under Petticoat
        • Georgian Over Petticoat
        • Georgian Bodice
        • Sacque Gown
        • Georgian Stomacher and Sleeve Flounces
        • Georgian Hat
    • Cinderella Live Action >
      • Cinderella Shoes and Wig
    • Lake Dress >
      • Making the Lake Dress Wig
    • Picnic Dress >
      • Making the Picnic Gown Wig
    • Parade Gown >
      • Making the Parade Gown Wig
    • Packing Gown >
      • Making the Packing Gown Wig
    • Dorothy Gale >
      • Dorothy Shoes, Wig & Basket
    • Giselle >
      • Making the Giselle Wig, Tiara and Necklace
    • Rapunzel >
      • Making Disney Rapunzel Wig and Tiara
    • Scarlett O'Hara BBQ Dress >
      • Making Scarlett's Wig and Necklace
    • Christine Daae >
      • Christine Daae Wig and Mask
    • Danielle De Barbarac >
      • Making Danielle De Barbarac Wig and Shoes
    • Claudia Interview With The Vampire >
      • Claudia Wig
    • Anna Coronation Dress >
      • Anna Wig and Necklace
  • More Costume Tutorials
    • Moana >
      • Moana Wig
    • Scarlett O'Hara White Prayer Dress >
      • Scarlett O'Hara Wig
    • Ariel's Blue Sight Seeing Dress >
      • Ariel's Wig
    • Belle's Gold Ball Gown >
      • Making Belle's Wig
    • Merida Blue Formal Dress >
      • Merida's Wig
    • Merida Teal Dress
    • Cinderella >
      • Cinderella Choker and Wig
    • Young Snow White >
      • Wig
    • Anna From Frozen
    • Elsa from Frozen >
      • Elsa Shoes and Wig
    • Aurora >
      • Wig and Crown
  • Making A Corset
  • Previous Costume Events
  • Contact
    • Facebook
    • Email
  • My Rabbit Cocoa
  • Dora the Rabbit
  • The Rabbit Welfare Association
  • ITEMS/MERCHANDISE FOR SALE
  • Tracy's sayings
  • Symington 1890 corset for sale
  • Disney Moana Costume For Sale
  • DOROTHY RUBY SLIPPERS FOR SALE
Georgian Pocket Hoops
For this costume, you will require intermediate to experienced expertise in sewing and boning

Difficulty factor 8 - 10

Please note, that we do not make costumes to order or to hire. These are one off costumes designed for Tracy.


Please use these instructions in conjunction with our videos, as they contain more information on items needed, their sources and technique
This is an example of the pocket hoops Tracy will be making.  She tried these on at Berrisford Hall which had a very good collection of Georgian costumes.
Picture
Picture
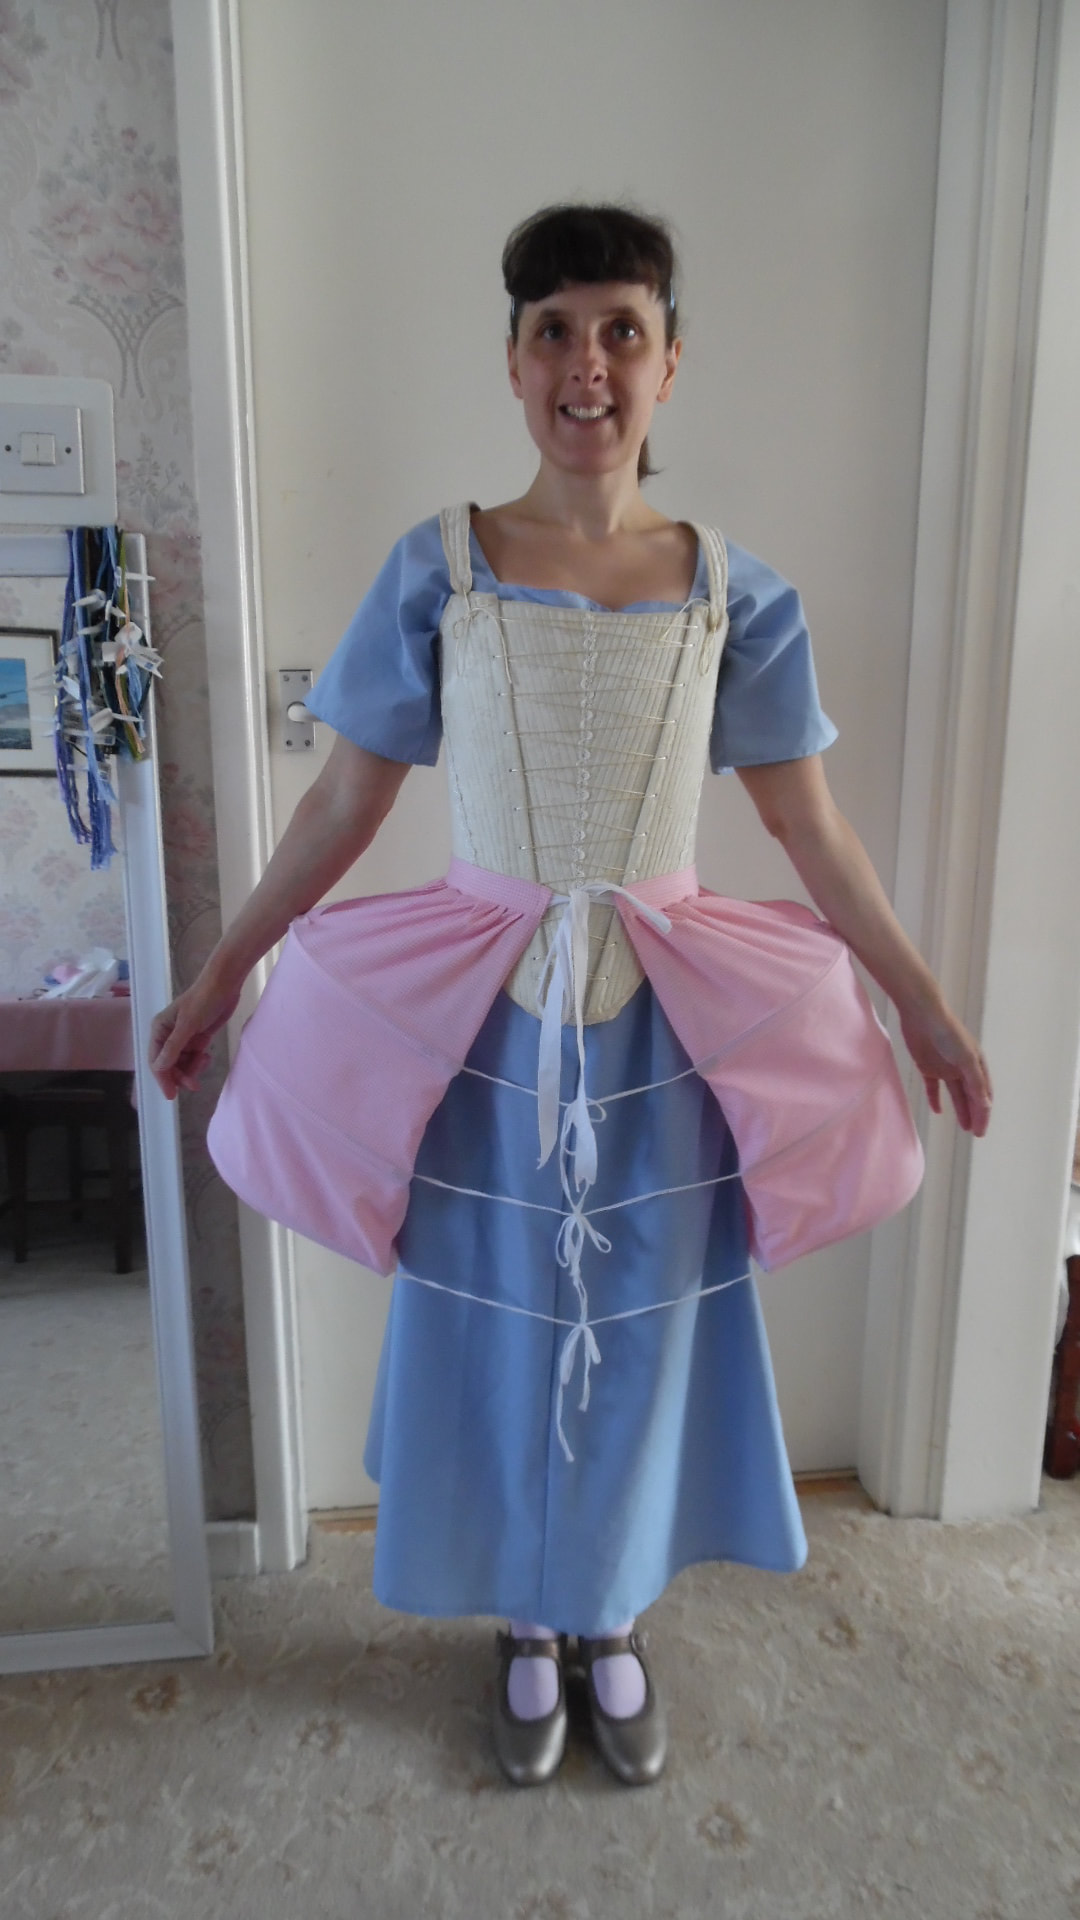
Tracy used the design from Jean Hunnisett to make her hoops. She did make an alteration and cut off the square piece to the right and re-cut it allowing for a seam allowance.


Materials:

1.1/2 metres gingham or material of your choice.
5-6 metres of 10mm wide tape
1cm wide steel ​Boning of your choice
2 metres of 2cm wide tape
Picture
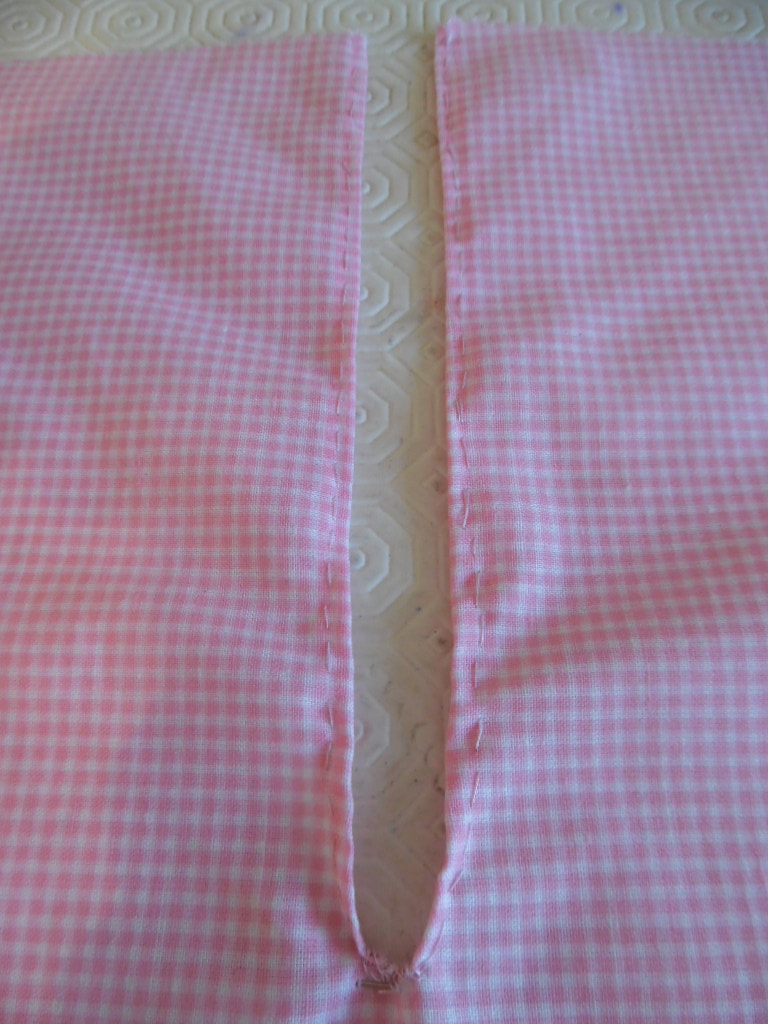
Cut a slit 18cm long and turn the fabric back using a running stitch.
Picture
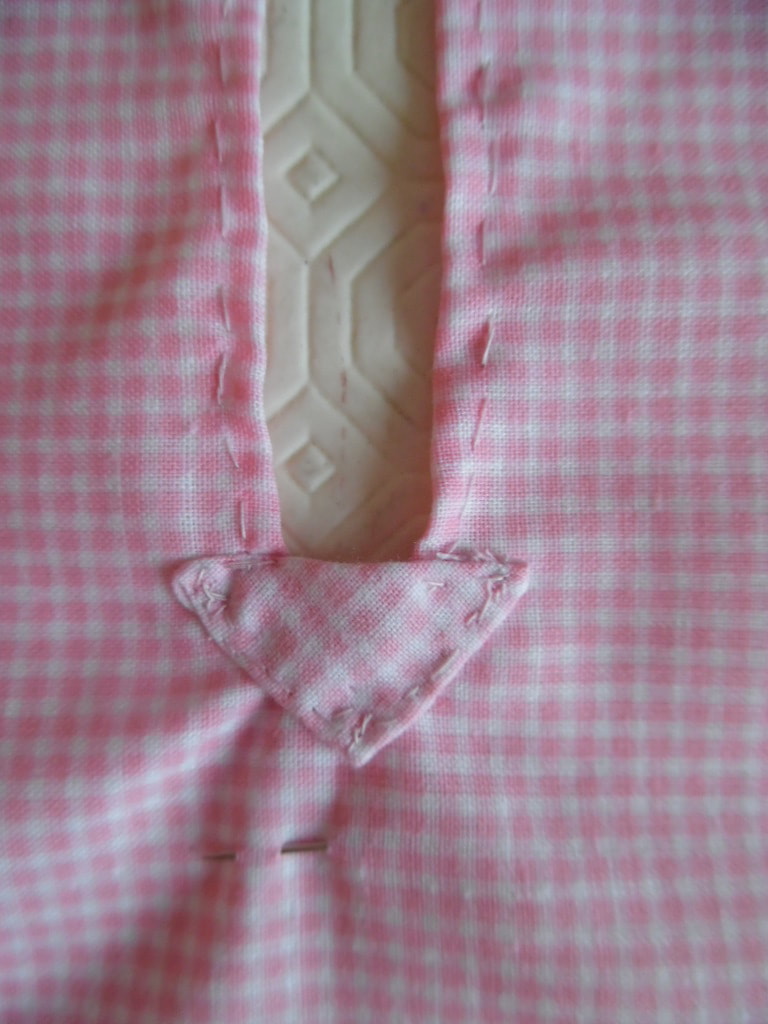
Cut out a square of material and halve it into a triangle and sew on at the end of the slit.  This helps to reinforce it.
Picture
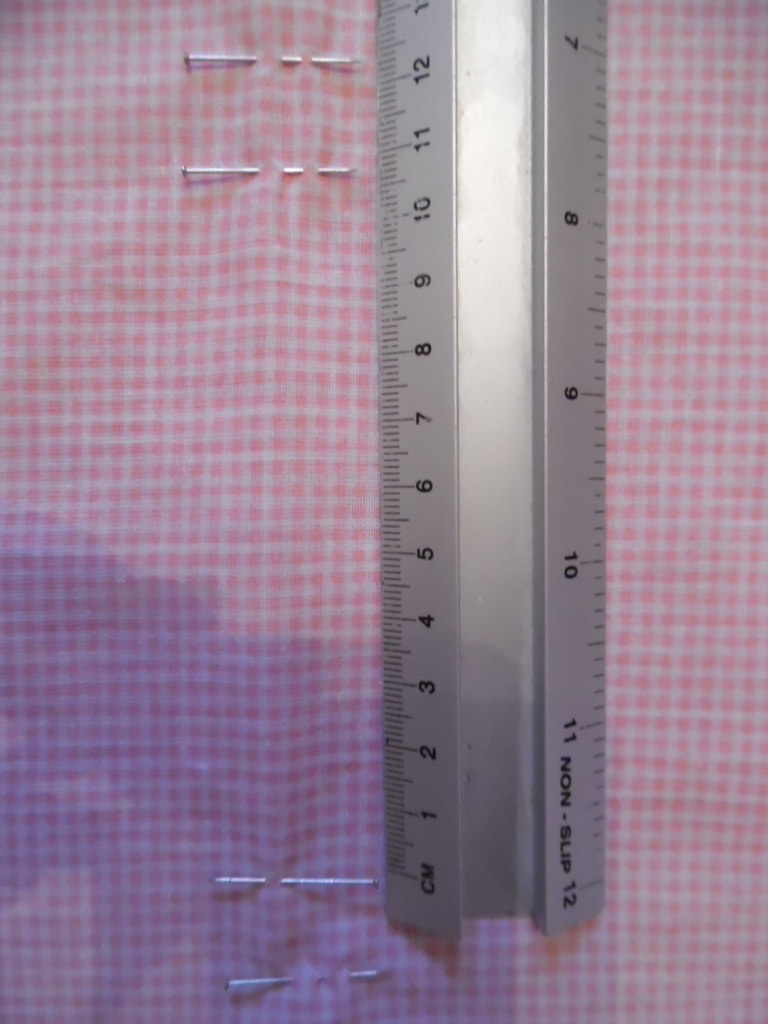
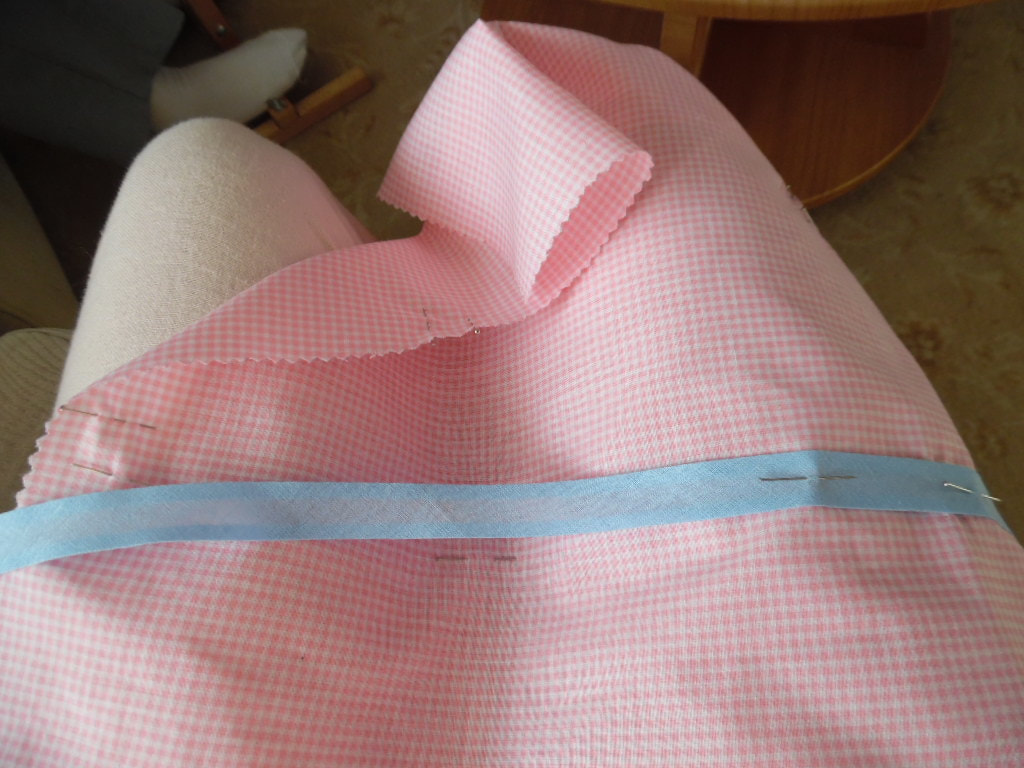
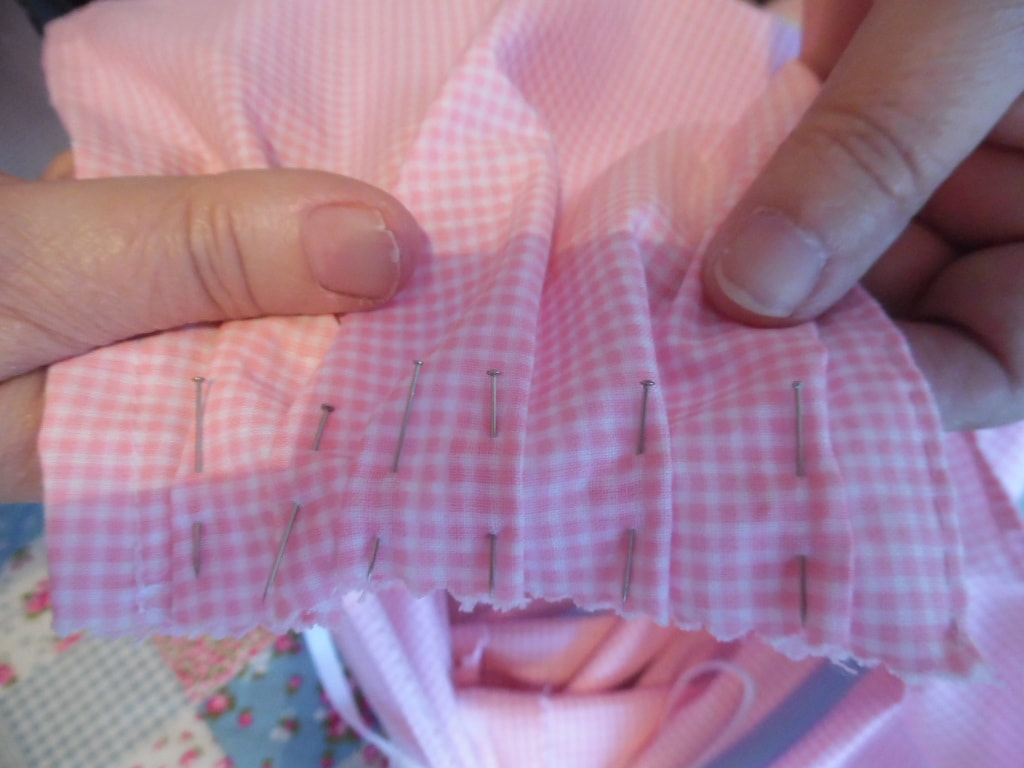
Mark with pins where the boning channels will be
Picture
Use the curve of your thigh when pinning on the bias, this will help the fabric bend slightly ready for the boning.
Picture
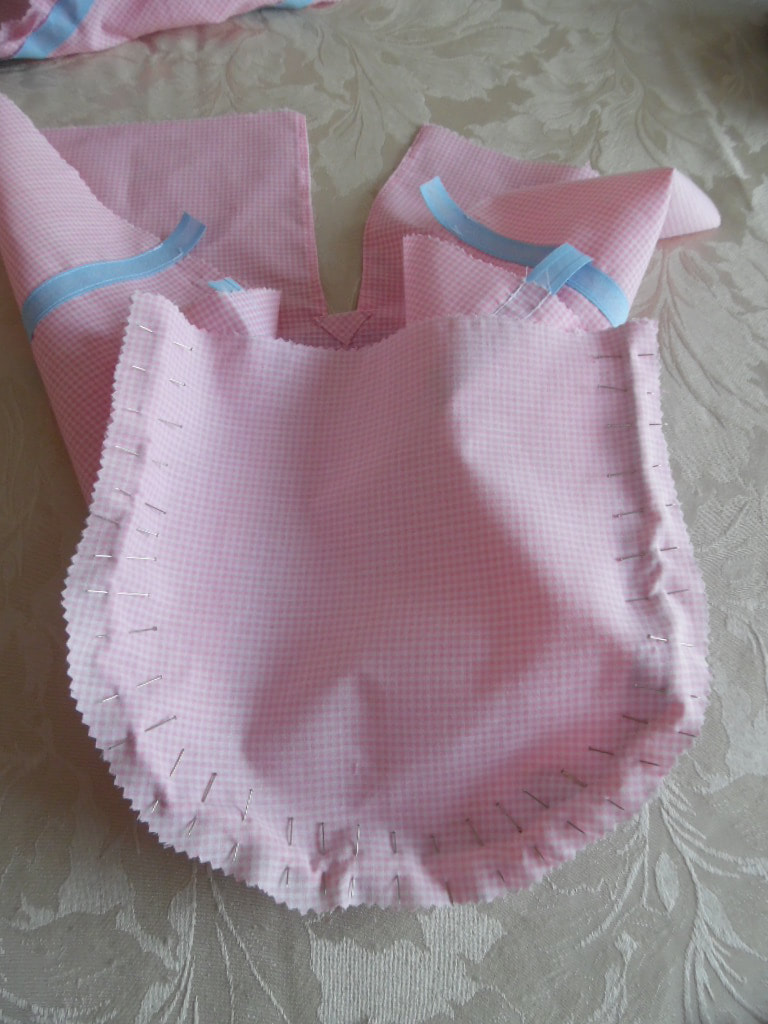
Pin and sew on the curved piece.  Do not sew all the way to the ends, leave 1.5cm unsewn.
Picture
Sew on the tapes and sew on the square piece of fabric at the bottom of the curved piece.  Do not sew all the way to the ends leave 1.5cm unsewn
Picture
For the next bit, you will definitely have to watch the video, because it is difficult to explain in pictures.  But basically, the straight edges of the square piece (above) are sewn to the edges either side of the curved piece.  It will make sense - honestly! Only sew up one side for now.
Picture
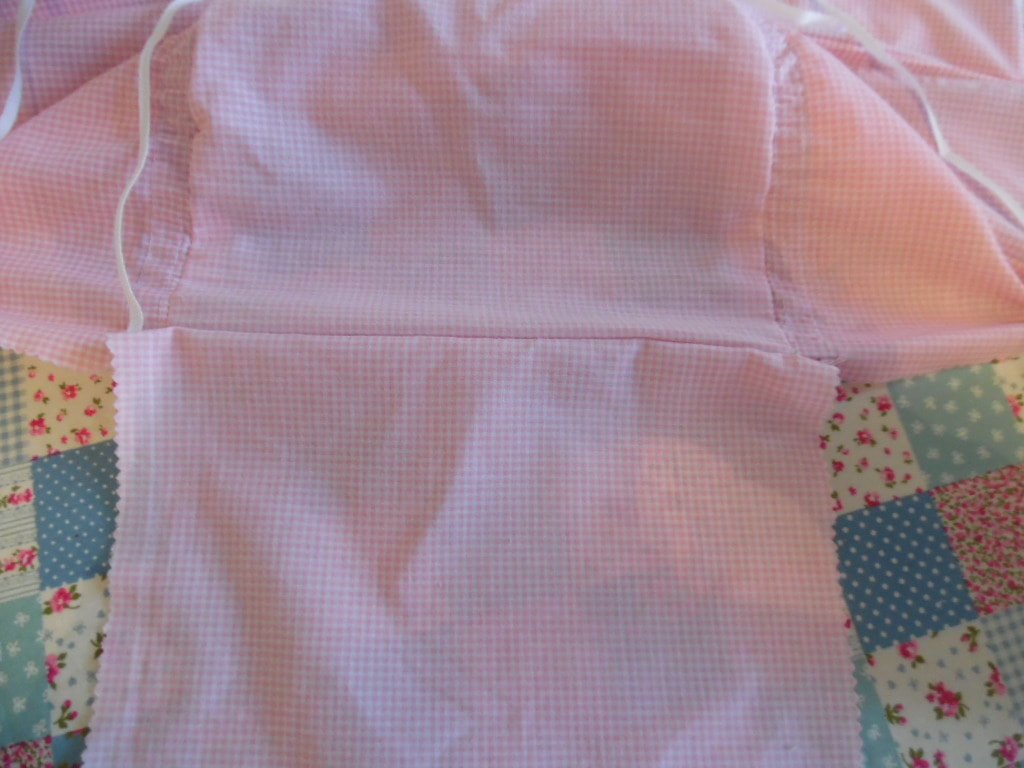
Insert the boning and sew up the side you left open.  You may need help here.
Picture
At this stage your pocket should look like this.
Picture
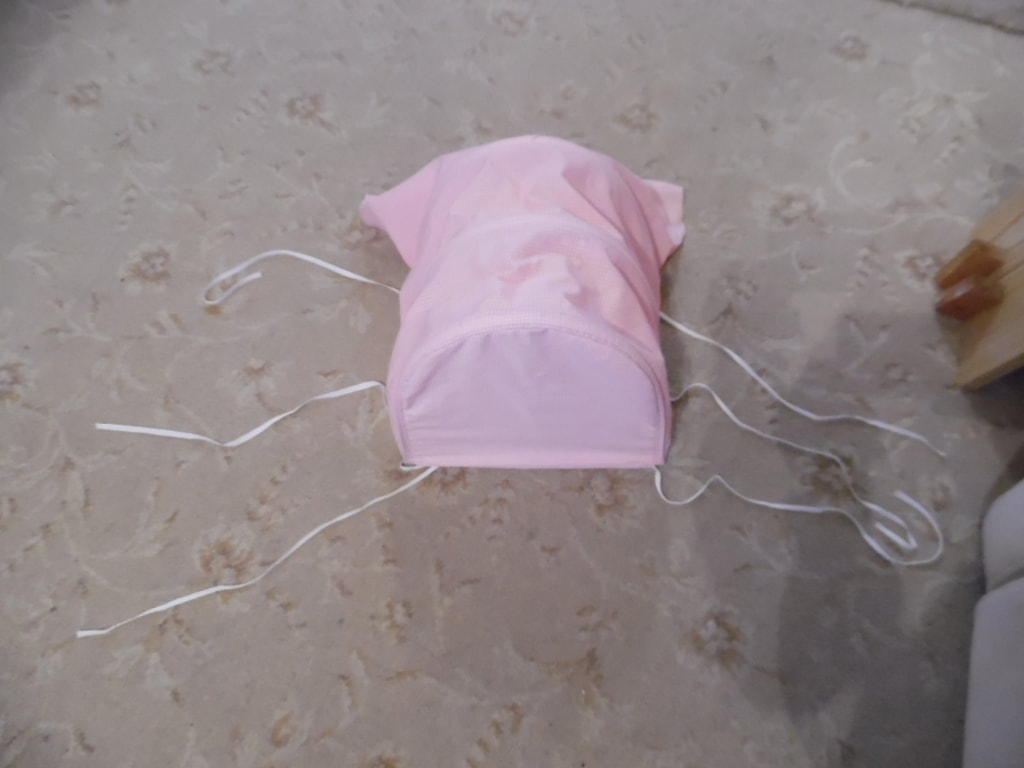
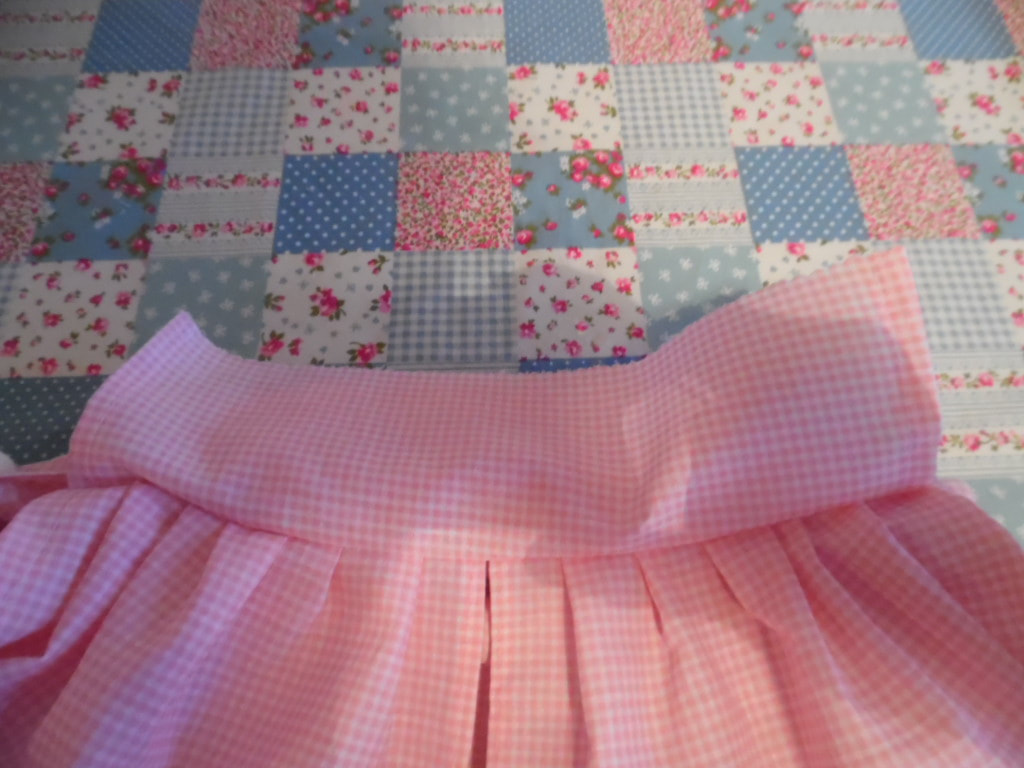
Pleat across the top of the pockets, this will vary according to your waist size
Picture
With the tops of your pockets butting up against each other, take a measurement and cut a strip of fabric for the waist band allowing for a seam. Do not close the ends as you will be threading tape through.
Picture
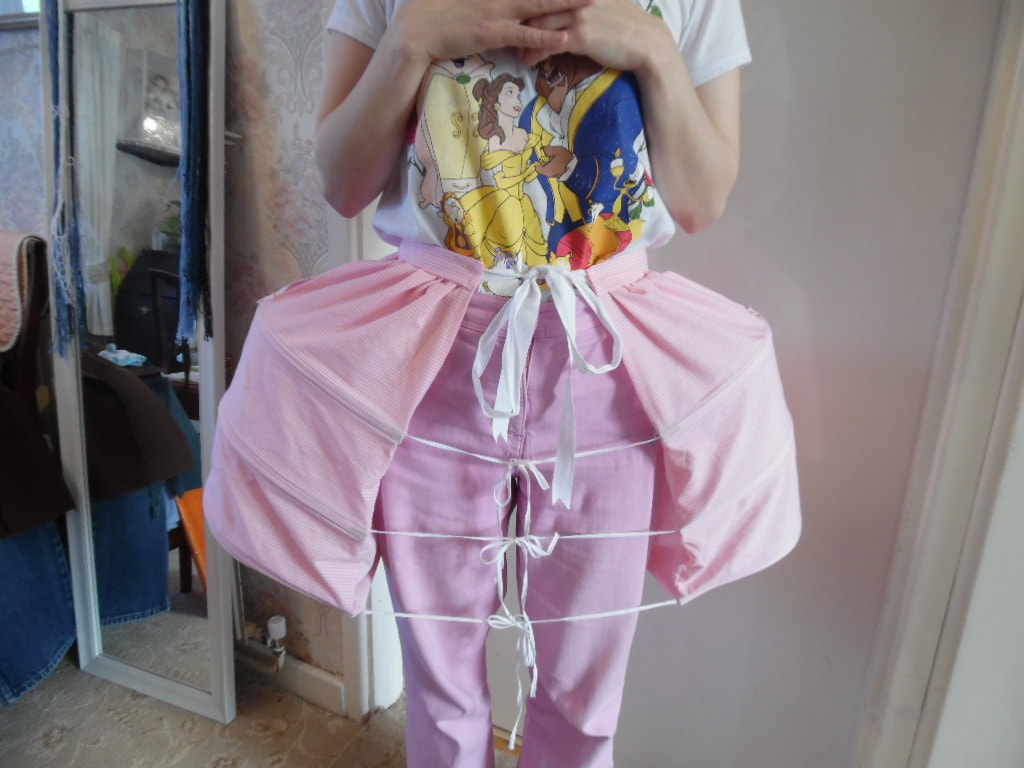
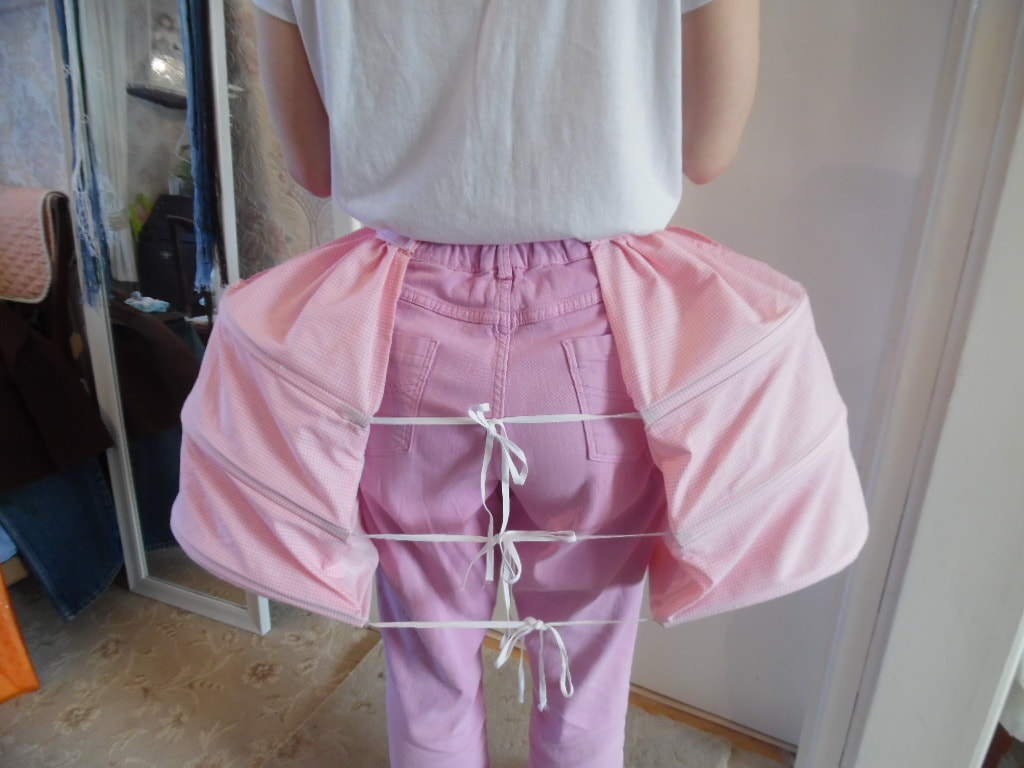
Thread the tape through the waist band and try on.  The pockets need to be on either side of your hips and leave enough tape at the front for tying.  When you are happy with the position, pin the waistband to the tape and both ends and sew onto the tape.
Tie your tapes at the front and back.  You may need help with the back, but don't make them too tight and check your side view to make sure they are directly over your hips.
Picture
Picture
Powered by Create your own unique website with customizable templates.